Employee agreements
 Updated
by
Leigh Hutchens
Updated
by
Leigh Hutchens
List of people
You can see information about employee agreements in Quinyx. To do this, click on People.

The view displays the following information:
- Employee name
- Badge number
- Contact information (email/telephone number)
- Agreement name
- Skills
- Unit & Section
- Roles
The default number of employees you can view on one page is 10. When there are more than 10 employees, use the < > keys to navigate between the pages.
Agreement tab in the employee details panel
You can add a new agreement and see more detailed information about the different agreements connected to the employee. You can do this inside the Agreements tab that is located to the right of Employee details in the Edit employee side panel. To add a new agreement, click Add new agreement, insert the correct information, and click Save. You can also view the current agreement of the selected employee in this tab. The information listed below is available in the tab and, if the Use template checkbox is unticked, you can also edit that information.
Add the following information to the employee's agreement:
- Agreement
- Main agreement
- If there are multiple agreements, the main agreement is displayed first followed by the other agreements based on their created dates.
- Agreement details
- Select agreement template
- Unit
- Agreement name
- From and to date
- Expires (you can set an agreement expiration date in the future)
- Salary
- Use template
- Salaries / Current
- Monthly
- Hourly
- Custom divisor
- Employment rate
- Use template
- Advanced setting categories
- Balance Period
- Schedule period and working hours
- Rules for working time
- Break rules and schedule changes
- Break calculation rules
- Salary adjustments
- Social costs
- Additional fields
- Monthly nominal hours per year
- Time
- Availability
- E-signing
- Mobile punch flow
Agreement selection logic and agreement validity changes
Salary
The Salary section displays the employee's current, future, and previous salaries and their respective from dates. You can also see if the employee is employed by the hour or if they have a monthly salary. If the employee has a monthly salary, you can also see the custom divisor. This divisor is where the no. of monthly working hours is entered. The monthly salary is then divided by this divisor to calculate the hourly salary shown. If the Use template checkbox is unticked, you will see an additional section called Agreement template values where you can see salary information as defined in the agreement template (for comparison purposes).
Employment rate
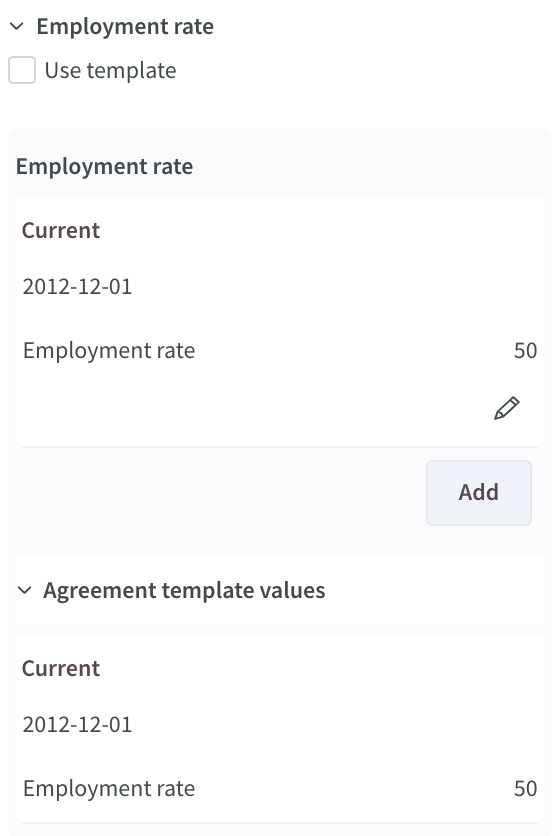
The Employment rate section displays the person's current, future, and previous employment rates and their respective from dates. If the Use template checkbox is unticked, you will see an additional section called Agreement template values which shows employment rate information as defined in the agreement template for comparison purposes.
Advanced setting categories
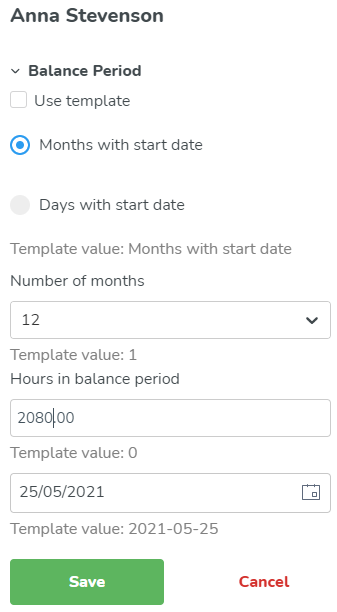
Balance period
The balance period allows you to track an employee's scheduled and worked hours in relation to a long-term work quota. By way of example, this can be used to follow up on annual working hours of 2080 hours. The work quota can be defined over a span of either X months or X days, with a specified start date.
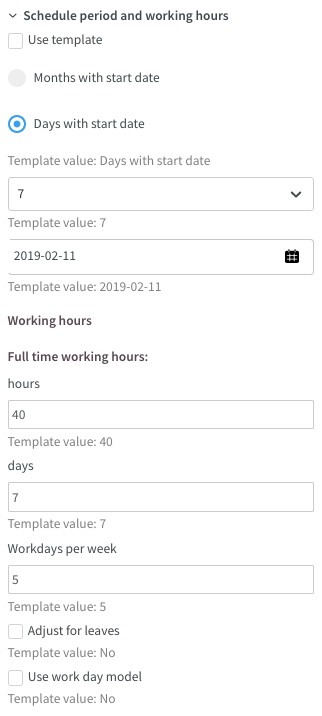
Schedule period and working hours
The schedule period is set up by choosing if it should be based on X number of months or days and the start date of the schedule period.
The working hours are set up by defining the desired full-time working hours in the period, the number of days in the period, and the number of workdays per week. These values will then determine the nominal hours per day, e.g., 40 work hours in 5 work days = 8 nominal hours per day.
You can also set whether the nominal hours should be reduced for leaves by checking Adjust for leaves. Another option is to use the work day model which is an alternative model for calculating nominal hours with the possibility to exclude Sundays:
Rules for working time
The Rules for working time section is used to enter different time rule types that apply to employees. The rules set up then help during scheduling, and Quinyx will generate warnings when the rules are breached. The following options are available:
- Use template: You can select to use a template, so you won't have to configure anything in this section.
- Use default time rule: You can use a default time rule, so you won't have to configure anything in this section.
- Max hours per day: The maximum number of hours for which the employee may be scheduled per day, before Quinyx issues a warning.
- Max hours per week: In this case, we have specified that the scheduled time per week may amount to a maximum of 48 hours.
- Min rest: The minimum rest period, daily rest, is set to 11 hours in the example. The box on the right determines whether the rest period can extend beyond daily break (in which case the box is checked) or whether the total rest period must fall within the preset 24-hour period (in which case the box will be unchecked). In the latter case (with the box unchecked), there is no need for 11 hours' rest between work shifts, but the rest period can be taken any time during the 24-hour period, but not extending beyond the daily break.
- Minimum hours/week: The minimum limit for the number of scheduled hours per week.
- Free days: The minimum number of consecutive days off the employee is entitled to after working the maximum period specified in the field above.
- Max days: The maximum number of consecutive days that may be scheduled for the same employee. Quinyx generates a warning if the employee is scheduled for more than these consecutive days.
- Minimum rest/week: Just as with daily rest, you can specify how many hours of continuous weekly rest the employee is to have. E.g., 35 hours. Quinyx will also generate a warning in this case if the minimum weekly rest quota is not met.
- Check minimum rest/week during any consecutive 7 day period: If the checkbox is ticked, the rest per week is carried out on a rolling basis. Read about this functionality in more detail in the Agreement templates - Rules for hours article.
- Schedule bank holidays: If the agreement template covers employees who work in a unit that, for instance, closes for every bank holiday, this box can be unchecked. You will then receive a warning about trying to schedule employees for days that are marked as bank holidays in Quinyx.
- Daybreak daily rest: This refers to the time for daily daybreak. This value set here will impact minimum daily rest, minimum weekly rest, maximum hours per day, and maximum hours per week.
- Minimum free weekends/year: This field can be used if the employee is entitled to have a certain number of weekends off per year.
- Advanced time rules: If this checkbox, which is mainly used in Denmark, is ticked Quinyx will generate warnings if the following advanced time rules are not observed:
- Maximum of 96 scheduled hours every 2 weeks.
- Minimum of 4 days off during a 14-day period.
- There must be at least 2 consecutive days off every second week.
- Minimum of 5 weekends off during the previous 3 months.
- Minimum of 1 weekend off every calculation period.
- Overtime overrides Unsocial time: According to most collective agreements, a given hour worked by an employee can't lead to compensation for both overtime and unsocial time. If this box is ticked, compensation for overtime will take precedence over compensation for working unsocial time.
- Allow override on overlapping shifts: Quinyx generates a warning if a shift is scheduled that involves overlapping times for an employee. If you tick this box, you can continue scheduling despite the warning.
- First day of the week: Specify the first day in a 7-day period. This period is specified so that Quinyx can monitor within which 7-day period the weekly rest quota is achieved.
- Unsocial time threshold: Some collective agreements state that employees must work a certain number of hours per week or calculation period for employees to be entitled to unsocial time compensation. In that case, this compensation will be based on the relevant unsocial time periods. Unsocial time compensation will be generated only when the specified time limit is reached. When the time limit is reached, this compensation will also apply retrospectively to the whole period.
- During days, Maximum days, With over hours: These three fields are used in conjunction with each other and are only relevant for a few collective agreements. In these collective agreements, there's a rule that during a particular period, there's a limit to the number of days during which the employee may work shifts exceeding the number of hours. As an example, the rule could state that during a time period of 10 days, a maximum of 3 days worked by the employee may contain shifts with over 10 hours. A warning is generated in Quinyx if the rule specified in these three fields is broken.
- Min shift length: Click Add to add any rules on the minimum shift length for which an employee can be scheduled. For example, the shift must be at least 6 hours if the shift starts anytime between 19:00 and 03:00.
Break rules and schedule changes
This section is split into two subsections.
Rules for breaks
The first section is Rules for breaks. The functions here are:
- Calculate breaks as working time: If you tick this box, Quinyx will calculate breaks as working time or not.
- Maximum work hours without breaks: You can set the maximum number of hours employees can work without a break.
- Minimum break (minutes): Set the minimum break time for employees.
- Maximum break time (minutes): Set the maximum break time.
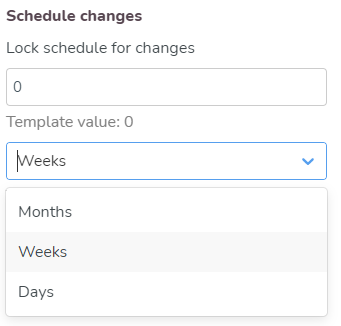
Schedule changes
The second subsection is called Schedule changes. It allows locking the schedule changes X days/months/weeks in advance. This is used, for example, if a collective agreement states that employees have the right to be notified about shift changes affecting them at a minimum 5 days prior to the shift in question taking place. Quinyx generates a warning if you make a change to the schedule with less notice than the defined value.
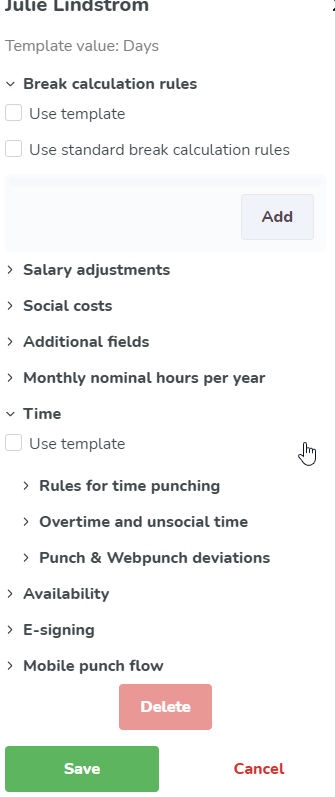
Break calculation rules
In the Break calculation rules section, managers can set up specific break calculation rules for a specific person. This means different people within an organization can have different break calculation rules. You can use a template or set values yourself.

Salary adjustments
In the Salary adjustments section you have the possibility to set up salary adjustments based on the following criteria:
- Employee age: Set the employee age. You can use a template or start a point for calculation yourself based on same calendar month, an exact calendar day, or next calendar month.
- Years worked: Set the number of years worked. You can use a template or start a point for calculation yourself based on same calendar month, an exact calendar day, next calendar month, same calendar month - industry start date, exact calendar day - industry start date, or next calendar month - industry start date.
- Personal additional salaries: Enter a from date and amount of the salary addition the employee should receive.
When you want to add a new rule for salary adjustments based on age and number of years worked, you start by selecting a starting point for the calculation (the same month, exact date, or the next calendar month) and then click Add. When you add a salary adjustment, you also have the option of setting a negative value in order to make a deduction, e.g., by typing -5 in order to reduce the basic pay by 5 euros. Not placing a sign before the value counts as making an addition. If the payment is to be adjusted on the basis of age, for example, you enter a basic salary in the Salary section further up in the Agreements tab and then scroll down to the Salary adjustments section to adjust it. Do not add the actual salary under the Salary adjustments tab, only add the actual adjustment:
Social costs
Quinyx can take social costs into account in order to increase the accuracy of calculated staff costs. Both social and leave costs can be defined, and these may vary depending on the age of the person. For this reason, it is important to specify the correct date of birth for all people in the organization. Social and leave costs are added as a percentage of the person's standard costs. If these additional costs are missing from the employee's individual agreement, they will be taken from the agreement template. If they are missing from there as well, they will be taken from the unit settings.
It is possible to select a period where the employee's basic pay (monthly pay/hourly pay) is not to be included in the staff cost summaries under Schedule and Time.
You can use a template or add another cost yourself.
Add cost: Adds another rule configuring the settings for social costs.
Type: Select the type of cost.
From age: Age of the employee for the cost to begin.
To age: Age of the employee for the cost to end.
Start on: Select when you want the cost to begin.
Cost %: Select the percentage between 1% and 100%.

Additional fields
The Additional fields section is made up of five standard text fields. You can add both numbers and text in the additional fields. The information will be included with agreement transactions via integrations.
Monthly nominal hours per year
The Monthly hours section is used if you have different nominal times per month depending on the season. For instance, you can set an exact number of hours per calendar month.
Time
In the Time section, you can set up various rules relating to punching and time reporting. The section is divided into three subsections: Rules for time punching, Overtime and unsocial time, and Punch & Webpunch deviations.
Rules for time punching
Time can be reported by people either punching in and out or not. A punching terminal, mobile phone, or web link is used when punching in/out.
- In a punching terminal, the employee clocks in/out by either:
- Entering their employment number.
- Swiping their magnetic card.
- Holding their tag against the terminal reader.
- Scanning a fingerprint.
- When punching in/out via a mobile device, you can choose whether preset GPS coordinates should be used in Quinyx for location recognition.
- Web-based punching in/out on a computer, POS terminal, or tablet is another option, provided that an internet connection is available. The employee punches in/out by entering their employee number or holding their tag against the terminal reader.
Rules for time punching
- Type of time reporting: This drop-down menu allows you to choose between the four different ways of reporting time in Quinyx:
- Punching in/out and breaks: This means that you must not only clock in and out but also punch in and out at break times.
- Punching in/out but no breaks: This means that you only punch in and out. Any scheduled breaks in their shift are automatically deducted from the time worked. Allowing people to punch in and out in Quinyx provides an easy, automated way of dealing with flex time and time off in lieu when the clocked time is shorter or longer than the scheduled shift.
- Deviation reporting: This means that people with this reporting method don't need to punch in or out. Quinyx goes by the employee's schedule and automatically generates punching in/out times that match the scheduled shifts' start and end times. Any deviations must be reported, such as leave, overtime, or other additional hours beyond what is normal. The deviation reporting function can preferably be used if it is not necessary to save the time worked at the minute level, for instance, in offices or in businesses where punching in and out is more difficult in practical terms, like when an employee is working in the field.
- Punching in/out without schedule: This means an employee can punch in and out without shifts on the schedule.
- Auto attest for absence: If this is ticked, all the approved leave periods will be approved simultaneously and will be included in the payroll file. If you tick the box, you won't need to approve the leave.
- Automatic punch out after (h): This function is useful for ensuring that no one will remain punched in by mistake in Quinyx. By setting this option to 12 hours, any person who has forgotten to punch out will automatically be punched out 12 hours from the punch-in time.
- Daybreak: This field controls the break for the calculation of nominal working hours, overtime, and additional hours over a period.
- Ignore absence type in Webpunch: This should be ticked if the employee can circumvent the creation of leave in Webpunch when punching in late or punching out early. This may be useful in the case of flextime.
- Allow punching on tasks: Tick this box if the employee is to punch time on tasks planned for the shift. This will display an additional dialog in Webpunch that will allow the employee to choose the task for which they want to punch in/out.
- Split shift's existing punch upon task addition: When adding a task to a shift in the past that has a punch and the task fully overlaps with one same punch, the punch will automatically split according to the task just added. This split will also take place for open punches but only when the punch-out of the shift occurs, including open punches that are been auto-punched out.
- Payroll file: Specify the correct payroll file.
Overtime and unsocial time
The second subsection in the Time section is Overtime and unsocial time. It contains three parts, Overtime, Overtime methods, and Unsocial time. The following functions are available:
- Flex time/Time bank: If this box is ticked, no overtime will be calculated.
- Overtime/Additional time bank: If overtime and additional time are to be generated, select whether the default mode is for them to be paid or saved time off in lieu.
- Allow user to ignore overtime in Webpunch: This box should be ticked if the employee is to be able to ignore overtime in Webpunch in order to avoid generating overtime. The punch time is then rounded to the start/end of the shift.
- Overtime methods: You can select Time exceeding schedule per day, Time exceeding nominal hours in a schedule period, Worked hours per week, Additional time, Minus time, Additional time/week.
- Unsocial time: If unsocial time is to be generated, select whether the default mode is for them to be paid or saved time off in lieu.
- Late schedule change: Tick this checkbox if unsocial time compensation is payable on late schedule changes.
- Type of unsocial time: Enter the type of unsocial time that should be when a late schedule change is made, assuming the above-mentioned checkbox is ticked.
Punch & Webpunch deviations
The third subsection in the Time section is Punch & Webpunch deviations. It contains two parts, Punch deviations, and Webpunch deviations. Just as in the subsections Time rules and Overtime and unsocial time, the Use template functionality is used vigorously in Punch & Webpunch deviations. One of the major advantages of Quinyx is that with optimal staffing and the correct use of Quinyx, you frequently have the opportunity to maintain control over payroll costs. One useful function is the option for setting deviation rules.
- Round breaks: This functionality is enabled with the time reporting method Punching times and breaks. You can also check the Round breaks box yourself. The following happens when this box is checked:
- Punched break is shorter than scheduled break: Quinyx will increase the punched-on break time to the scheduled break time.The punch itself will not be changed when the break is rounded. Only the salary outcome will be changed.
- Punched is longer than scheduled break: If the punched break is longer than the scheduled break, the punched times will be as is. If multiple breaks are punched during the day, but only one is scheduled, all breaks are added together and the rounding will be based on the total break time.
- Punched break is shorter than scheduled break: Quinyx will increase the punched-on break time to the scheduled break time.
- Add: You can configure a new deviation rule. Configuration options are as follows:
- Max difference: This means that the person may be slightly late or leave a little bit earlier but nevertheless be paid for the entire shift.
- For example: An employee is scheduled to work between 09:00 and 18:00. If the employee punches in at 09:07 and out at 17:52. The max difference function in our example has a deviation value set to 10 minutes in relation to the start and end of shift. This means that the person has the option of clocking in up to 10 minutes late and clocking out up to 10 minutes early, with a salary calculated from the shift's start time to the shift's end time.
- Rounding to shift start/end: You can round off the time so that if a person punches in a few minutes early and out a few minutes late, the employee will only be paid for the scheduled times.
- For example: An employee is scheduled to work between 09:00 and 18:00. The employee punches in at 08:46 and out at 18:09. If the rounding function is not enabled, the time worked will be calculated from 08:46 to 18:09. If the employee is also paid on an hourly rate, this means that, you can pay an hourly salary for 23 minutes (14 + 9 minutes = 23 minutes) more than the scheduled shift. Using the rounding function means that Quinyx can automatically remove these additional minutes, based on a time frame that you define yourself. A rule of 15 minutes in connection with punching in and the same amount when punching out means that Quinyx automatically rounds the punched times to the start and end times for the shift, as long as the person clocks in or out within the defined time frame of 15 minutes. In the case above, the person's working hours will be calculated between 09:00 and 18:00, exactly as scheduled.
- Round to time interval: This rounding method enables Quinyx to round punched times at different time ranges. Punches are rounded to a specific time range. It is possible to round up, down, or to the nearest interval. It's also possible to specify whether interval rounding is to be applied outside, within, or both outside and within the times for the shift.
- Example: 20-minute intervals are applied. If the person has a shift that starts at 09:00 but punches in 30 minutes early, the time will be rounded to 08:40. If the rounding method is Down, the punch in time will be rounded to 08:20. If the rounding method is Nearest, the time will be rounded to 08:40 as it is always rounded up if the punch is within the defined interval. Note that the same logic is applied if you have selected the Inside shift ratio. The only difference is that the rounding rules are applied within the shift. If both time range rules and rounding or max deviation rules are applied, rounding rules will always take precedence over time range rules. By way of example, let's say we have applied both time range rules and rounding rules with the following settings: Time ranges of 6 minutes, punching in, rounding method up and outside the shift with rounding of 30 minutes. If, for example, a person has a shift that starts at 09:00 and clocks in at 08:32, the punch will be rounded to 08:38 in accordance with the new time range rules. However, if the person clocks in at 08:44 the rounding rule will apply, which means that the time will be rounded to 09:00.
- Indicator: You can set a color for an indicator to quickly see when the schedule and associated punches in and out differ by more than a specified number of minutes. You can select before the shift starts, after the shift starts, or both before and after the shift starts.
- Max difference: This means that the person may be slightly late or leave a little bit earlier but nevertheless be paid for the entire shift.
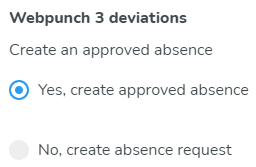
- Create an approved leave: This setting determines whether an approved leave application will be created when a punch deviates from the time of the connected shift. Creation of approved leave is the default setting, but the option to create a leave application that needs to be approved by a manager exists as well.
Availability
In the Availability section, you can configure that employees are available for scheduling every week, 7 days a week. At an individual level, you can then specify availability more precisely, which is good if you have, for instance, minors, who aren't allowed by law to work at night, or if you have an employee who is only available to work on certain days of the week.
E-signing
E-signing is an add-on service. Employment agreements can be created, signed, and distributed digitally via Quinyx.
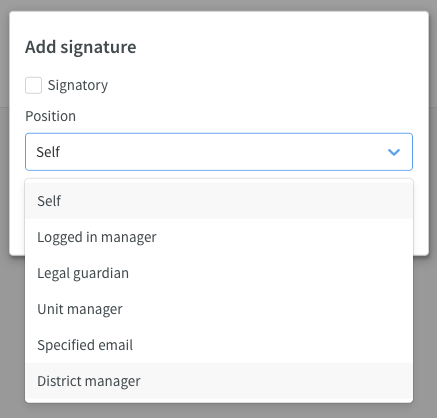
Add: Click this button to add people to the e-signing process if additional employees should be added to the signing process than are specified in the agreement template. You need to untick the Use template checkbox in order for the Add button to become clickable.
Assert that the contract is already valid: Ticking this box sets the agreement as valid. This removes the ability for you to start the e-signing process.
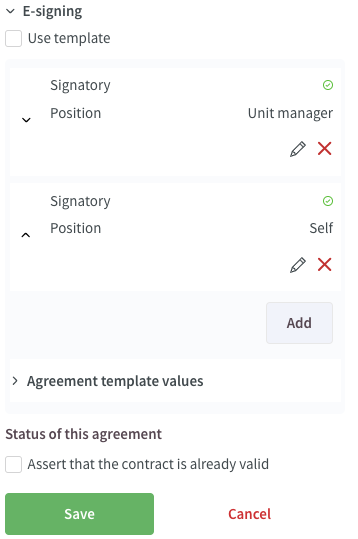
In the pane that appears, tick the Signatory checkbox if the person you're adding is an actual signatory of the agreement. For employees that are only supposed to view the agreement, add them but leave the checkbox unticked.
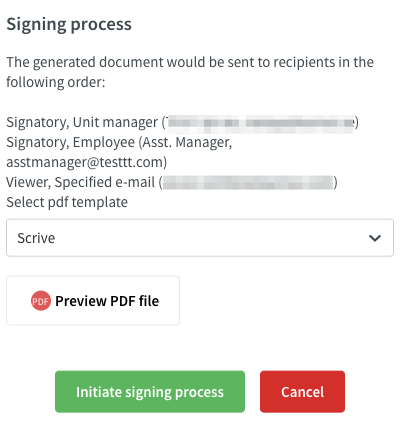
After adding the employees of your choice, click Save at the bottom of the side panel. Refresh the People page you're currently on. You should see a star in the Agreement column of this page for the employee in question:

Click the star. You can initiate the signing process as specified.
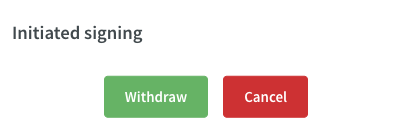
If you refresh the People page, you will notice the star next to the person you've initiated the signing process for has been replaced by an hourglass. This symbol indicates that the signing process is initiated:

Clicking the hourglass will bring up a pane displaying the status of the signing process. You also have the option of withdrawing the signing.
Once the signing process is complete, the hourglass will be replaced by a green tick followed by a PDF symbol. Clicking the green tick gives you the option of initiating a new e-signing process, whereas clicking the PDF symbol will download the signed agreement to the device you're currently using.

Mobile punch flow
Mobile punch flow determines all settings for the mobile punching flow. You can select an existing template to copy from or tick the checkboxes to configure specific settings:
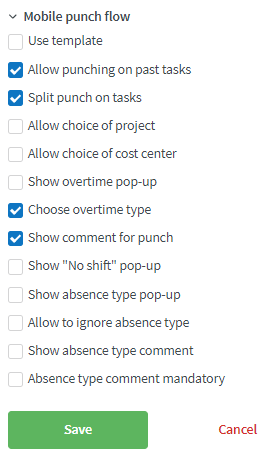
- Allow punching on past tasks: This makes it possible to punch on a task that's in the past.
- Split punch on tasks: This splits the punch based on the planned tasks during the day with the correct settings in the employee's agreement.
- Allow choice of project: Select the project for a punch connected to a task.
- Allow choice of cost center: Allow the choice of cost center.
- Show overtime pop-up: This setting determines if the overtime dialogue in mobile punching is turned on or off.
- Choose overtime type: You can select the type of overtime.
- Show comment for punch: Add a comment on punch connected to tasks.
- Show "No shift" pop-up: Allow a pop-up indicating there is no shift.
- Show absence type pop-up: Allow a pop-up enabling the employee to choose an absence type.
- Allow to ignore absence type: Allows the employee to ignore/skip adding a leave reason.
- Show absence type comment: Display comments about absences.
- Absence type comment mandatory: Require employees to comment on absence type.