Version 0078
 Updated
by
Leigh Hutchens
Updated
by
Leigh Hutchens
API / Web services update
GET /aggregated-data
Getting the aggregated data that has previously been uploaded for the given forecast variable with /raw-data
- externalForecastVariableId - ID for a variable as set up for units in Account settings→Forecast→Variables→External ID
- externalUnitId - External ID for a unit as set up for units in Classic → Settings → Tables → integration keys
- externalSectionId - External ID for a section as set up for units in Classic → Settings → Tables → integration keys (optional)
- startTime - Start of the period you want to GET data for
- endTime - End time of the period you want to GET data for
Bug fixes
- Several bugs related to validations and warnings.
New functionality
General
Added support for American English.
Schedule and time
Salary type rules
With version 0078 we released salary type rules on both shift and shift type. Shift salary type rules allow you to define rules for extra salary types to be generated when an employee punches time on a specific shift. In the salary type overview, you’re able to identify salary types added as a result of these rules. They are denoted by an orange square.
Adding rule on individual shifts
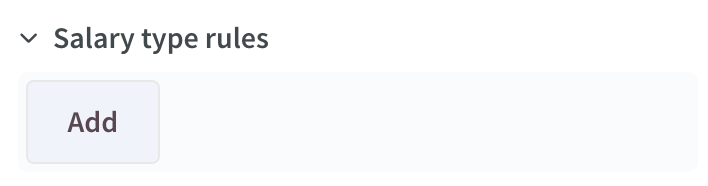
To add a shift salary rule directly on an individual shift, click on “Add” in the “Salary type rule” section of the "Edit shift" form.
The following form will then appear:
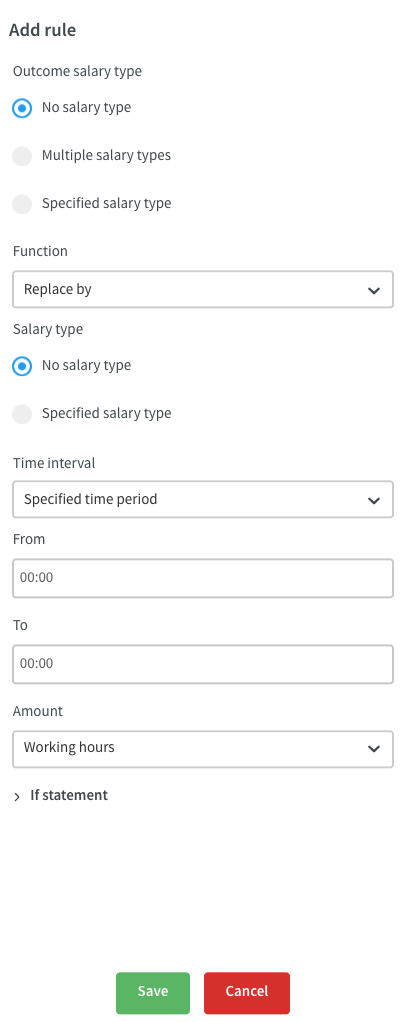
You begin by selecting outcome salary type, which we’ll refer to as “salary type X” for the remainder of this article. Your have three options here:
- No salary type: The rule will only be applied if the punch doesn’t have any salary type outcome.
- Multiple salary types: The rule will only be applied if a salary type in the selected group of salary types occurs on the punch. Click here for a list of which standard salary types are part of which categories.
- Specific salary type: The rule will only be applied if that salary type occurs on the punch. Note that for a salary type to be visible in this drop-down on an assigned shift requires for it to be selected on the assignee’s agreement template. For unassigned shifts, the salary type needs to be selected in global settings.
You may choose between the four following options:
- Replace by: removes salary type X and replaces it by salary type Y.
- Add: salary type Y is generated in addition to salary type X.
- Multiply by: when selecting this function, an additional field appears where you’re required to enter a multiplication factor. This factor multiplies the amount of salary type Y by that of salary type X. For instance, if there are 4 hours of Hourly salary on the punch, you select multiply by 1.5 and Extra on call compensation, then the punch will have 4 hours of Hourly salary and 8 hours of Extra on call compensation.
- Replaced completely: this function removes the salary type X from the punch altogether regardless of the time interval set below, but adds salary type Y only to that specific time interval.
You then select the salary type that this function should be applied to. We’ll refer to this salary type as “salary type Y” for the remainder of this article. You have two options here:
- No salary type
- Specific salary type: Note that for a salary type to be visible in this drop-down it needs to be selected on the assignee’s agreement template for assigned shifts and in global settings for unassigned shifts.
The next step is to set which time interval the rule should be applied to. You have five options here:
- Specified time period: the rule should only be applied within the specified time period. Selecting this option adds two additional fields allowing you to specify “From” and “To” time of the time period.
- Within schedule: the rule should only be applied for hours on the punch worked within the scheduled shift.
- Outside schedule: the rule should only be applied for hours on the punch worked outside the scheduled shift.
- Generated hours: the rule should be applied for all hours on the punch generating salary type X.
- Punched hours: the rule should only apply if the amount of hours punched hours is within a specific span (NB: there is limited support for this option at the moment as the minimum and maximum fields used to set the span for this will be added in a soon-to-be-release).
Next up is defining the amount of hours of salary type Y that should be generated by the rule in question. The following options are available:
- Working hours: salary type Y should be generated by the same amount as the number of punched hours on this shift and as defined in the “Time interval” section.
- Exactly: an exact amount of salary type Y should be created. An additional field allowing to specify that amount appears if you select this option.
- Minimum: salary type Y should be generated for the same amount of hours that has been worked and as defined in the “Time interval” section, but a minimum amount will be generated if the amount of worked hours are less than that. That minimum amount is specified in an additional field that appears if I select this option.
- Maximum: salary type Y should be generated for the same amount of hours that has been worked and as defined in the “Time interval” section, but a maximum amount will be generated if the amount of worked hours are less than that. That maximum amount is specified in an additional field that appears if I select this option.
When setting up a salary type rule, you may also make use of an if-statement that allows you to specify an additional criteria that needs to be met in order for the rule to apply in the first place:
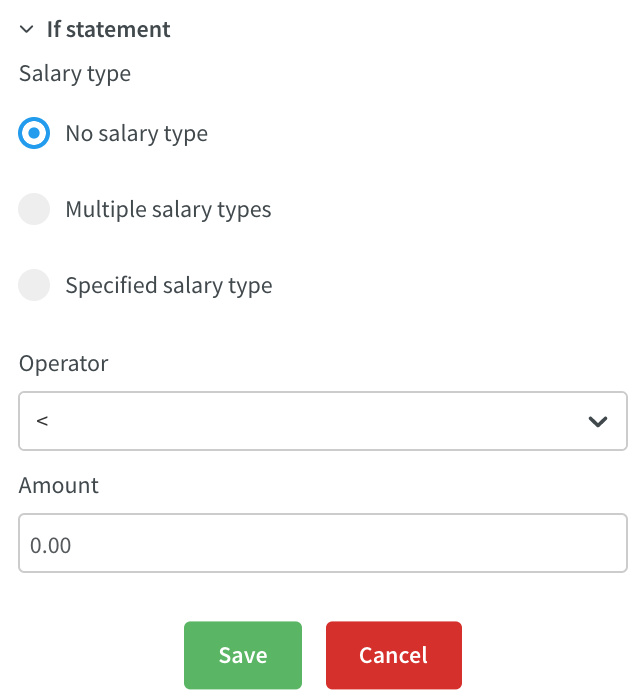
This if-statement, too, checks whether a certain salary type exists on the punch in question. Just as for salary type X on the rule itself, you have three options here:
- No salary type: The rule will only be applied if the punch doesn’t have any salary type outcome.
- Multiple salary types: The rule will only be applied if a salary type in the selected group of salary types occurs on the punch. Click here for a list of which standard salary types are part of which categories.
- Specific salary type: The rule will only be applied if that salary type occurs on the punch. Note that for a salary type to be visible in this drop-down on an assigned shift requires for it to be selected on the assignee’s agreement template. For unassigned shifts, the salary type needs to be selected in global settings.
The following criteria options are then available:
- <: the salary type you select in this if statement has been generated for fewer hours on the punch than what’s been defined in the if statement’s “Amount” field.
- >: the salary type you select in this if statement has been generated for more hours on the punch than what’s been defined in the if statement’s “Amount” field.
- =: the salary type you select in this if statement has been generated for exactly as many hours on the punch as what’s been defined in the if statement’s “Amount” field.
Inheriting rule from shift type
When applying a shift type on which a salary type rule is set up to a shift in Schedule, Quinyx will apply that shift type’s salary type rule to your shift. This goes for when you’re creating a new shift as well as for when you’re editing an existing shift. The inherited rule will appear under the "Salary type rules" section of "Edit shift" form.
If the shift type salary type rule contains a salary type which isn’t available, the salary will not appear on the rule. Likewise, if the salary type isn’t available this will in turn affect the salary outcome on the punch. As mentioned above, whether a salary type is available or not is set on the assignee’s agreement template for assigned shifts and in global settings for unassigned shifts.
Time warnings
As of Neo 0078, we’re adding support for the below time warnings on punches - the same time warnings on non-punch schedule components will follow in a soon-to-be release.These time warnings are displayed the same way the remainder of our punch warnings are, i.e. using a red border around the punch. They are displayed for past and future punches, both attested an unattested.
Overtime
The warning is useful in that it alerts you that this punch is generating overtime compensation. When you click into the punch, the warning will display as follows:
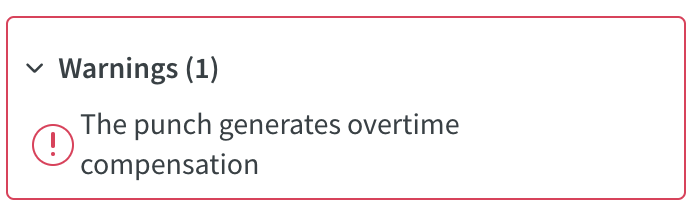
The warning will appear assuming the two below criteria are met:
1. The salary type overview for a given employee on a given day contains at least one of the following salary outcomes:
- Daily overtime 4 paid
- Extra daily overtime paid
- Extra overtime paid
- Extra weekly overtime paid
- Ordinary overtime paid
- Ordinary daily overtime paid
- Ordinary weekly overtime paid
- Overtime 4 paid
- Qualified daily overtime paid
- Qualified overtime paid
- Qualified weekly overtime paid
- Weekly overtime 4 paid
2. The "Paid" radio button is selected in the "Overtime/Additional time type" section of the punch generating the warning.
Additional time
The warning is useful in that it alerts you that this punch is generating additional time compensation. When you click into the punch, the warning will display as follows:
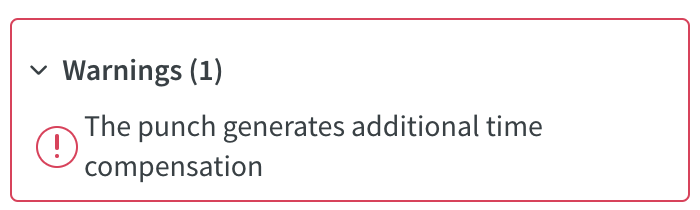
The warning will appear assuming the two below criteria are met:
1. The salary type overview for a given employee contains an "Additional hours paid" salary outcome.
2. The "Paid" radio button is selected in the "Overtime/Additional time type" section of the punch generating the warning.
Time in lieu
The warning is useful in that it alerts you that this punch is generating time in lieu. When you click into the punch, the warning will display as follows:
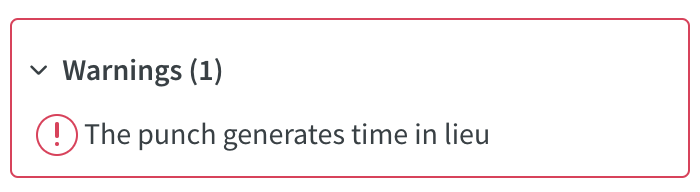
The warning will appear assuming the two below criteria are met:
1. The salary type overview for a given employee on a given day contains at least one of the following salary outcomes:
- Daily overtime 4 to time off in lieu
- Extra daily overtime to time off in lieu
- Extra weekly overtime to time off in lieu
- Extra worked overtime to time off in lieu
- Ordinary daily overtime to time off in lieu
- Ordinary weekly overtime to time off in lieu
- Ordinary worked overtime to time off in lieu
- Qualified daily overtime to time off in lieu
- Qualified weekly overtime to time off in lieu
- Qualified worked overtime to time off in lieu
- Weekly overtime 4 to time off in lieu
- Worked overtime 4 to time off in lieu
2. The "Save as time in lieu" radio button is selected in the "Overtime/Additional time type" section of the punch generating the warning.
Salary type requires approval
The warning is useful in that it alerts you that this punch is generating a salary outcome requiring approval is currently unapproved. As soon as the salary type is approved in the salary type overview, the warning disappears.
When you click into the punch, the warning will display as follows:
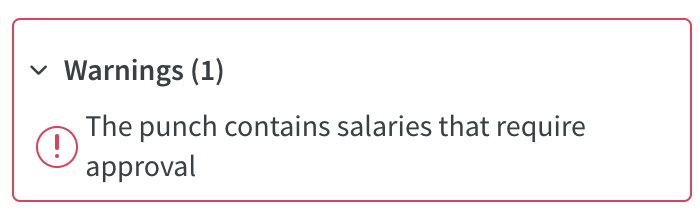
The warning will appear assuming the two below criteria are met:
1. The punch in question contains a salary that's been configured to require approval.
2. The salary is yet to be approved in the salary type overview.
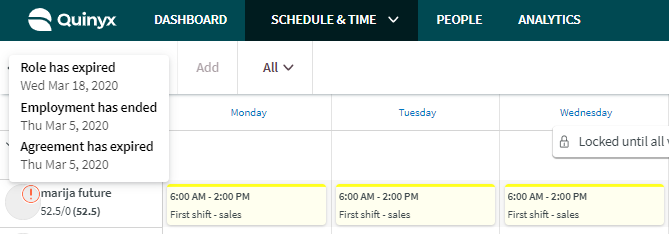
Base schedule
As of this release you will be able to see in the Base schedule per employee when:
- a role has expired
- a main agreement has expired
- employment has ended
You will also be able to see which date any of the above has occurred and it's indicated with an exclamation mark on top of the employees profile picture. On hover, you will be able to see further details.
Please see example below.
We will also change the logic for visibility of employees with ended employments. Prior this release, we removed all employee rows where the employees employment had ended, so they could not be seen in the base schedule view.
As of this release, we will not remove employees with ended employments, they will be visible in the view. You can decide if you want to delete or reassign the shifts.
Note that it's not possible to roll out the base schedule on a date where the employee has not agreement, role or employment. However, you can still plan the employees schedule in the base schedule view and roll out on a date where there has an active employment, role and agreement.
Shift type management
Apply rules
With this release we are adding the feature of adding salary type rules on shift types to shifts in the schedule (read more about this feature here).
After adding a salary type rule to an existing shift type you can choose to also apply that rule for shifts of that shift type in the schedule during a selected period.
When you have added the salary type rule to a shift type click on actions in the top right corner and select apply rules
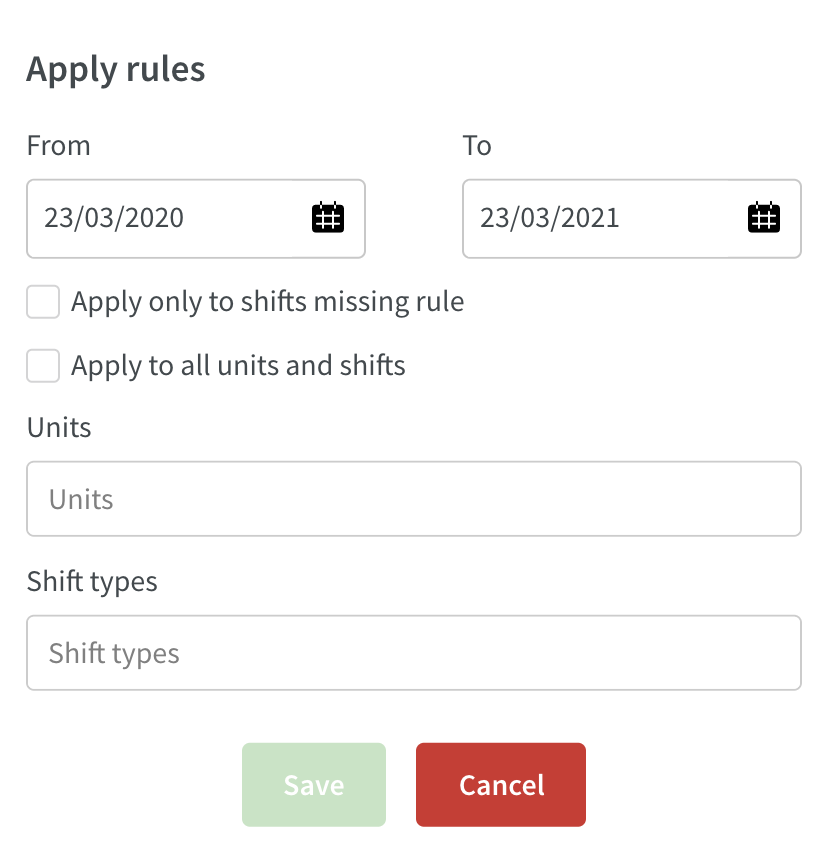
- Select for what period the rule should be added
- Select if the rule should be added only to shifts that are missing a rule
- Select if the rule should be applied to all units and shifts (all units that you have access to). If you don't mark this checkbox then select the specific units and shift types
- Press save
The rule that you added to the shift type will now also be added to the shifts (of that shift type) in the schedule for the selected period.