Shifts
 Updated
by
Victor Jespersen
Updated
by
Victor Jespersen
- Adding a shift
- Quick editing
- Drag-and-drop for shifts
- Copy a shift
- Corrective actions
- Assign an employee to a shift
Adding a shift
There are different ways to add shifts.
- Click on a row in the Schedule view to quickly add a shift.
- Select a shift type. If you want to add more details, select More options.
- You can also click the + icon that appears at the top-right of the app.
- Click Add shift.
- Select the employee for whom you want to add a shift.
- Select a shift type. If you want to add more details, select More options.
Quick editing
To make shift editing faster and easier, you can "quick edit" in the schedule and base schedule. Click on a shift, and the quick edit panel will open. You might want to do this to change an employee's shift, change the cost center, or make corrections.
With quick editing you can:
- View the history trail: You can quickly access the shift history of an existing shift in the schedule. Clicking the icon of the Edit shift panel will bring you to the item trail as we know it in the audit log view. This way, the path to locating an existing shift's history is much shorter for you as a manager. The same access rights are required for the item trail in the schedule as in the audit logs view, namely read access on the scheduling permission. Read more about audit log item trail in schedule here.
- Delete the shift: Click on the trash can.
- Re-assign the shift to another employee: Select another employee in the drop-down.
- Change shift type: Select another shift type in the drop-down.
- Move the shift to another day: Select a new date in the date picker.
- Change start and end time: Edit the start and end time.
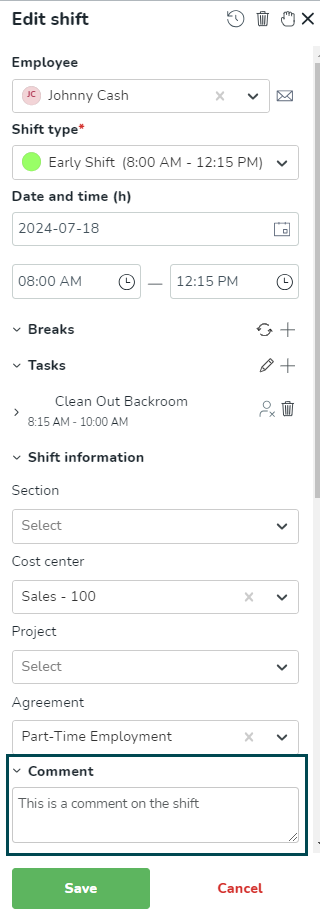
If you want to make additional changes, such as changing the cost center or break time, click More options, and the detail panel will open on the right-hand side.
Employee
Select from the list of employees you want the shift assigned.
Shift type
If you're switching between shift types as you're creating a new one, the shift times, as well as any breaks will always reflect those of the last selected shift type. However, if you're switching between shift types as you're editing an existing shift, the shift times, as well as any breaks, won't update to reflect those of the last selected shift type.
Date and time
Select the date and time of the shift you want to add.
Breaks
- There's support for adding multiple breaks to the same shift. If you haven't set up break rules, adding a break will result in a 30-minute break being added to the middle of your shift by default. For a 9:00-11:00 o'clock shift, the break will be placed at 9:45-10:15, but you can modify this to your liking. If your shift were to be shorter than 30 minutes, the default behavior is for the break to be made as long as the shift contains it.
- The recycling button next to the Breaks heading will replace any existing breaks of the shift with what's been configured in shared/local, agreement template-, or agreement-level break calculations. You can also add additional breaks manually after applying your break calculation rules. Read more about break calculation rules here.
- If the break(s) are outside of the shift, you will receive a warning immediately while editing the shift.
Tasks
Tasks are essentially the same as a shift, in that they are built out of shift types. On a task, you need to define shift type and start and end time. You add a task directly on a shift. You can only add a task within the mother shift's timespan.
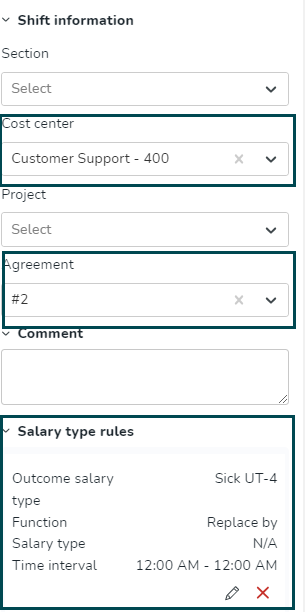
Shift information
- Section: Select which section of the unit the shift should be placed.
- Cost center: Select the relevant cost center for the shift.
- Project: Select any project you want to be associated with the shift.
Agreement
The agreement field is added to the form once you assign an employee to the shift in question.
- When adding a shift, the agreement setting Allow override on overlapping shifts affects if a new shift can overlap an existing shift that the employee has.
- This setting can be set up in the agreement template (Account settings > Agreements > Agreement templates > [insert agreement template] > Rules for hours) and inside the personal agreement (People > [insert employee] > Agreement > Advanced setting categories > Rules for working time).
Comment
The shift comments will be visible on the shift in both daily and weekly views of the Schedule view.

Salary type rules
Salary type rules allow you to define rules for extra salary types to be generated when an employee punches time on a specific shift. These rules can be defined for individual shifts in the schedule (but not in base schedule) and on shift type.
Drag-and-drop for shifts
Updating, copying, or moving shifts via drag-and-drop in the Schedule view is possible. Below, we will list the different ways you can do this.
Update the time of the shift
Using the drag-and-drop functionality, you can update the time of a shift by dragging the left, or right side of the shift while in the daily view. This way you will be able to quickly, with fewer clicks update the time of the shift without the need to open the shift panel and manually adjust the time.
Move a shift
Using the drag-and-drop functionality, you can move an employee's shift to a different time during the day or move an existing shift to a different employee. Click and hold down on the shift you want to move and drag it to where you want it.
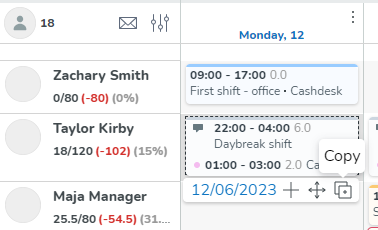
Copy a shift
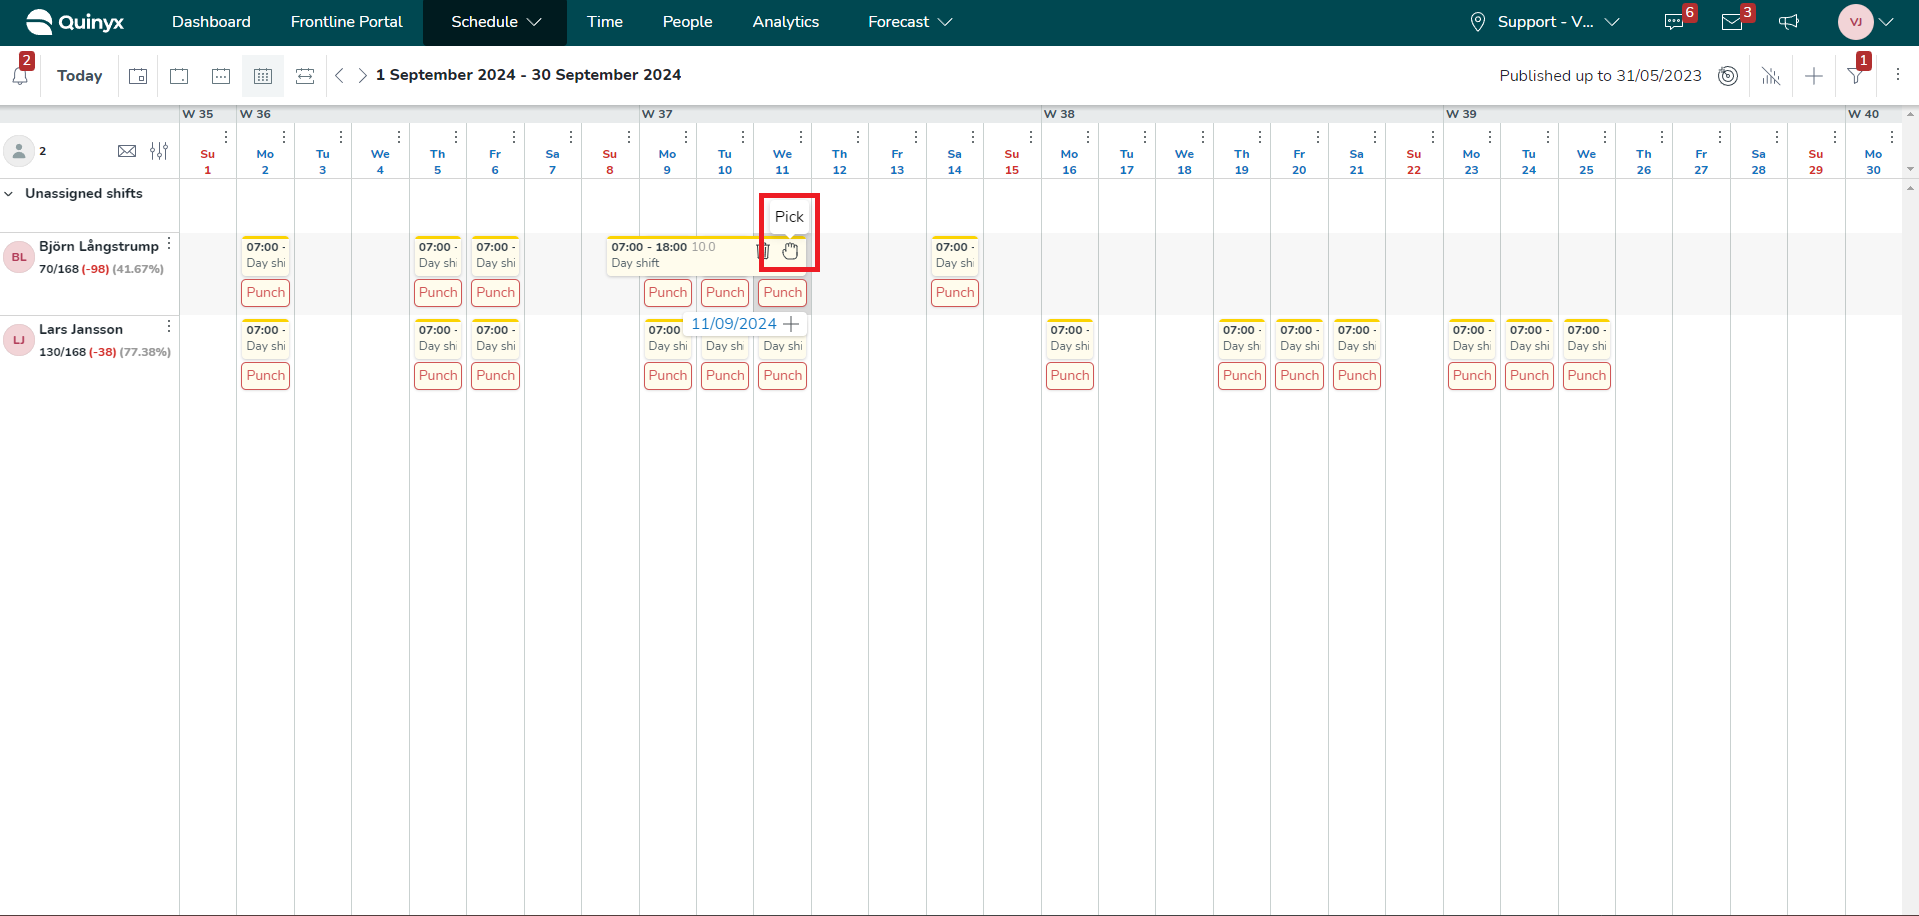
You can copy a shift in different ways. To copy an existing shift, click on the shift and click the pick (hand) icon.
Navigate to where you want to add the + to copy the shift.
You can also copy a shift by:
- Holding CTRL for the Windows while dragging the shift.
- Holding Option for macOS while dragging the shift.
Important to remember!
- The manual salary type rule is copied regardless of whether the shift is being copied to the same employee, another employee, or no employee. This currently applies to individually copied shifts.
- If the original shift isn't valid on the date the agreement has been copied, then the agreement selection logic will be applied, and Quinyx will select an agreement for the copied shift based on that. This only applies if the shift is copied to the same employee. This is also how you copy shifts in the base schedule.
- If you manually change a cost center on a shift where the cost center was initially inherited from shift type and then copy that shift to another day for the same employee, then the copied shift will have the same cost center as the shift it was copied from.
Advanced settings
Advanced settings are inherited from your shift's shift type, but you may override these on the shift level at the very bottom of the Edit shift dialog under the Advanced settings section.
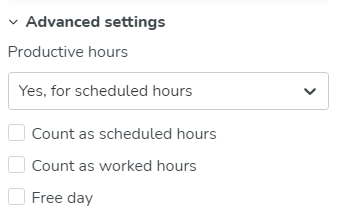
You can configure the following advanced settings on the shift level.
Productive hours
It's possible for shifts that aren't counted as scheduled hours to be counted as productive time and so be included in the Headcount summary that you can see in the daily schedule and scheduled staff view if you use the Forecast module. If a shift is tagged as productive time, it will be included in all Headcount summaries in scheduled views and Forecast:
- No: This option can be selected if the shift type is used for tasks that don't contribute to sales and should never be included in the headcount compared to optimal staffing figures, e.g., administration or training.
- Yes, for scheduled hours: Hours will be calculated as productive only if the shift has Count as scheduled hours checked and is selected by default.
- Yes, always: The value Count as scheduled hours is ignored, and the shift will always be counted as productive time.
Count as scheduled hours
Count as scheduled hours determines whether the shift's hours count toward Scheduled hours. Note the dependency of this setting and that of Productive hours.
Count as worked hours
Count as worked hours determines whether the punch linked to this shift counts toward Worked hours.
Free day
Checking that a shift is a free day indicates that the assignee of this shift is not supposed to work between the start and end time of the shift. Typically, this setting is checked in combination with unchecking the Count as scheduled hours and Count as worked hours.
Corrective actions
When a shift is connected to at least one punch, additional functionality will appear in the shift detail panel.
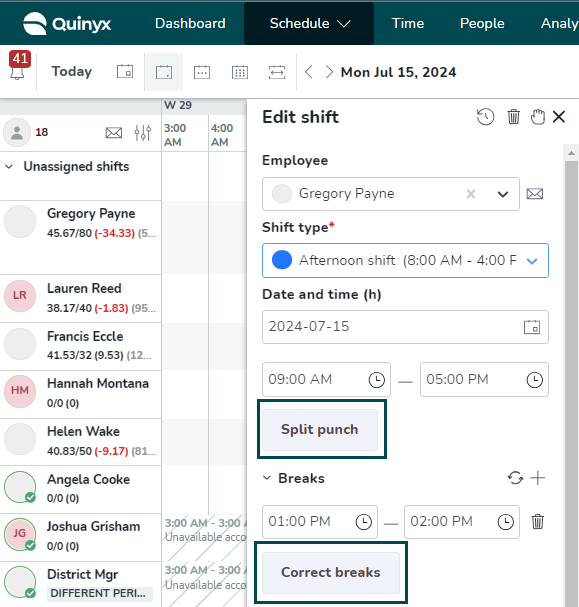
Split punch
With this functionality, all segments of the punching that lie outside of the connected shift will be divided into their own punches. After the split has been made, all split punches will be connected to the original shift, but they can be connected to another shift and other agreements, cost centers, and projects.
A typical example of use is if an employee has several agreements, one which permits flex time and one that allows overtime. With this function, a manager (or employee) connects the different segments to the correct agreement depending on whether the employee has worked in flex or has worked for ordered overtime.
Correct breaks
This may be useful if the employee has punched in or out for a break incorrectly or failed to punch out for a break completely. When you select Correct breaks, the last entry associated with the shift will move forward or backward so that the total punched time of the break matches the total scheduled time of the break. If there are no breaks when punching, the Correct break functionality will create breaks for you.
When a user applies the Correct breaks functionality, the following logic applies:
- One scheduled break, no punched break: A break will be added at the same time and duration as the scheduled break and split the punch
- One scheduled break, one punched break that is shorter than the scheduled break: The start time of the second punch is moved so that the total break time is the same as the scheduled break time.
- One scheduled break, one punched break that is longer than the scheduled break: The start time of the second punch is moved so that the total break time is the same as the scheduled break time.
- Two scheduled breaks (or more), two punched breaks (or more) where the total of scheduled break hrs is longer than the total of punched breaks: The start of the last punch is moved so that the total break time is the same as the scheduled break time.
- Two scheduled breaks (or more), two punched breaks (or more) where the total of scheduled break hrs is shorter than the total of punched breaks: The start of the last punch is moved so that the total break time is the same as the scheduled break time. (note that punched breaks can be removed completely)
Assign an employee to a shift
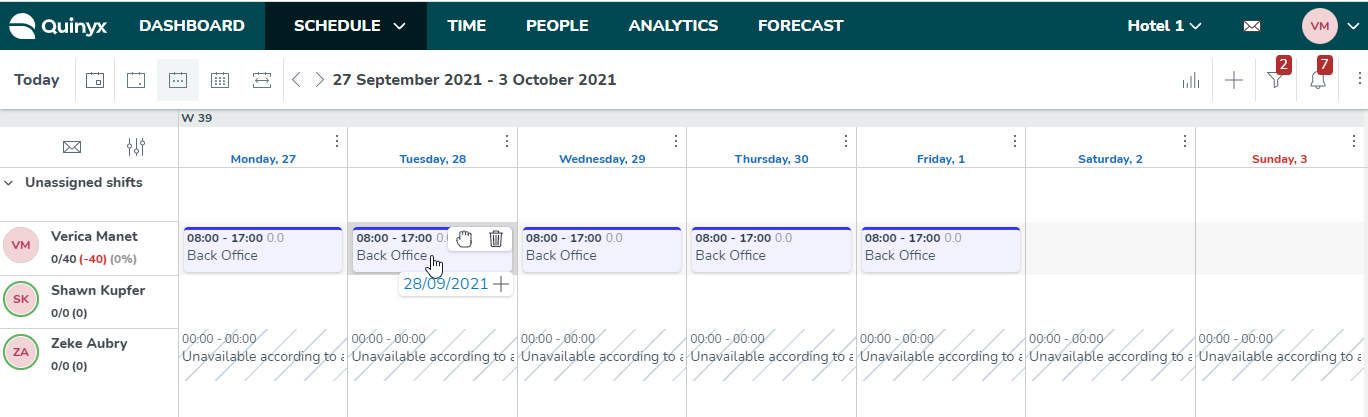
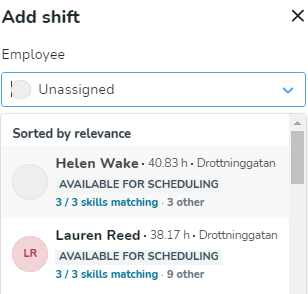
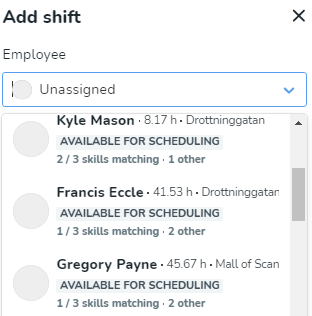
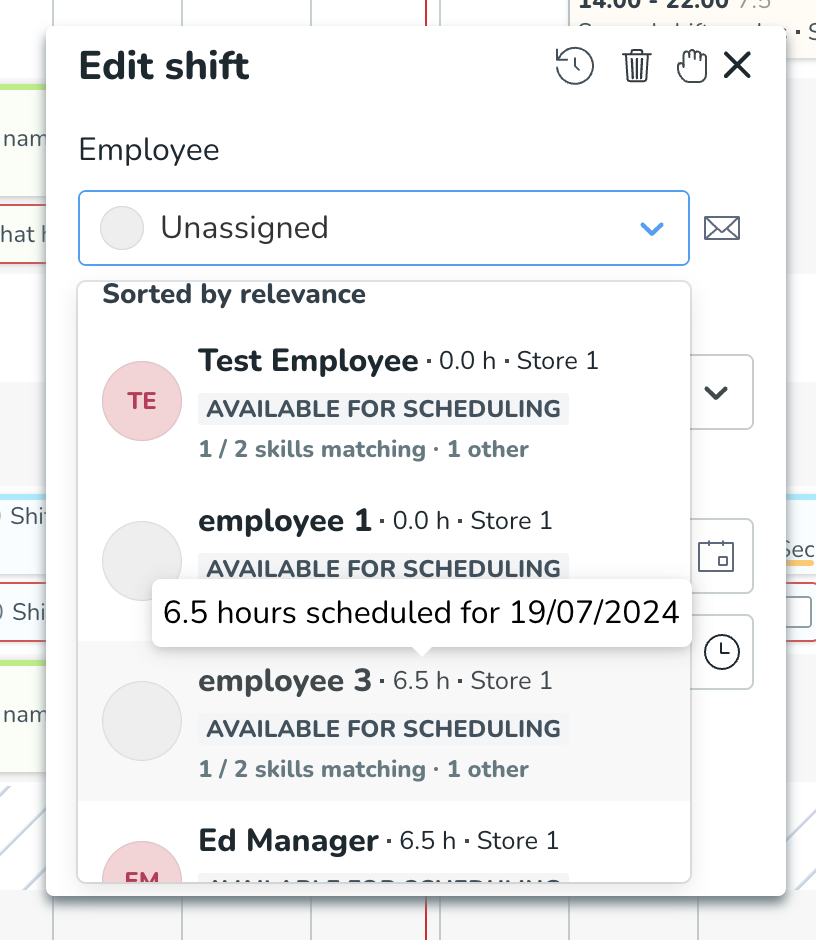
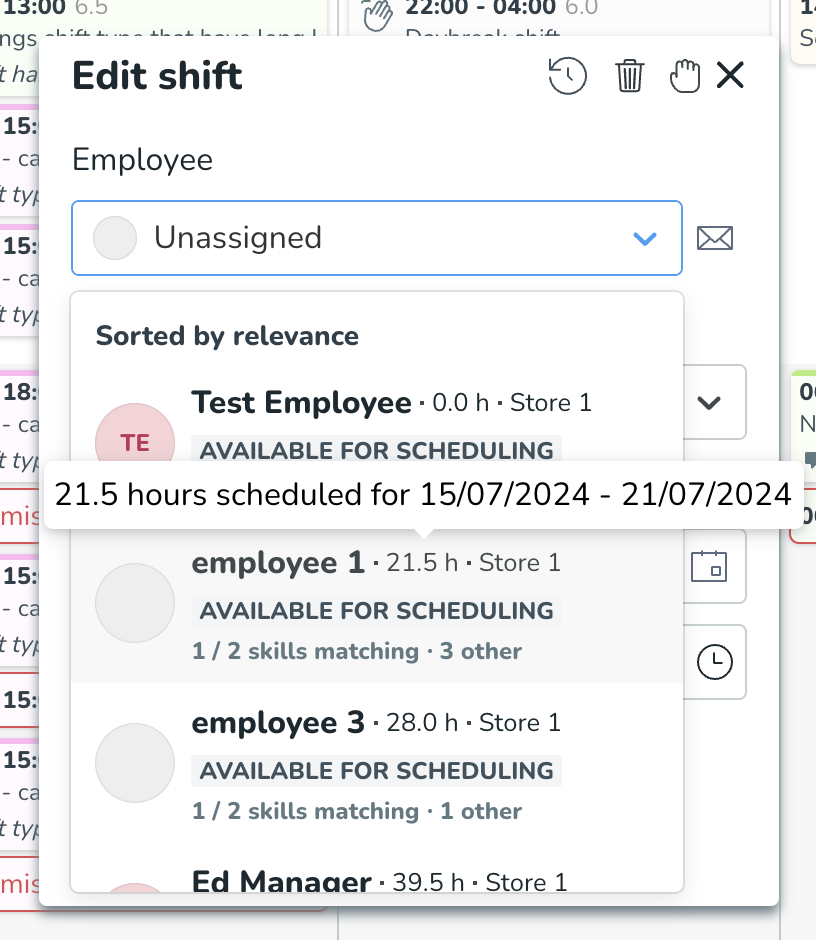
When assigning an employee to a shift, you will see a list of potential employees to schedule in a list. In this list, you can find information about the scheduled hours that the employee has within the selected period. This information will help you quickly understand if the selected employee is the right one to be assigned to the shift based on already scheduled hours for that day, week, or month.
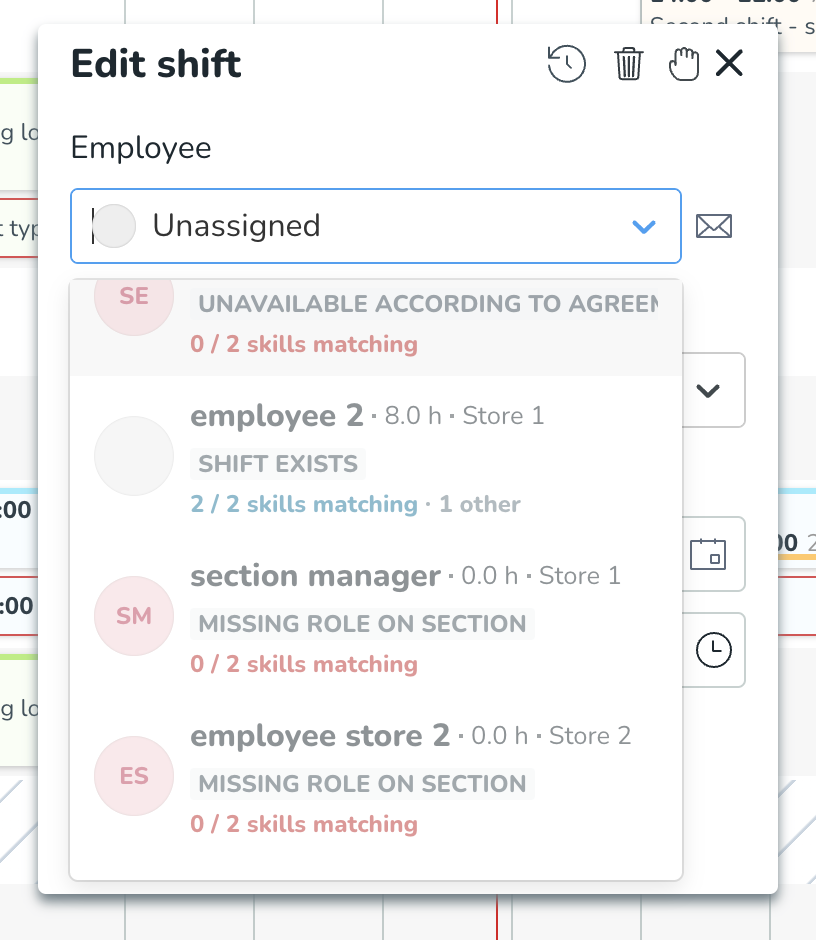
When an employee is available, you'll see the availability displayed as a "badge" by the employee's name.
If an employee is unavailable, the "row" is slightly greyed out. Additionally, if a manager is scheduling their employees on a unit level, and the employee is missing a role on a section where they are being considered, this will be displayed with a "badge" saying "Missing role on section".
How to assign a shift
- Create a new shift or edit an existing shift.
- Select a shift type.
- Select the date and time of the shift.
- Click on the drop-down to choose an employee to be scheduled on the shift.
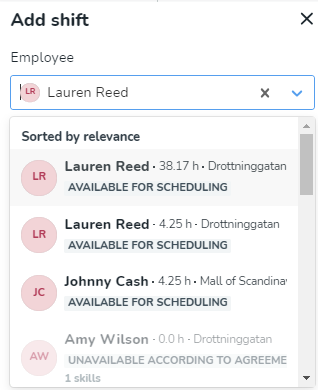
- The employee list appears, and employees are sorted by relevance.
What does Sorted by relevance mean?
- Employees who are available or unavailable according to their agreement and have submitted Availability (if availability is not used, this part is not applicable):
- Home unit
- Away unit
- Available employees (according to the main agreement, no absence, or shift):
- Home unit
- Away unit
- Unavailable employees (according to the main agreement, have an absence or a shift):
- Home unit
- Away unit
In the sorting logic, Quinyx also takes into consideration how many skills between the shift type and the employee match. If employees meet the exact same criteria, they are sorted in alphabetically ascending order.
Visual indications
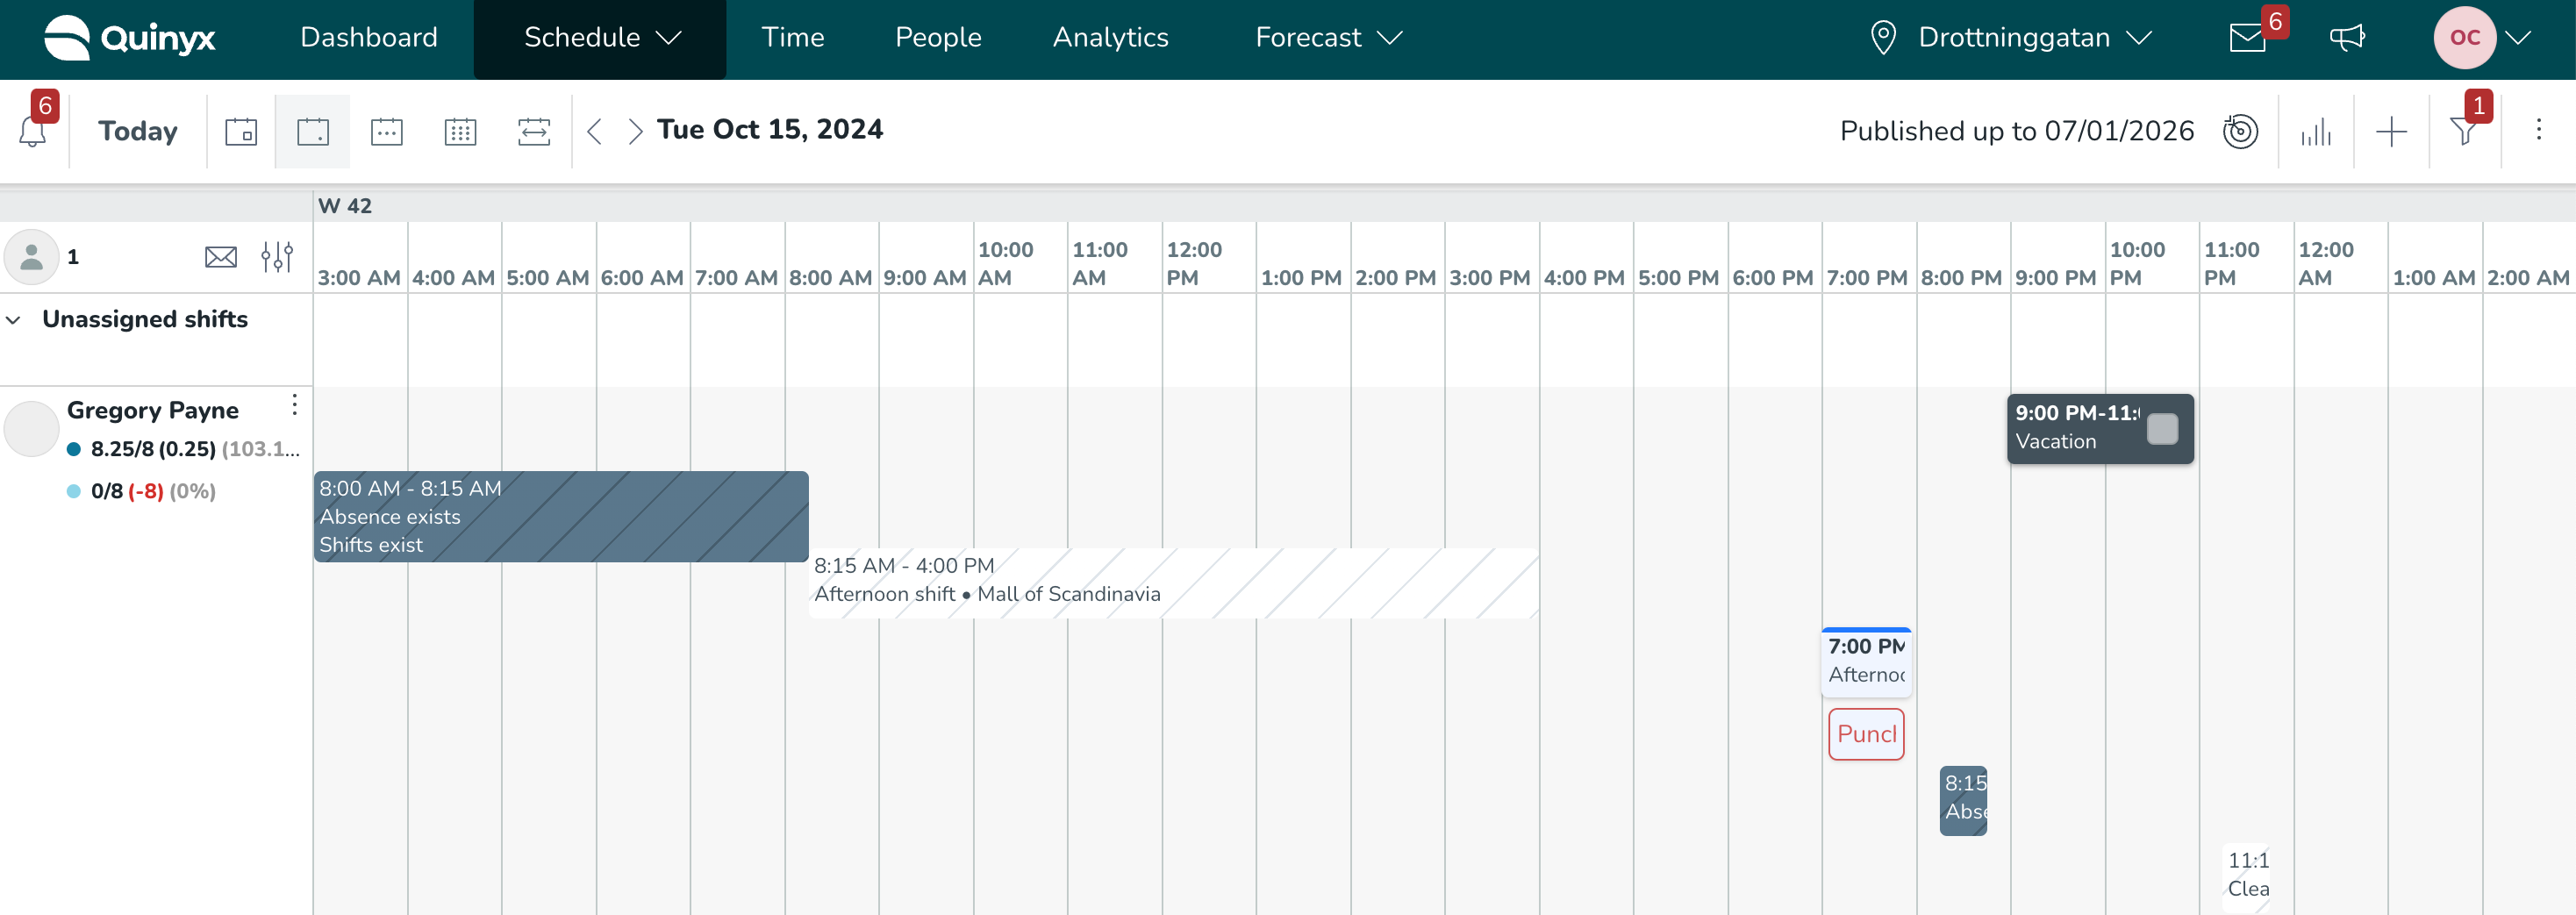
If you have employees who work on multiple units, you can see shifts created for employees on other units. Away-group shifts are recognized by a white background, light grey slanted lines, and black text.
The shift type name of away-group shifts also displays if the shift type used happens to be a local one:
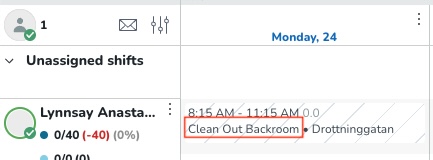
This aims to improve your understanding of a given employee's workday(s) when monitoring or assessing whether to edit their schedule.
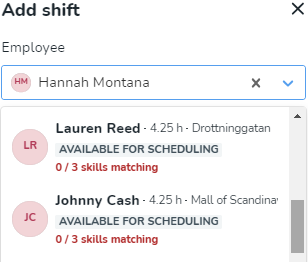
Skills
- Blue text: All skills matching between employee and shift type.
- Grey text: Partial skills between employee and shift type.
- Red text: Missing skills between employee and shift type.
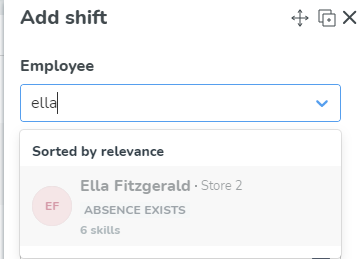
Grey dot on the employee's profile picture
- Unavailability according to agreement.
- Absence
- Employee has a shift the same time.
Green dot on the employee's profile picture
- Availability
Example: If an employee is absent the first part of the day, he/she will have a visual indication (grey dot) with the text Absence exists and be sorted at the bottom of the list, even if the shift is about to be assigned is the second part of the day.
Smart lists
Smart lists in Quinyx are essential for efficient scheduling. They help managers quickly assess if an employee is a good fit for a shift by showing scheduled hours, roles, and relevant skills. This makes it easier to assign the right employee and avoid scheduling conflicts.
Evaluate the chosen employee for a shift
You can work with the scheduled hours that the employee has within the selected period. This information will help you quickly understand if the chosen employee is the right one to be assigned to the shift based on already scheduled hours for that day, week, or month. The same information will be available inside the Notifications panel when handling different requests.
Example:
See if an employee has a role in the section for which the shift is created
Quinyx also provides information if the employee has a role in the section for which the shift is created. This is important for managers who are scheduling their employees on the unit level where they don’t have a good overview of which section the employee has a role in. This will be visualized with the new badge “Missing role on section” and greyed out line since that employee is unavailable to be scheduled. Active role, in this case, is checked for the date of the shift that you want to assign.
Example:

Check skills on tasks when selecting an employee for a shift
The smart list checks skills on tasks when suggesting which employee is the best match for a shift.
Example
In the example below, we've assigned a person to a shift with a task. The shift requires Skill 1, and the task requires Skill 2.

- Elin Olsson has both skills, so she is considered the best match.
- Andreas Olsson has Skill 1 (required for the shift) but is missing Skill 2 (required for the task), so he is considered the second-best match.
- Björn Gustafsson is missing both skills, so he is considered the third-best match.
Bulk actions for shifts
Add multiple assigned shifts in a single action
You can now add multiple assigned shifts in a single action.
Selecting multiple employees within the existing "Add Shift" panel will determine the number of assigned shifts that will be added after clicking Save.
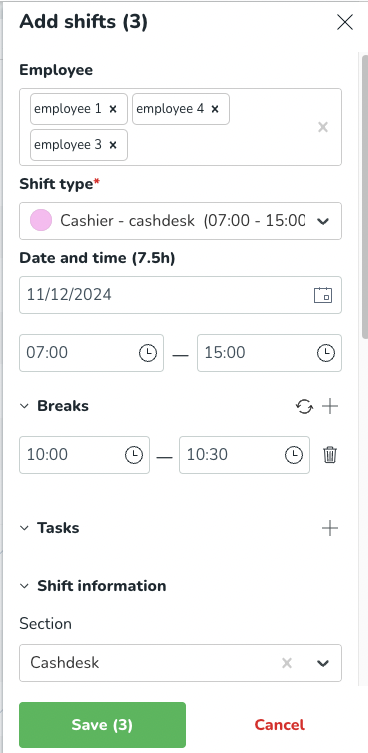
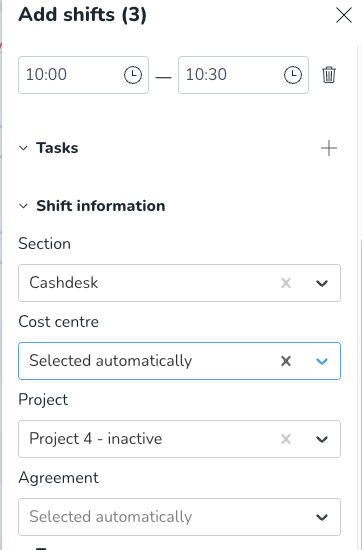
When creating shifts this way, the agreement value will be defaulted to “Selected automatically”. This means that each individual shift assigned to a selected employee will be assigned the agreement that belongs to that specific employee following the regular agreement assignment logic. The value “Selected automatically” presented while creating the shifts will not be editable, but you can always edit the assigned agreement in the shift after it's created.
Similar to agreements, if cost centers are connected to individual employees, due to inheritance logic, we will follow that inheritance logic and the field will default to “Selected automatically”. In this case, the manager can always remove the automatically added cost center or select one manually that will apply to all created shifts.
Update time breaks and tasks inside bulk edit panel
You can use the option to update the date, time, breaks, and tasks inside our existing Bulk edit panel.
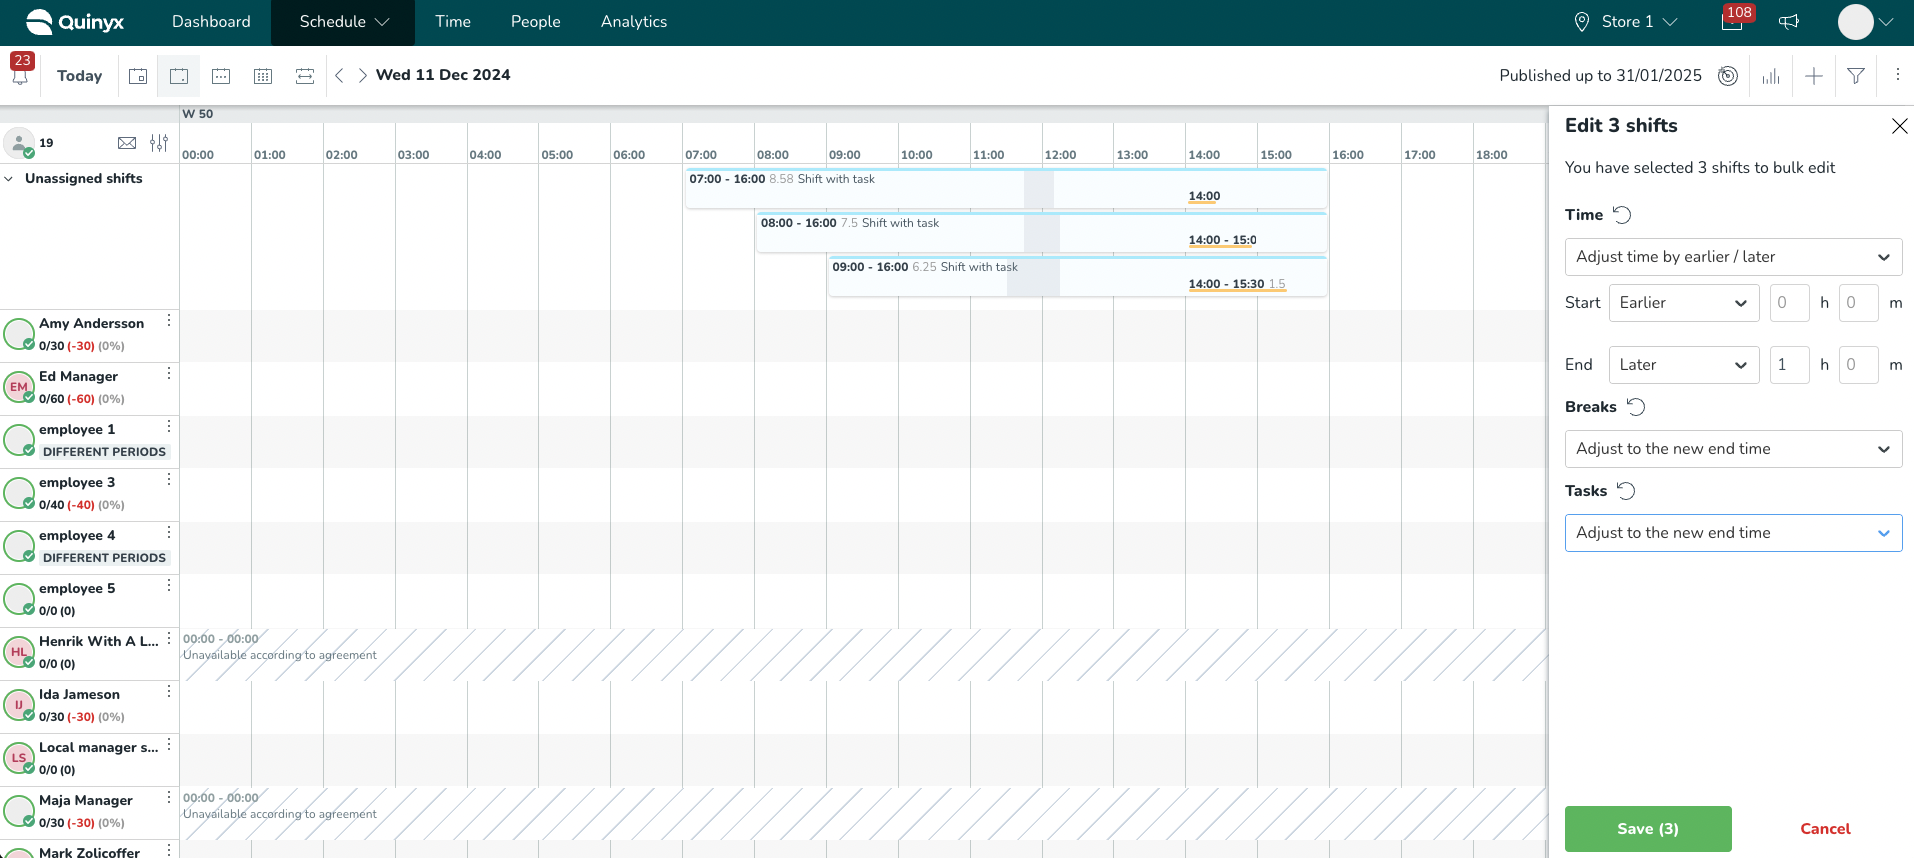
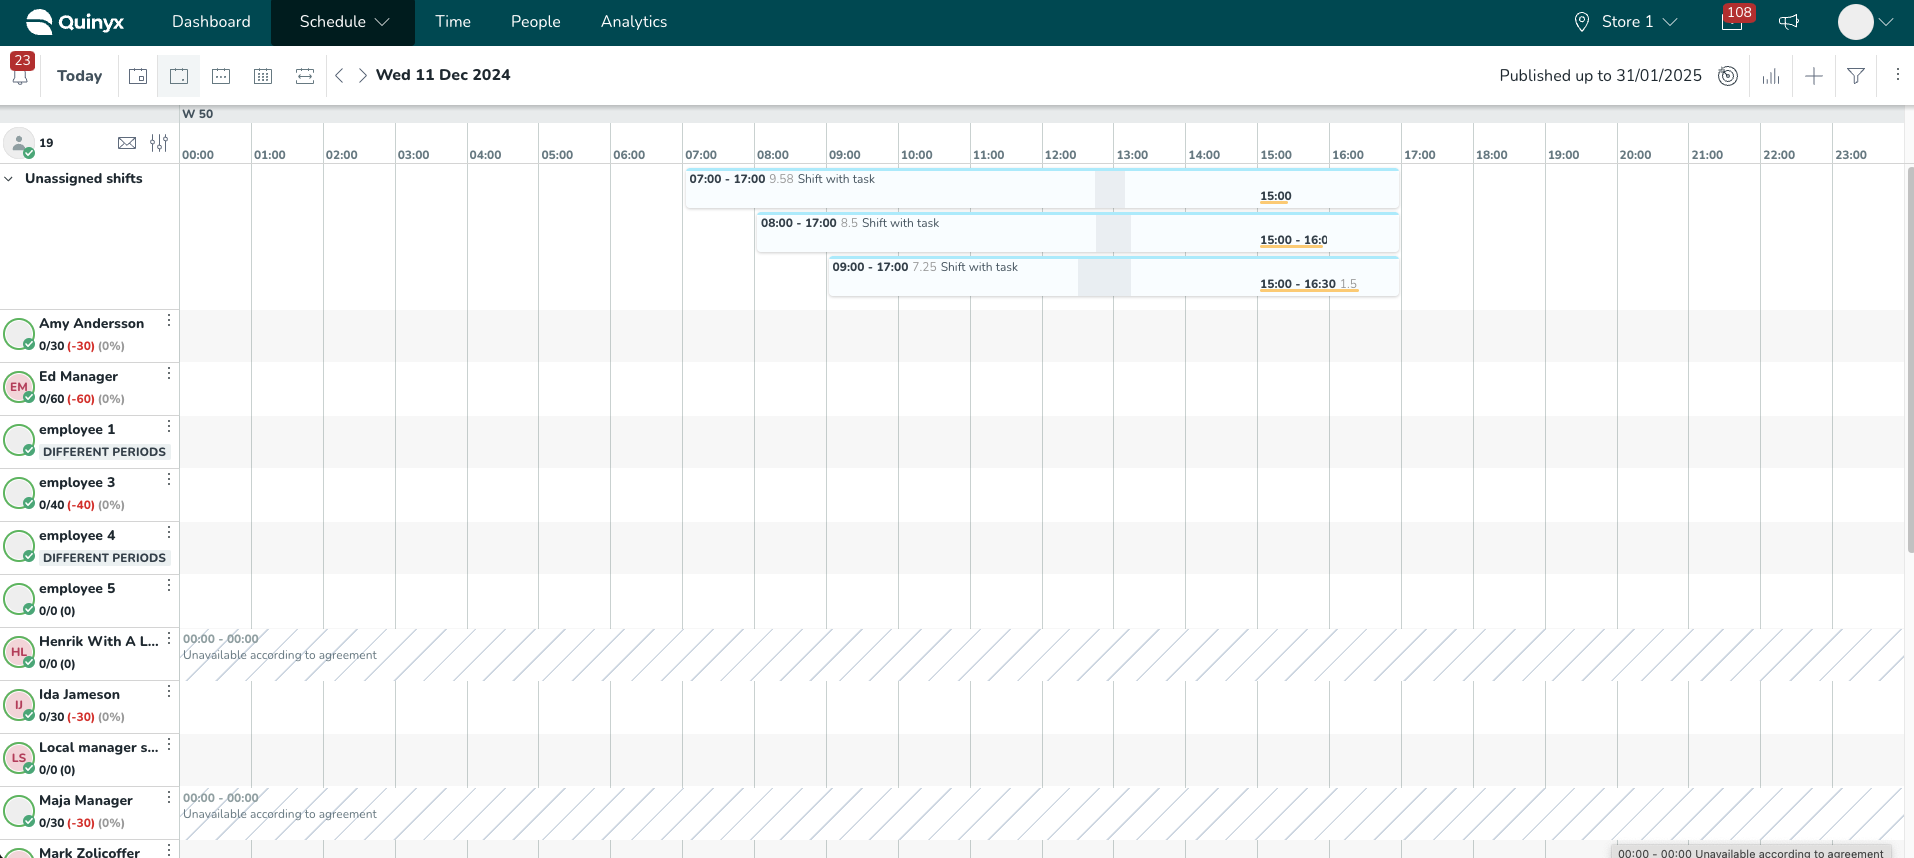
A new option in the time drop-down is called “Adjust time by earlier/later” and will allow you to extend or shorten all selected shifts by a specified number of hours and/or minutes.
When this option is selected, you will be presented with new fields to change the shift's start and/or end time and to decide if you want it to start/end earlier or later by the selected amount of hours/minutes.
If this option is selected inside the time drop-down, to follow a similar logic, you can adjust breaks and tasks in a similar manner using new options called “Adjust to the new start time” or “Adjust to the new end time”. This option will adjust the time of the breaks and tasks for the same amount as selected in the time dropdown.
Example: If you have selected “End - Later - 1 hour” inside the time dropdown, this will extend the end time of selected shifts for 1 hour. Selecting “Adjust to new end time” inside breaks and tasks will result in moving breaks and tasks by 1 hour later as well.
Bulk copy shifts
You can batch copy shifts from one employee's schedule to another..
- Click the employee in the left-hand margin and select Copy shifts.
- Select the employee for whom you want to copy the shifts.
- Select the to-period for which you want to copy the shifts.
- The shifts have now been copied.
Bulk select shifts
You can multi-select shifts for different purposes, such as editing or deleting multiple shifts simultaneously. Using the hand-picking functionality, you can select more than one shift. The number of selected shifts will be displayed at the bottom of the screen. Next to the number of selected shifts, you’ll see two options:
- Edit selected shifts
- Clicking the Pen button displays a bulk edit panel.
- Clicking the Pen button displays a bulk edit panel.
- Delete selected shifts
- Clicking on the bin button, you will be asked to confirm the deletion of selected shifts.

- Clicking on the bin button, you will be asked to confirm the deletion of selected shifts.
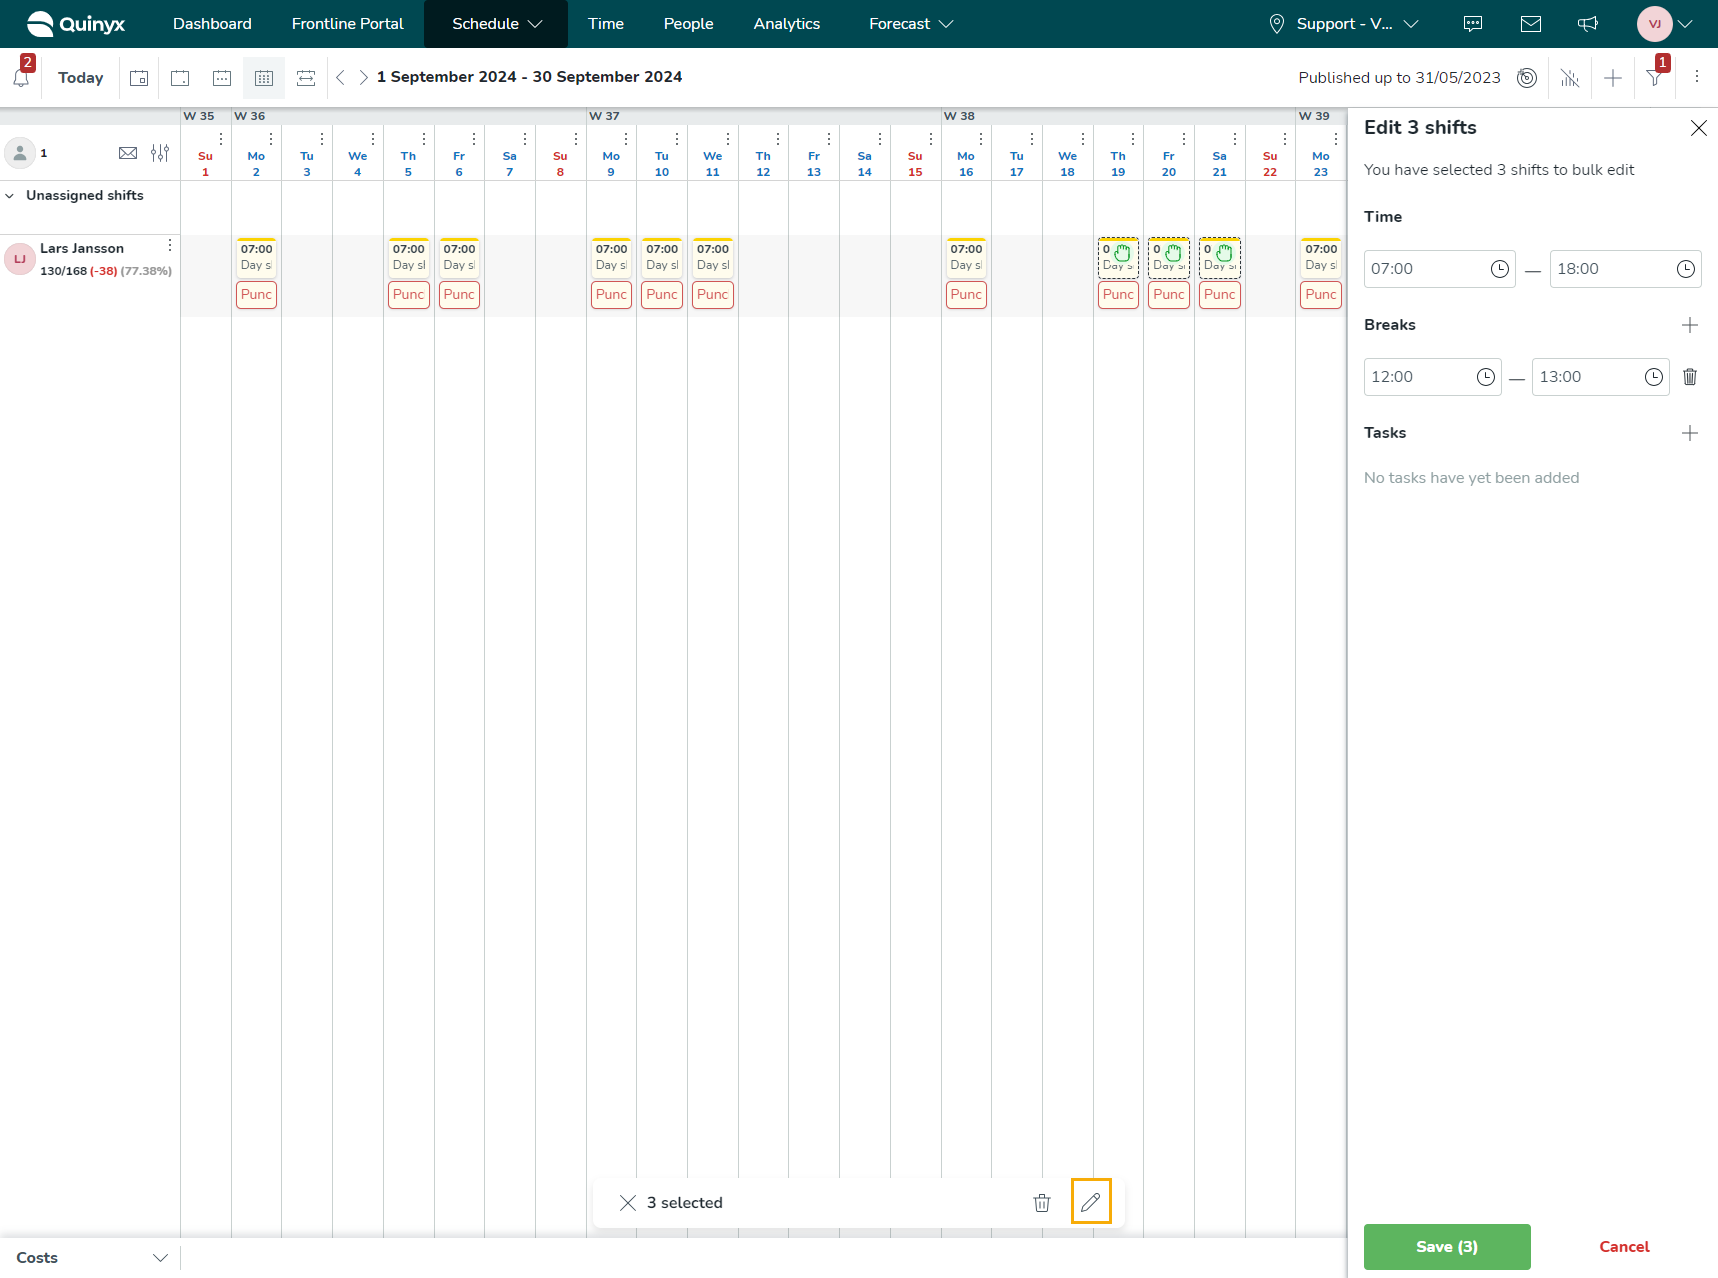
Bulk edit shifts
You can batch edit shifts for a single or multiple employees at once. You can achieve this by:
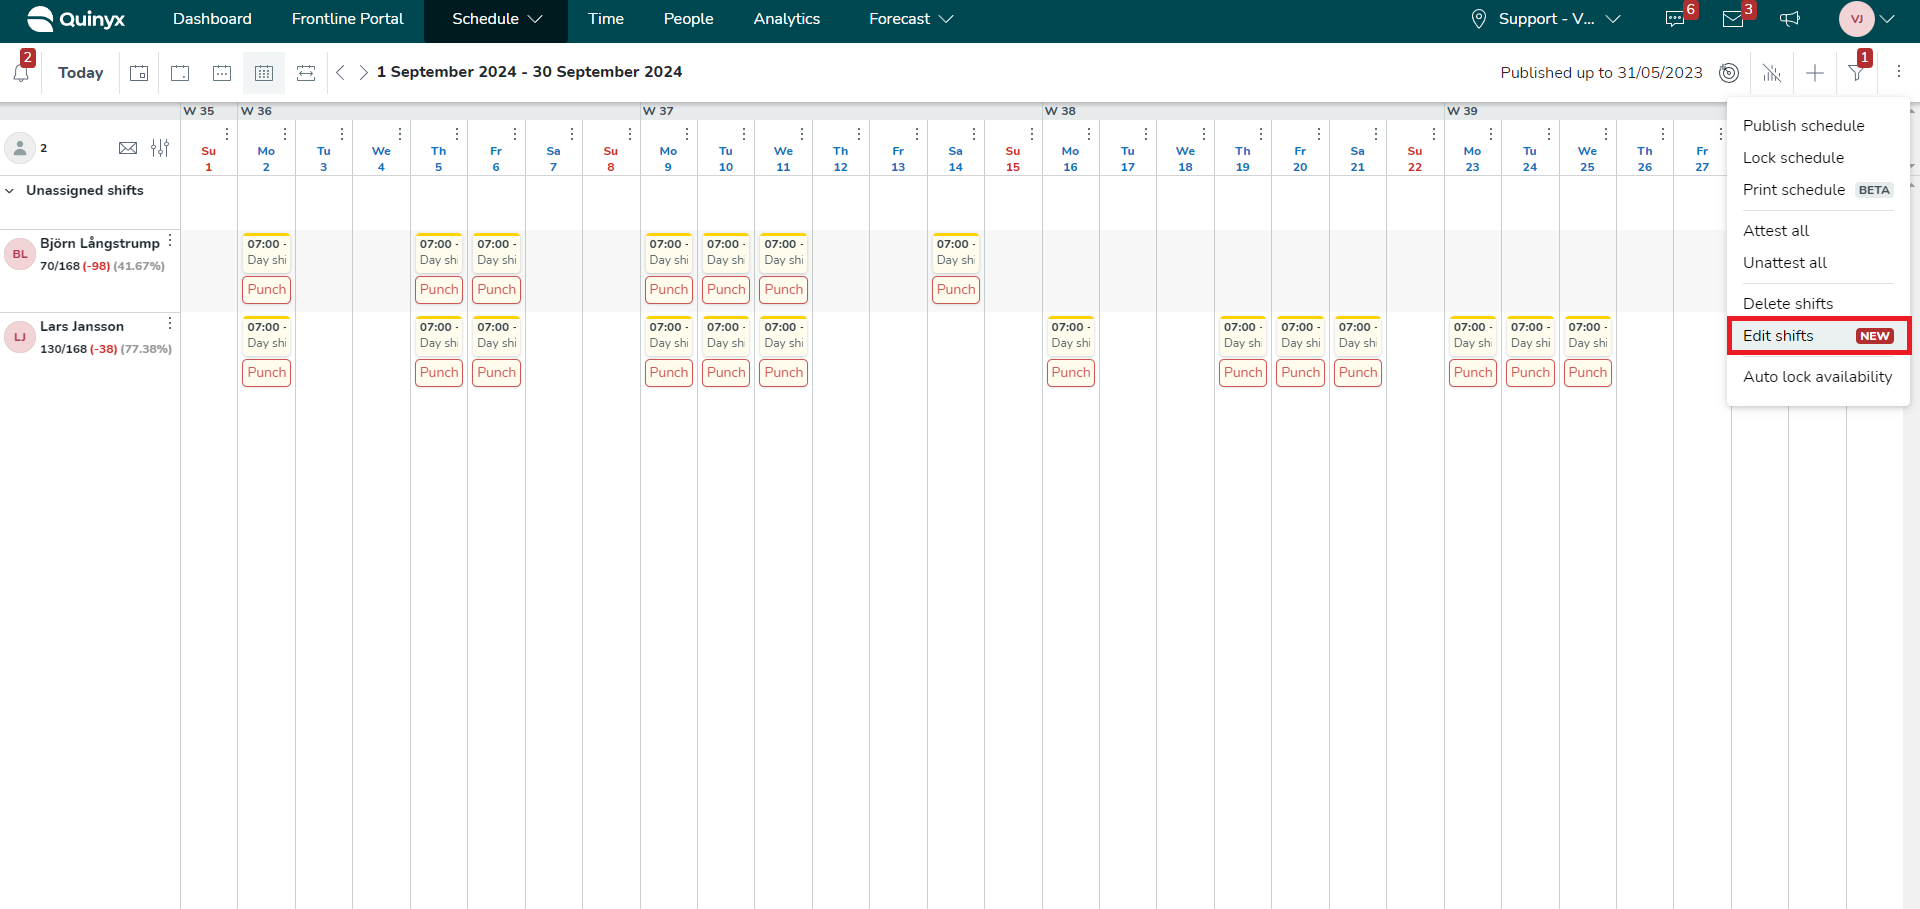
- Picking the shifts you'd like to edit.
- Select the ellipse icon.
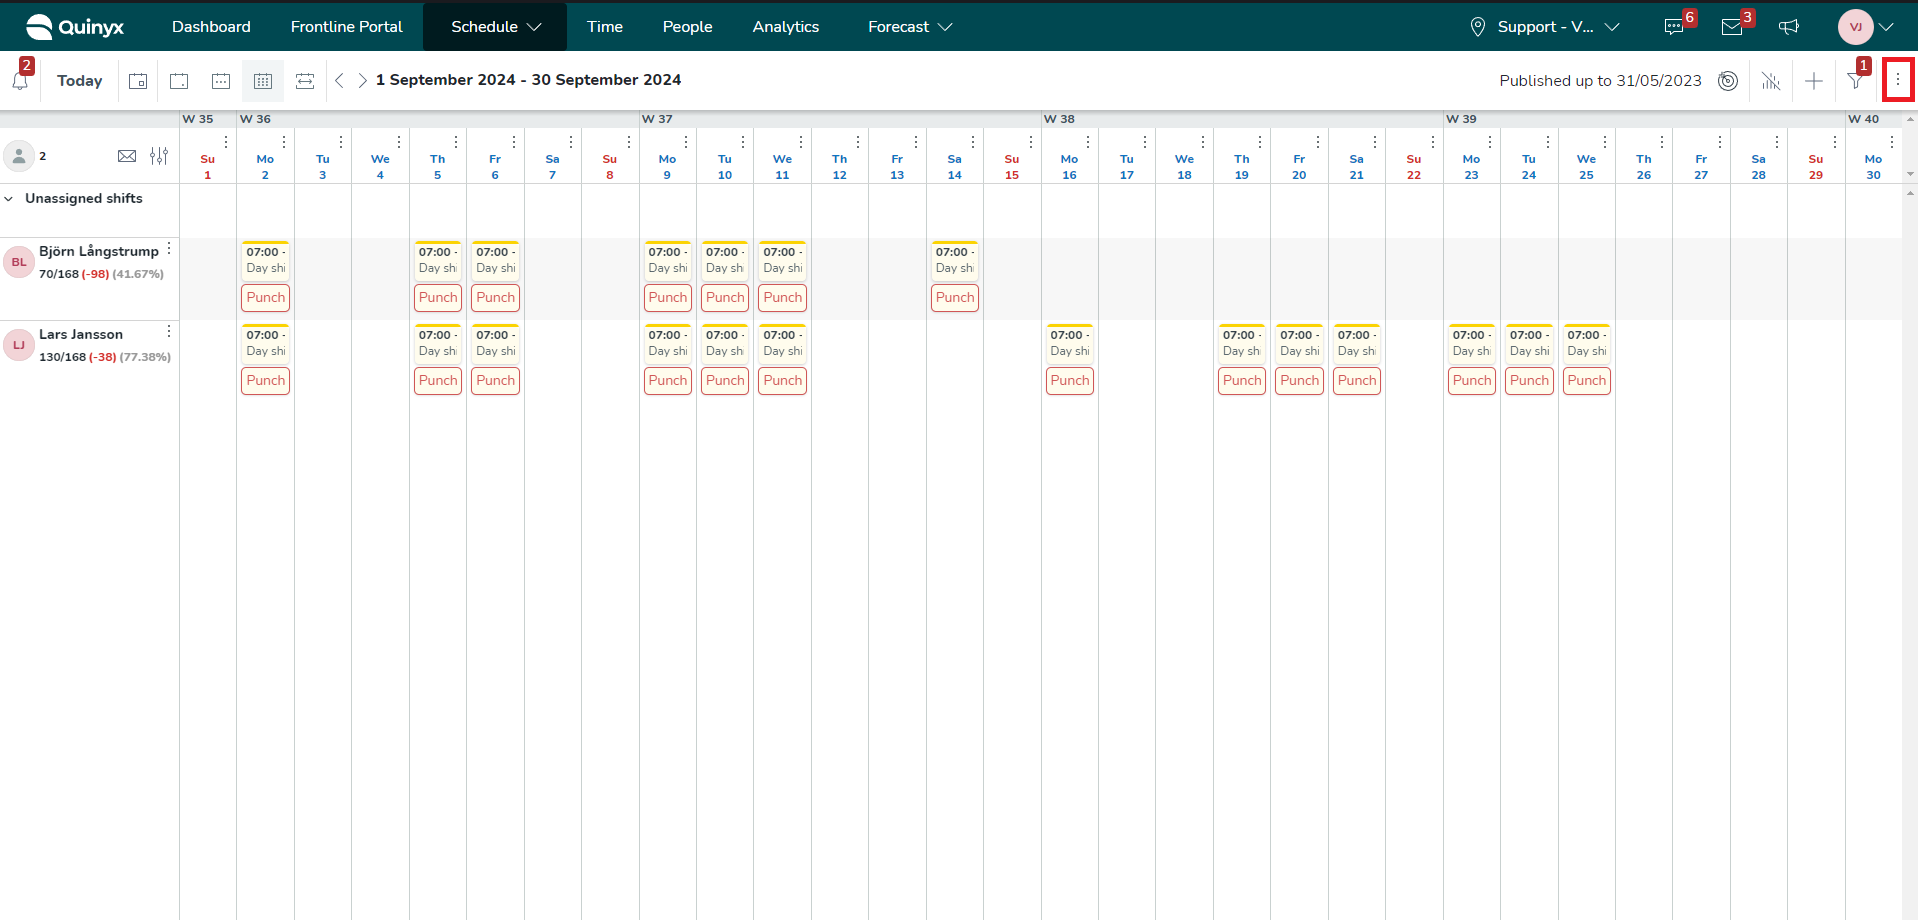
- Select the Edit shifts button.
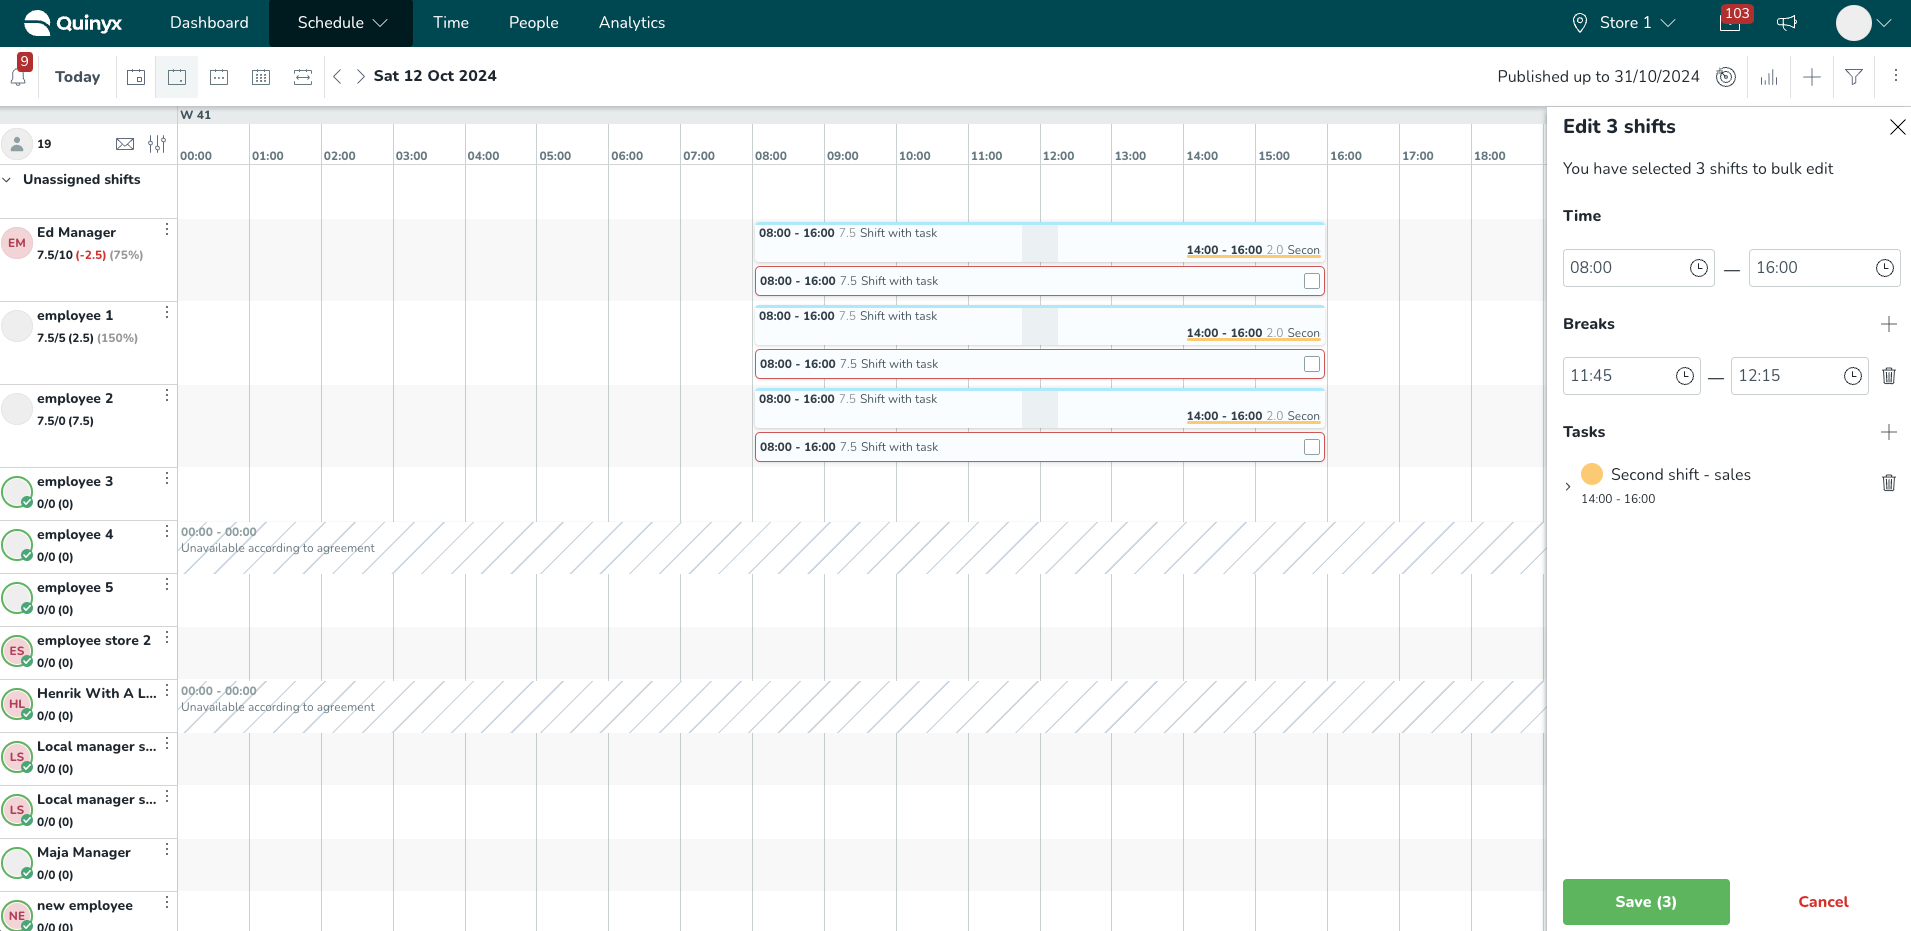
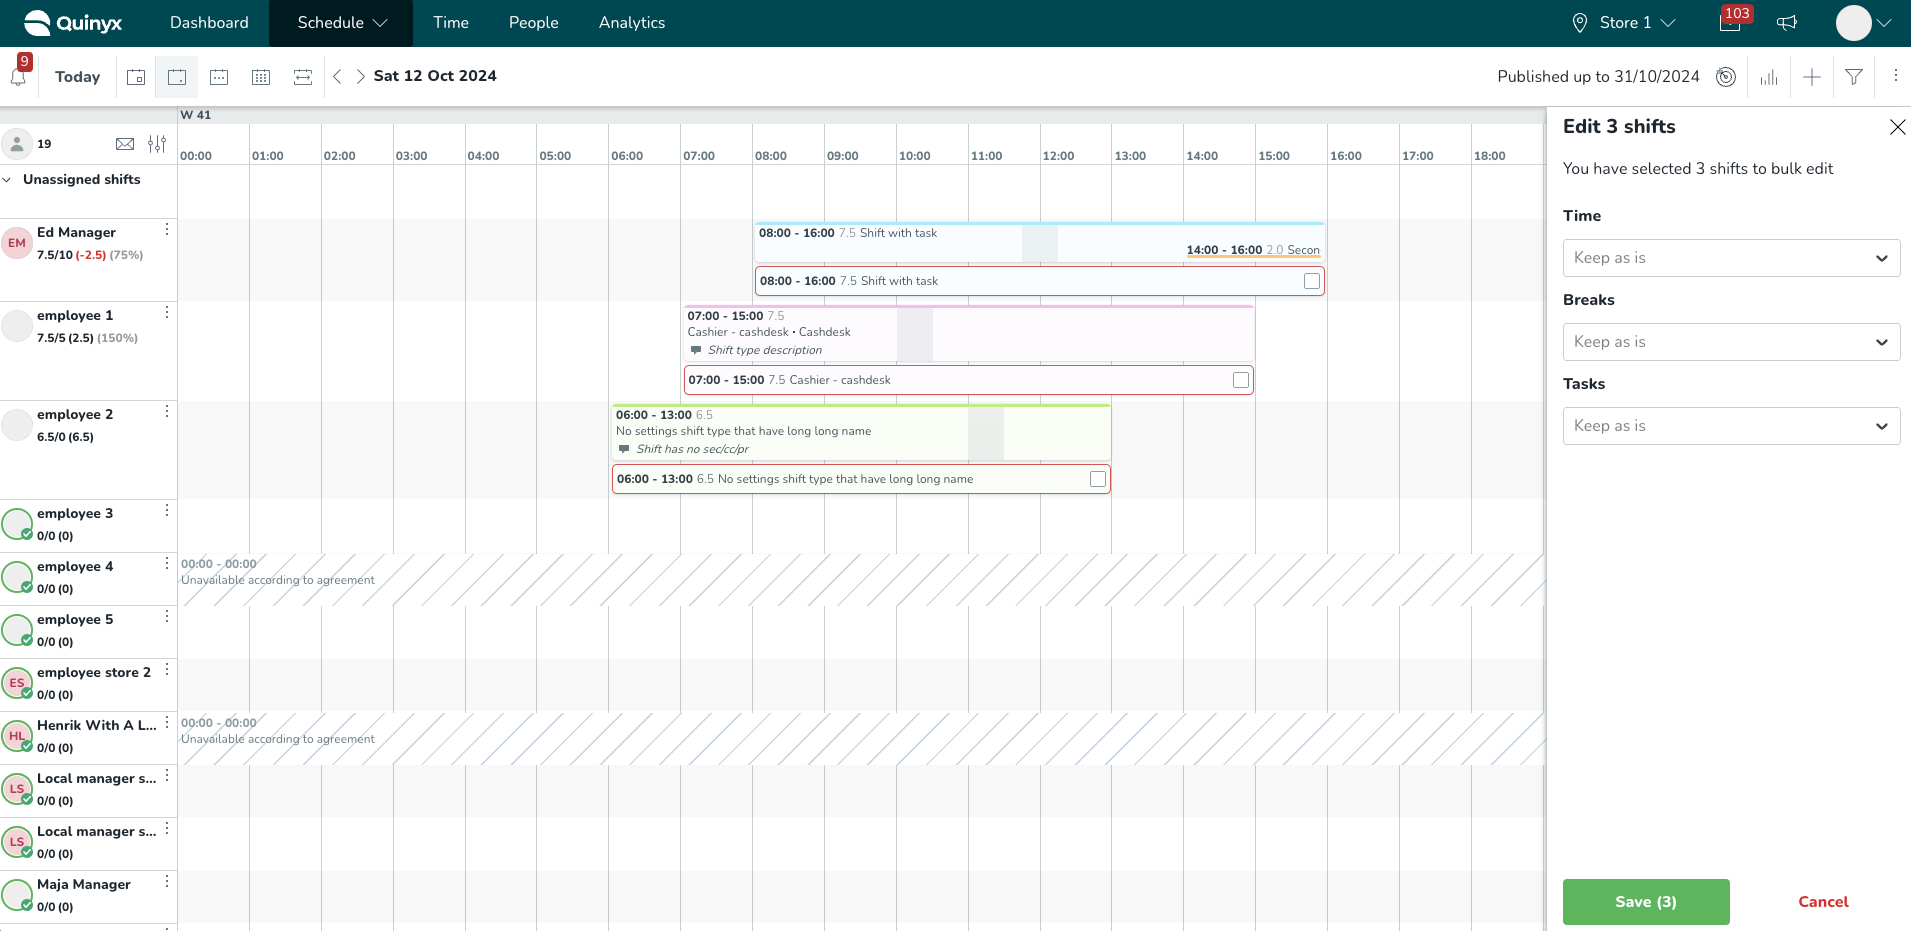
Within the edit shift panel, you will be able to edit the following:
- The title that states the number of shifts that are being edited
- Date of the shift(s)
- Shift time input fields
- Breaks time input fields
- Task time input fields
- All properties that can be connected with shift type configuration, like project, cost center, salary type rules, comment, etc
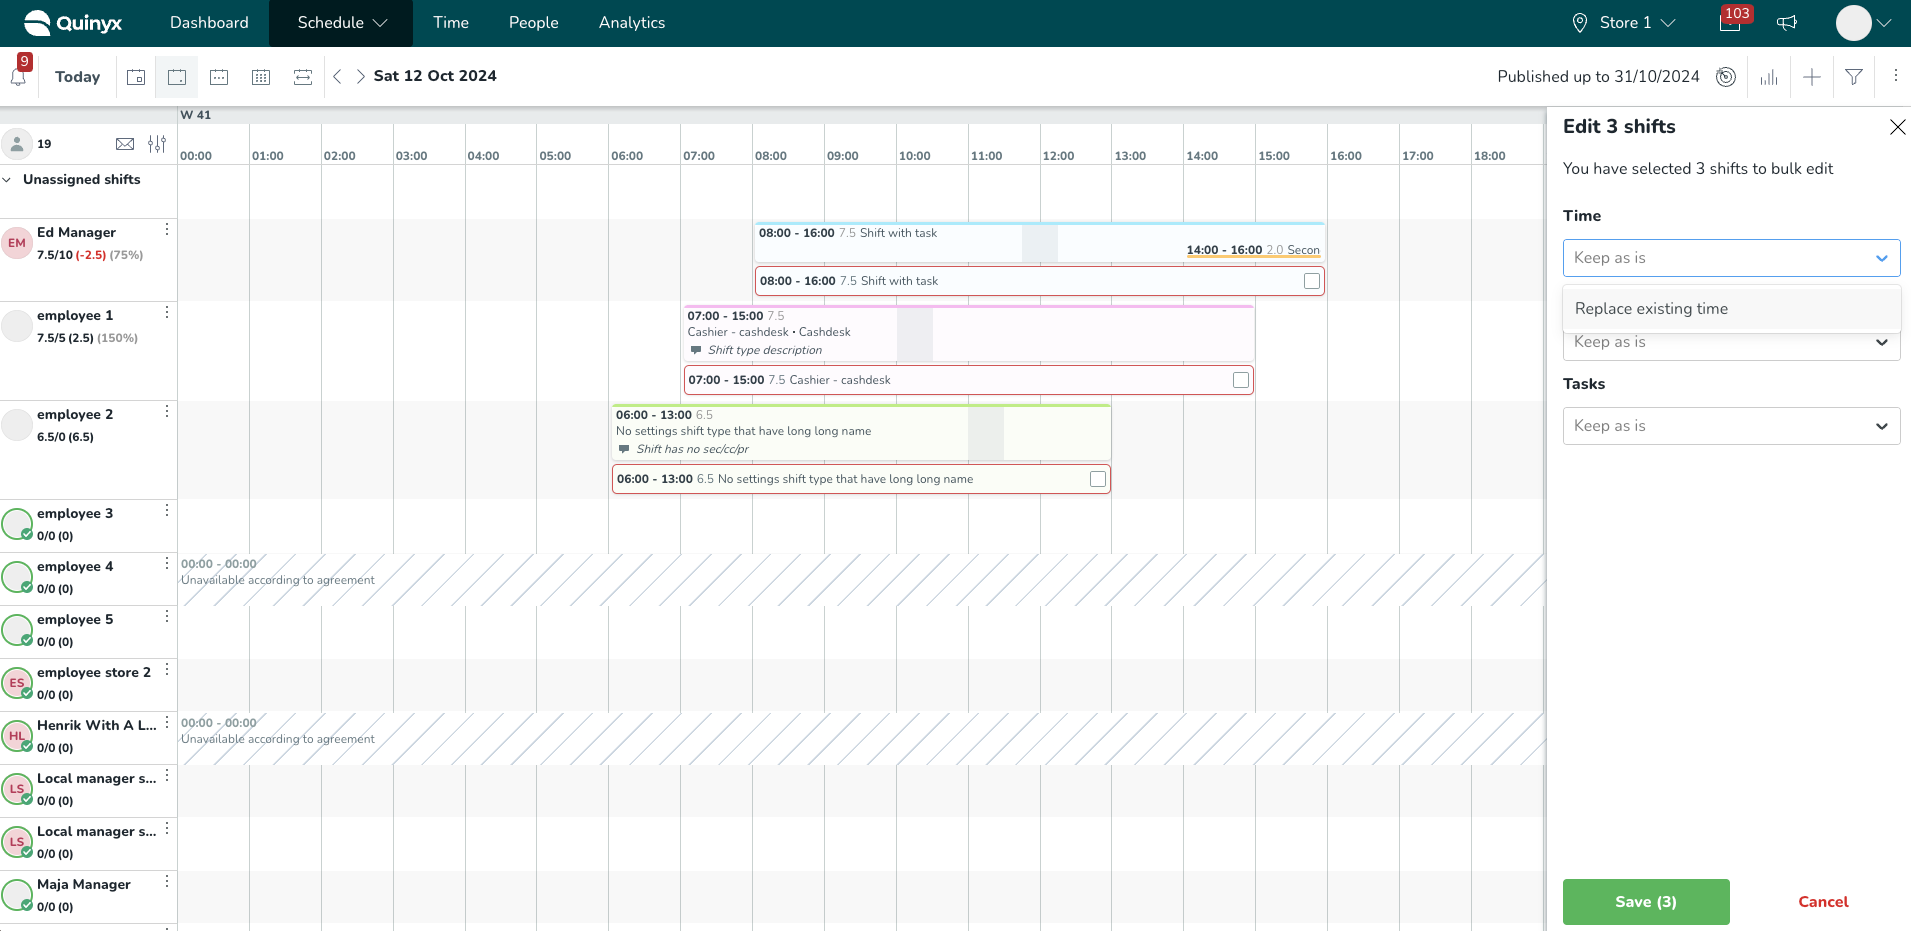
The default value of time input fields depends on the selected shifts you want to edit.
- If you have selected shifts that have identical values of times, breaks, and tasks then the panel will have those values pre-selected as default.

- If you have selected shifts with different property values, the default value in the drop-down is called Keep as is. This option means that all selected shifts have multiple different values of properties. If these values remain selected in the drop-down, clicking on the Save button will not update shifts with any new values but will keep the original values of that property.
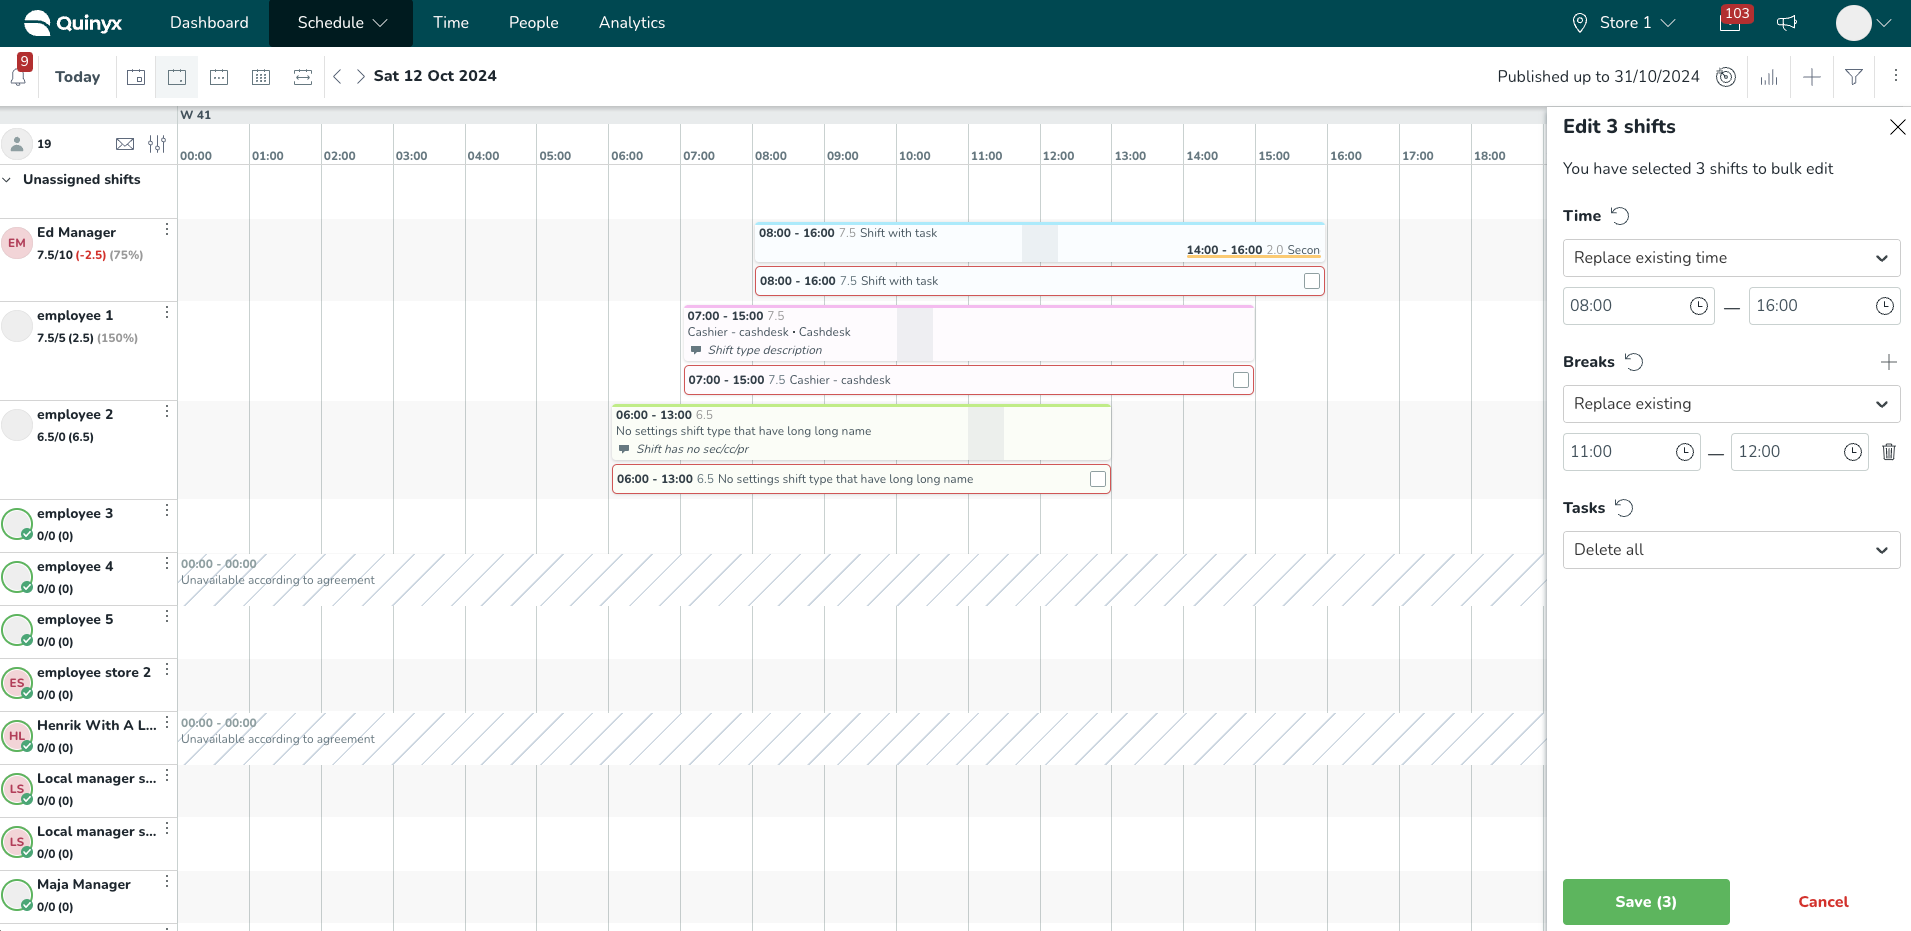
- The option Replace existing allows you to specify new shift times, breaks, or tasks. Clicking the Save button will apply new values to all selected shifts. Once this option is selected, you will also be presented with an Undo button that allows you to reset the value to the default one, Keep as is.
- Additionally, drop-downs for breaks and tasks will have one more option called Delete all. Selecting this option and clicking on the Save button will delete all breaks and/or tasks in the selected shifts.
- The option Replace existing allows you to specify new shift times, breaks, or tasks. Clicking the Save button will apply new values to all selected shifts. Once this option is selected, you will also be presented with an Undo button that allows you to reset the value to the default one, Keep as is.
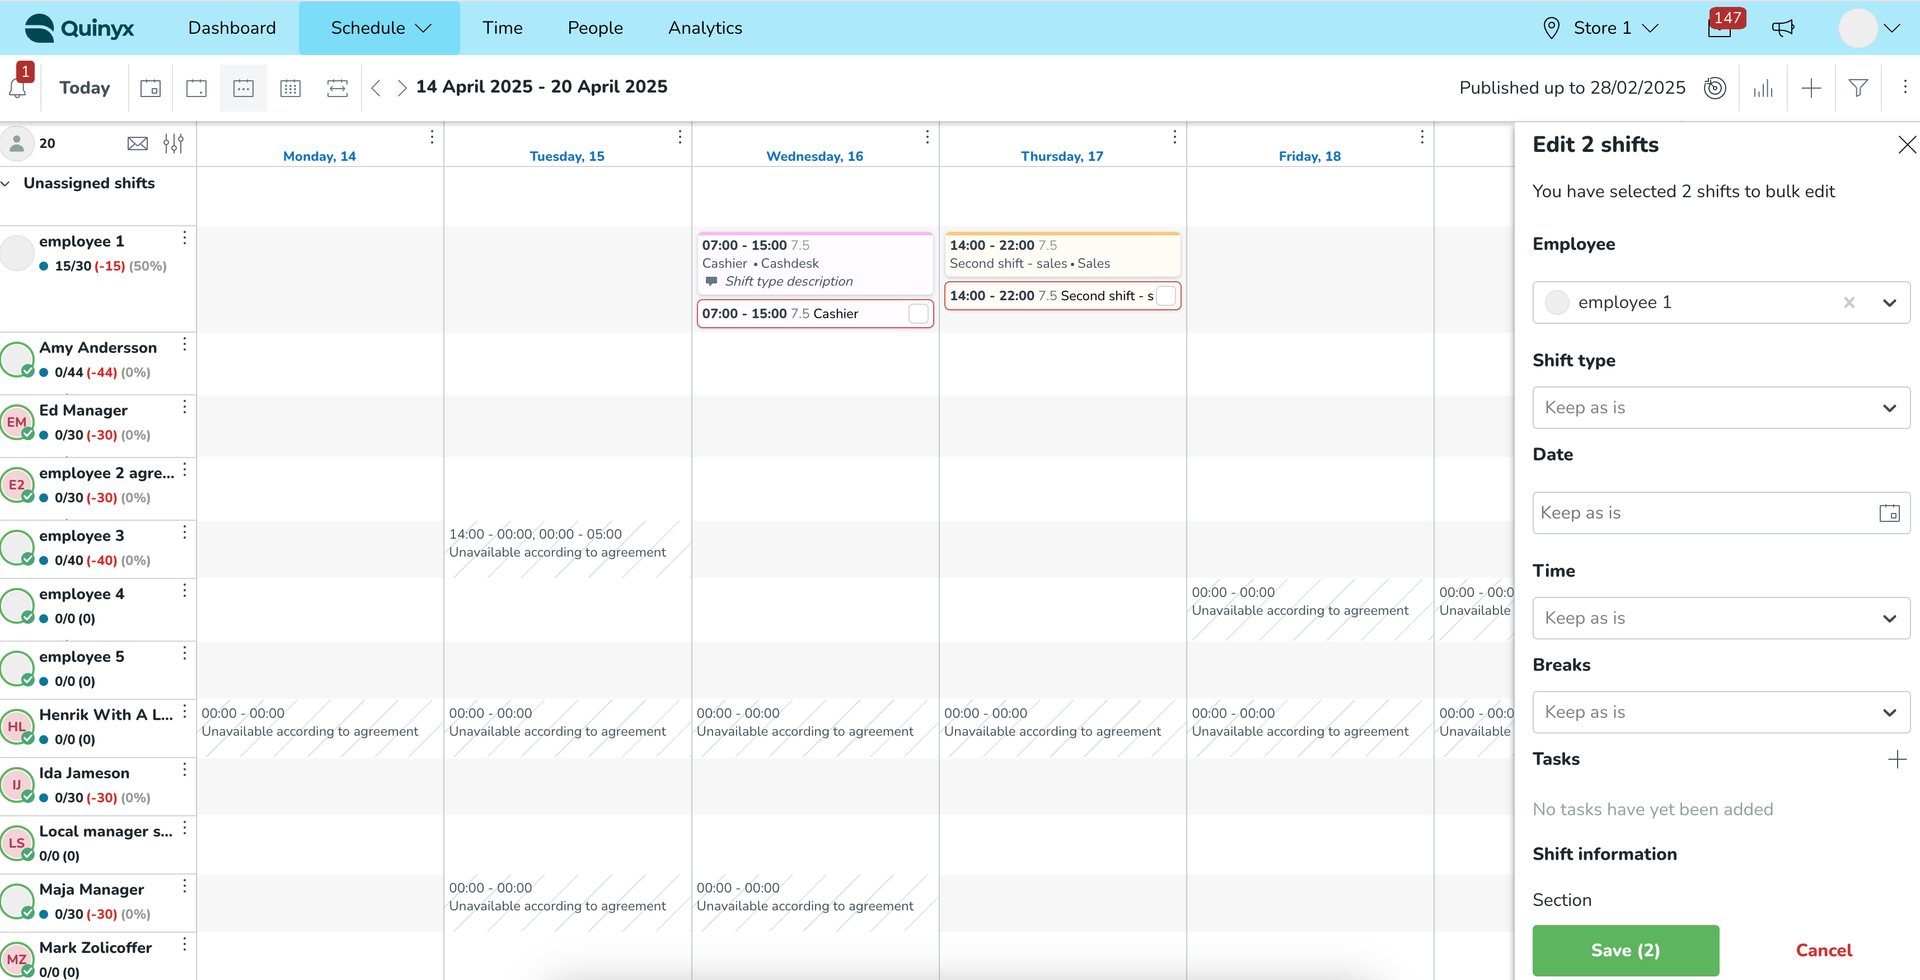
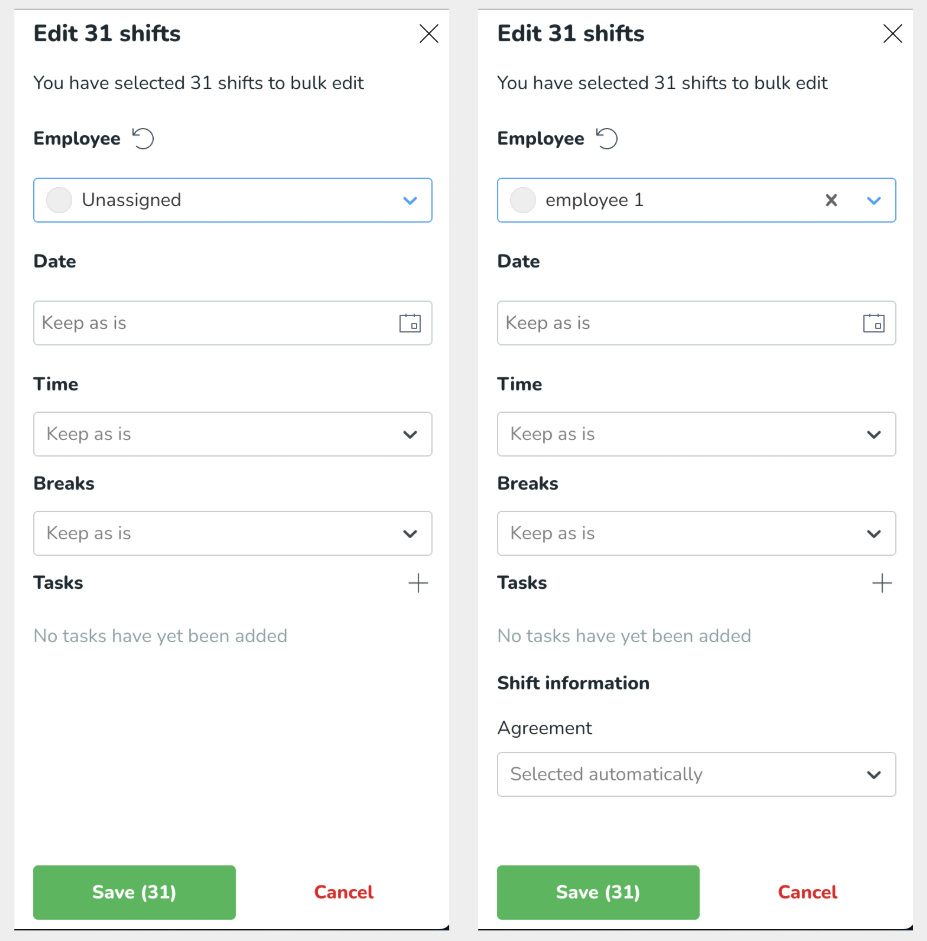
Edit employees on multiple shifts
Selecting all shifts in the schedule or picking up a few of them, you can now quickly change employee value and reassign those shifts to another employee. Also, this improvement will allow you to remove any employee value on selected shifts and quickly make them unassigned.
How does this logic work?
- If you have selected shifts that are assigned to one employee (identical value) → this employee will be the default selection inside the drop-down. To change this selection:
- You can click on 'x' button to remove the employee value and to get to the “unassigned” value.
- You can, in the drop-down, select any other employee.
- What happens with agreement value in this case?
- The agreement field will be shown with the default value “Select automatically”, meaning that Quinyx will select a valid agreement based on the date when shifts are taking place.
- You can still manually select any other valid agreement from the list if you want one specific agreement to apply to all shifts.
- If, in the same panel, the date of selected shifts is updated, the list of agreements will be updated to represent valid agreements on that date.
- If an agreement is selected manually but it’s not valid on another date where the shift is updated, Quinyx will manually select another valid agreement.
- If you have selected shifts that are unassigned (identical value) → “Unassigned” will be the default selection inside the drop-down. To change this selection:
- You can select any employee from the list and assign all shifts to that employee.
- What happens with agreement value in this case?
- For this case, the agreement field will not be shown since we don’t show agreements for unassigned shifts.
- If you have selected shifts assigned to multiple employees → “Keep as is” will be the default selection inside the drop-down. To change this selection:
- You can click on 'x' button to remove the employee value and get to the “unassigned” value.
- You can, in the drop-down, select any other employee.
- What happens with the agreement value in this case?
- For this case, the agreement field will not be shown as there are multiple agreements connected to multiple employees, so Quinyx will keep agreements already connected to selected shifts.
- For this case, the agreement field will not be shown as there are multiple agreements connected to multiple employees, so Quinyx will keep agreements already connected to selected shifts.
Bulk move shifts
You can bulk move shifts from one employee to another.
- Click the employee in the left-hand margin and select Move shifts.
- Select the employee to whom you want to move the shifts.

You'll receive warnings if there are any issues with the shifts you're moving. The warnings will appear in a warning panel for all shifts with a warning which will give you a better overview of affected shifts.
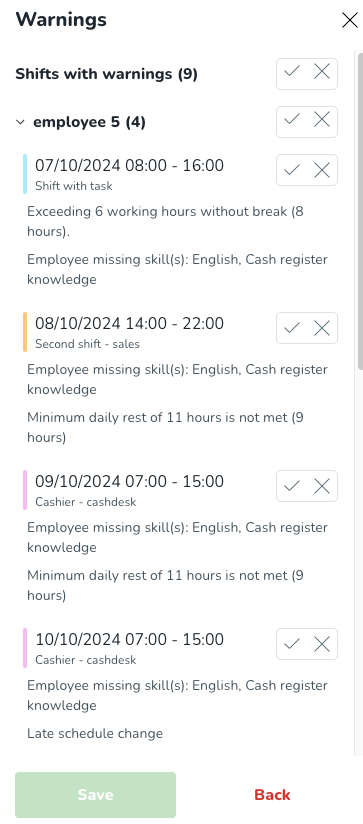
You can either select the check mark on the shift to accept the warnings and proceed with the change or select the cross icon to reject the warning and cancel the change. Once all the warnings have been handled, select the Save button to proceed.
Bulk delete shifts from employee row
You can delete an entire employee row in Schedule.
- Click the employee in the left-hand margin and select Delete shifts.
- Tick the Include punches if you want to delete all punches associated with the shifts.
- Click Delete.
When deleting multiple shifts, you’ll see a detailed pop-up that lists any schedule compliance violations. If the violations are warnings only, you can choose to proceed and delete the shifts anyway—giving you more transparency and control during shift management.
Bulk delete shifts using filtering options
It's possible to delete all currently visible shifts, which means that any filter selections you've made are taken into account. This means you can, for instance, delete all shifts for a given employee, unit, etc. from a schedule. You can do this in a couple of different ways.
Example 1
- Start by navigating to the time frame of your choice and apply any filter. In this case, we've selected a certain employee.
- Next, click the ellipsis beside the employee's name followed by Delete shifts as shown below. A pop-up will appear, displaying the number of shifts to be deleted and giving you the option of also deleting any corresponding punches.
- Click Delete, and the shifts for that employee will be deleted.
Example 2
- Start by navigating to the time frame of your choice and apply any filter. In this case, we've selected a certain shift type.
- Next, click the ellipsis in the upper right corner followed by Delete shifts as shown below.
- Click Delete, and the shift type for the shown period will be deleted.
Deleting historical shifts
Sometimes we're asked if its possible to automatically delete historical shifts of employees after a certain period of time. Two things apply in this case:
- There currently isn't any function in the manager portal that allows for the automatic deletion of historical shifts. However, it can be done with an external flow using the APIs and delete shifts. Note that this is generally not advised because for legal reasons almost all customers will want to be able to go back.
- If you end employment for an employee who has a shift, those shifts will automatically be unassigned after an end date if you don't perform the necessary steps to reassign or delete the shifts.
Quicker bulk editing of the Schedule - edit employees on multiple shifts
With this release, we are adding the “Employee” field inside the bulk edit shifts panel so that the employee value can be updated on multiple shifts. Selecting all shifts in the view or picking up a few of them, you can now quickly change employee value and reassign those shifts to another employee. Also, this improvement will allow you to remove any employee value on selected shifts and quickly make them unassigned.
How does this logic work?- If you have selected shifts that are assigned to one employee (identical value) → this employee will be the default selection inside the drop-down. To change this selection:
- You can click on 'x' button to remove the employee value and to get to the “unassigned” value.
- You can, in the drop-down, select any other employee.
- What happens with agreement value in this case?
- The agreement field will be shown with the default value “Select automatically”, meaning that Quinyx will select a valid agreement based on the date when shifts are taking place.
- You can still manually select any other valid agreement from the list if you want one specific agreement to apply to all shifts.
- If, in the same panel, the date of selected shifts is updated, the list of agreements will be updated to represent valid agreements on that date.
- If an agreement is selected manually but it’s not valid on another date where the shift is updated, Quinyx will manually select another valid agreement.
- If you have selected shifts that are unassigned (identical value) → “Unassigned” will be the default selection inside the drop-down. To change this selection:
- You can select any employee from the list and assign all shifts to that employee.
- What happens with agreement value in this case?
- For this case, the agreement field will not be shown since we don’t show agreements for unassigned shifts.
- If you have selected shifts assigned to multiple employees → “Keep as is” will be the default selection inside the drop-down. To change this selection:
- You can click on 'x' button to remove the employee value and get to the “unassigned” value.
- You can, in the drop-down, select any other employee.
- What happens with the agreement value in this case?
- For this case, the agreement field will not be shown as there are multiple agreements connected to multiple employees, so Quinyx will keep agreements already connected to selected shifts.
- For this case, the agreement field will not be shown as there are multiple agreements connected to multiple employees, so Quinyx will keep agreements already connected to selected shifts.
The list of employees in the drop-down provides the same information as the list for single-shift editing.Updating employees on shifts can trigger an update of the cost center, the same as how it works today for copy/move shifts functionality, but for now, that will not be visualized in the bulk edit panel until the bulk update of the shift type is released in the coming releases.- If you have selected shifts that are assigned to one employee (identical value) → this employee will be the default selection inside the drop-down. To change this selection: