Time card
 Updated
by
Daniel Sjögren
Updated
by
Daniel Sjögren
The purpose of the Time card is to answer the question "what has happened on this day for employee X, and what was the outcome".
View an employee's Time card
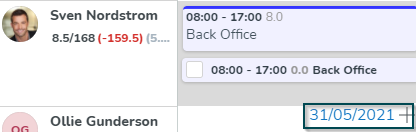
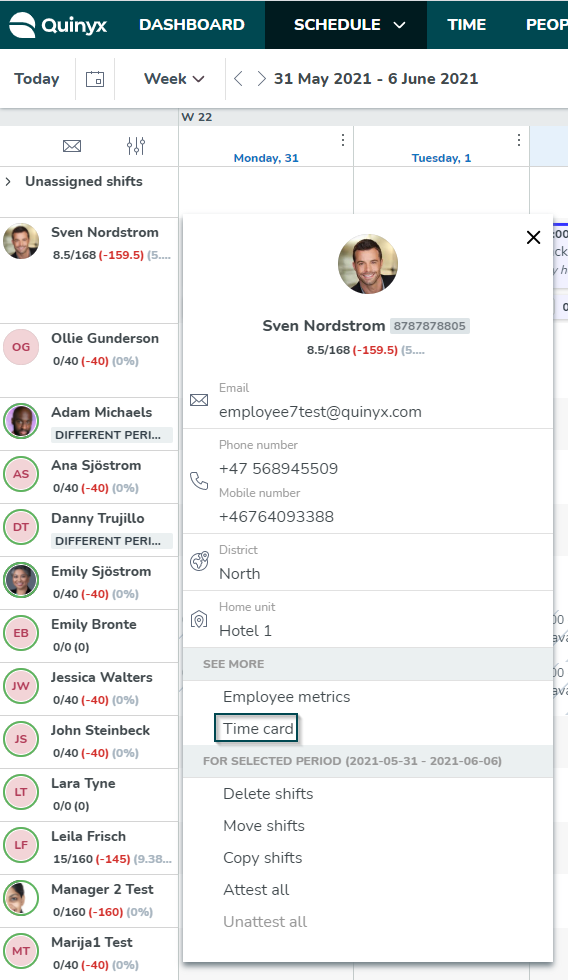
You can enter the Time card in the schedule view in three places:
- Hover over a cell (employee and day) and click on the date that appear:
or
- Click on the "three dots" beside the employee's name and select Time card:
or
- You can access the time card from Time by clicking on a payroll item in the employee view or in the unit view.

Access control to Time is controlled by the permission Transfer to payroll, where the user needs at least read access to be able to see data in the time tab and reach the time card through Time. The access control for data in the time card is controlled by the permissions under Scheduling.
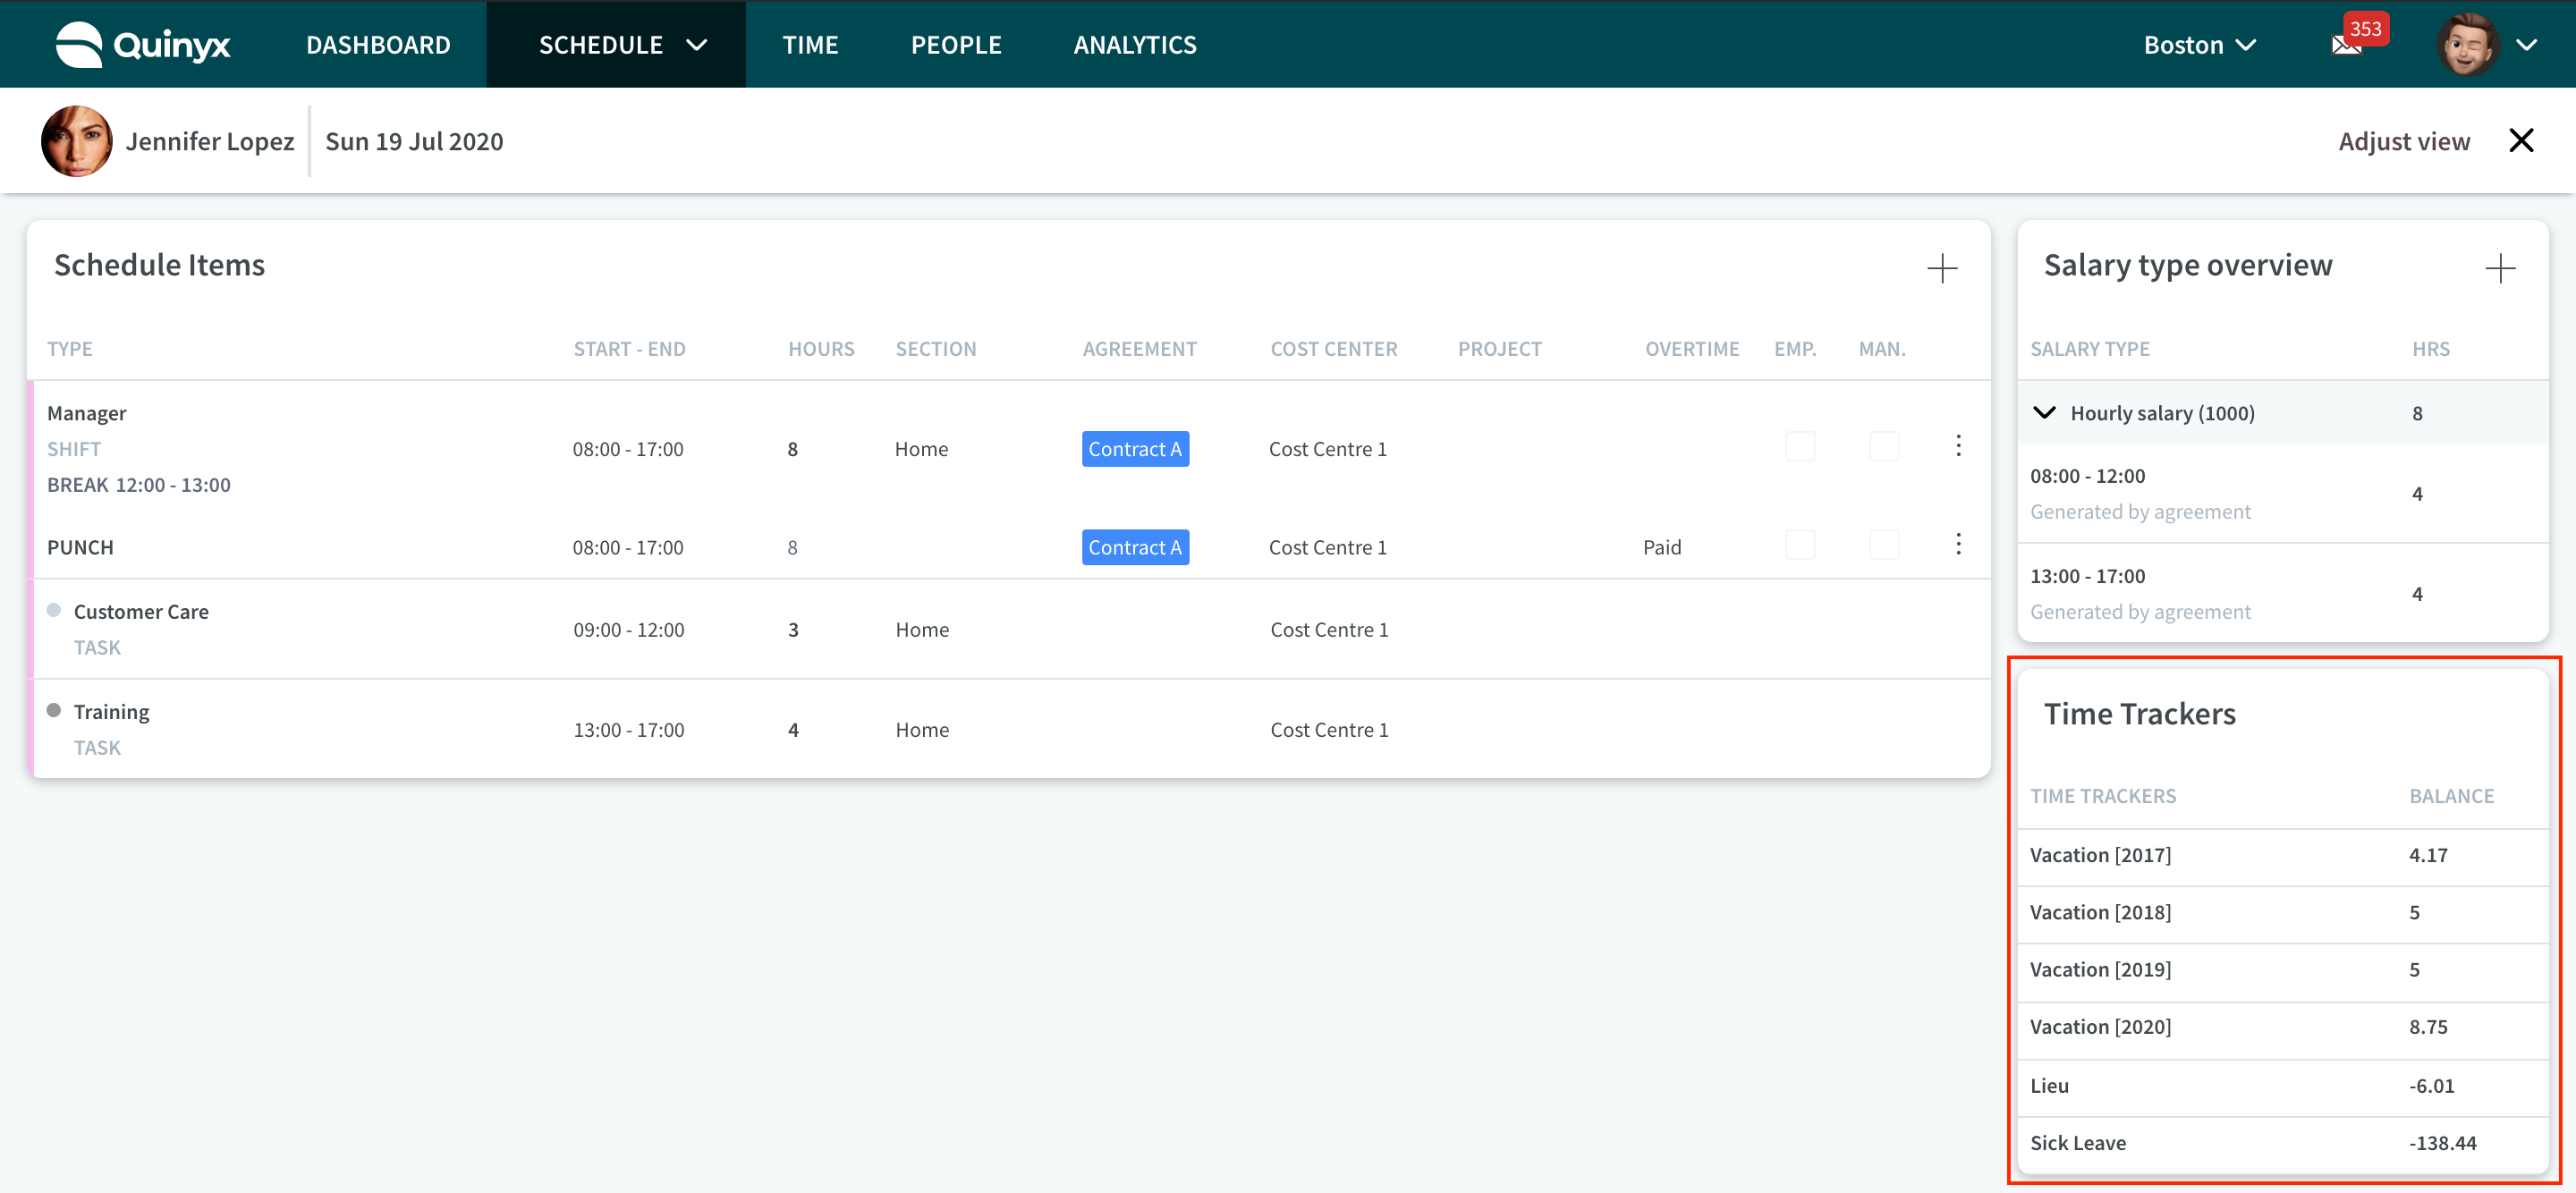
The Time card consists of up to five tables that you can decide to turn on or off. Here is a brief explanation of the tables. Please see more detailed information further down in this article.
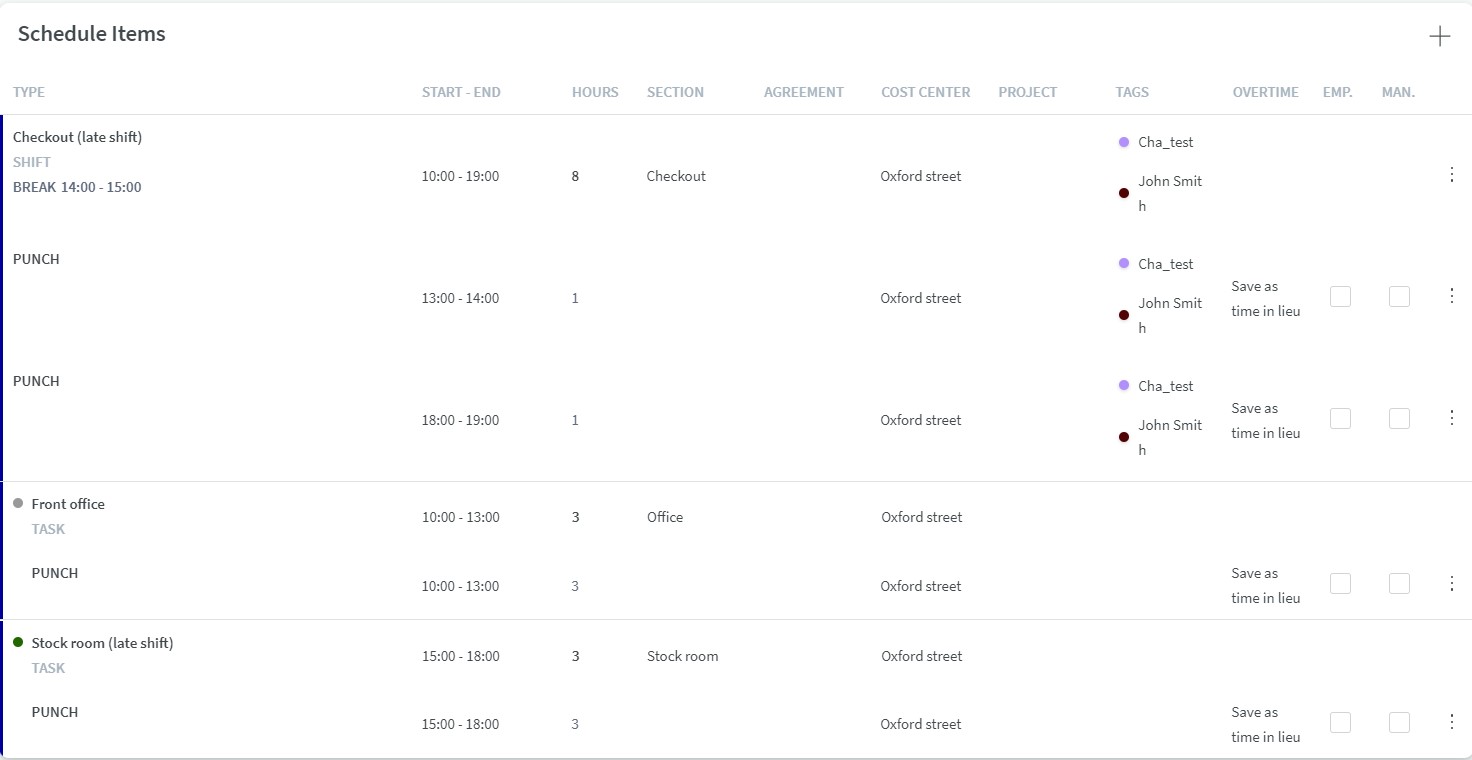
- Schedule items: In this table, you can see: shifts, tasks, punches, tasks, leave requests, and absences. You can also attest time. If you click on a row, a detail panel will open and from there you can make changes on the schedule item.
- Summary: The difference between total scheduled hours and total worked hours and the difference between total scheduled breaks and total punched breaks.
- Salary type overview: The salary outcome for the day.
- Time Tracker balance: The balance of Time Trackers.
- Time Tracker transactions: Search for Time Tracker transaction.
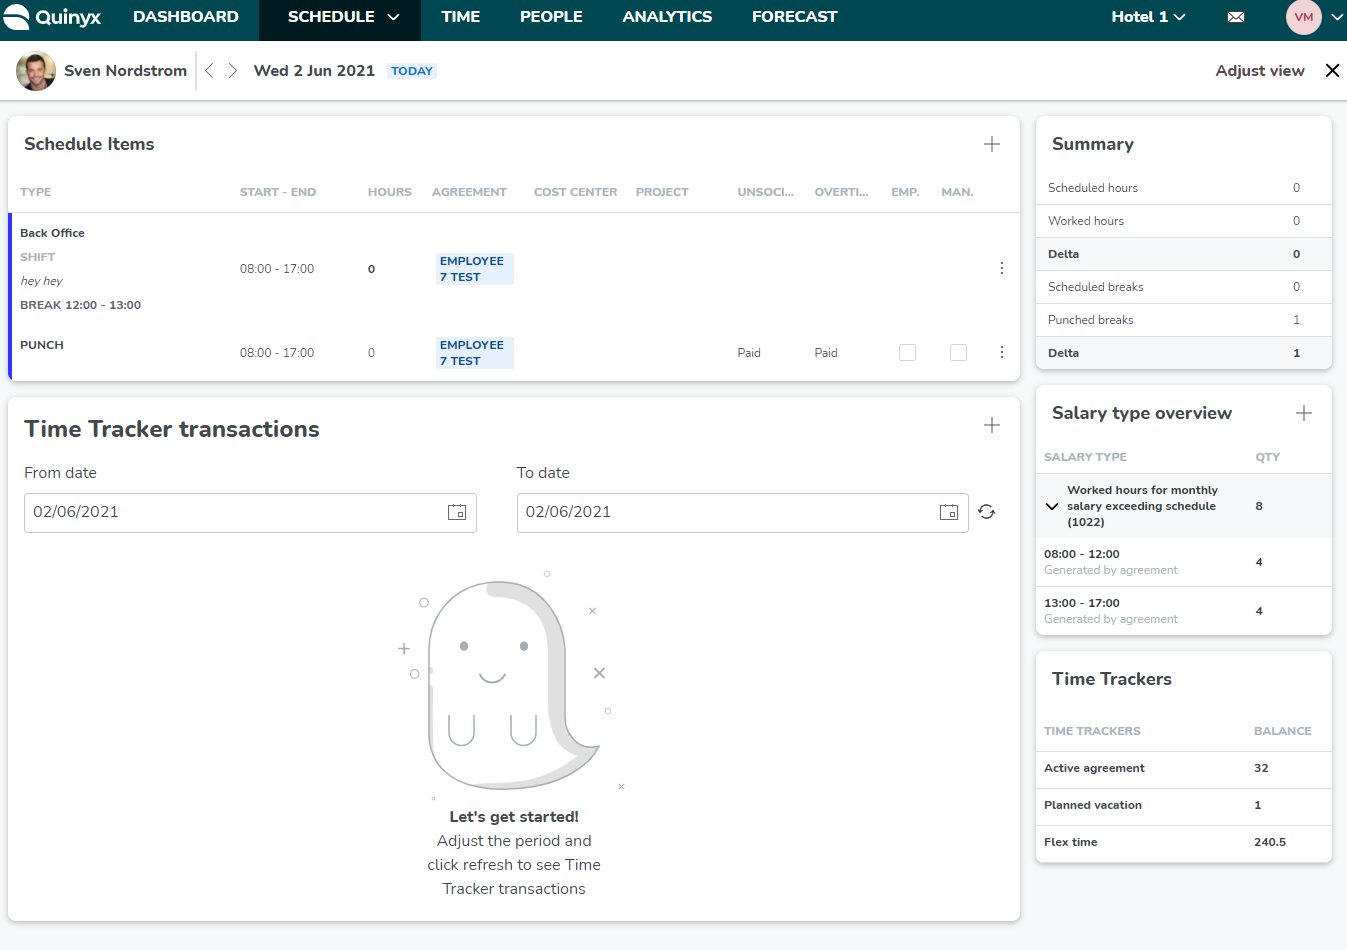
Schedule items
In this table, you're able to see details about shifts, tasks, punches, leave requests, and absences for one employee per day.
Shifts and tasks
Shifts are indicated in the Time card as a vertical stripe with the color from the shift type. Tasks are indicated below the shift with a small circle with the color from the shift type.
The following detailed information can be found for shifts:
- Name of the shift type
- Comment (o)
- Start and end time of break(s) (o)
- Start and end date and time of the shift (date is only displayed in cases where the start and end is not on the same day/daybreak)
- Sum of scheduled hours (including or excluding breaks depending on setting)
- Section (of the shift) (o)
- Agreement (o)
- Cost center (o)
- Project (o)
- Tags (o)
The following detailed information can be found on tasks:
- Name of the shift type
- Start and end time of the task
- Section (of the task) (o)
- Cost center (o)
- Project (o)
- Tag (o)
If there are more than one task, they are sorted after start time below the "mother" shift.
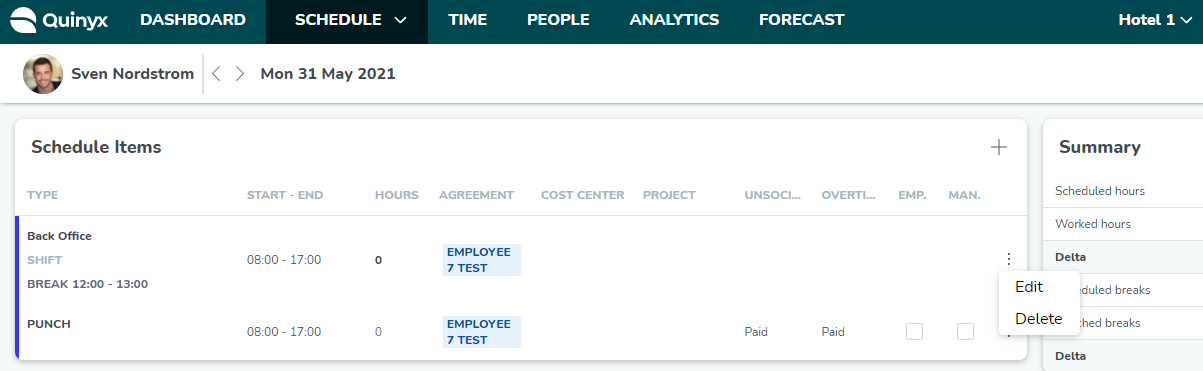
Edit a shift
If you want to edit a shift, click on the shift type name, or click Edit after clicking the "three dots" on the right-hand side of the shift. When you do, a panel opens. If you want to know more, please read here.
Add a shift
If you want to add a shift, click on the plus icon on the upper right corner of the Time card, and select Shift. A panel will open where you can add the details about the shift.
Delete a shift
If you want to delete a shift, click on the "three dots" on the right hand side of the shift and select Delete.
Virtual shifts
Virtual shifts are generated from bank holiday rules or overtime configuration. The outcome is generated on the actual day the rule exists on as a “virtual shift”. This shift is not visible as a scheduled shift by the employee or manager and also does not:
- Count as scheduled hours
- Count as worked hours
- Count as a shift
With this functionality, the estimated salary cost will be even more accurate for individual days surrounding the bank holiday or overtime configuration containing a rule for time off. It will also make it very visible where the outcome from a rule is generated.
A few things to take into consideration:
- A single virtual transaction cannot be reversed, but it will be reversed when reversing other transactions for employee or unit.
- A virtual shift cannot be attested or unattested, they are always in the attest state.
- It is only viewed in the actual Time Card view in Quinyx WFM
- If a shift or punch is added to a day, the virtual shift will be removed.
- Since there is no shift in this day, the cost center will be inherited from employee card or employee section or employee unit.
Punches
If the punch is linked to a shift, it will appear below that shift on the Time Card, matching the shift’s type color.
The following detailed information can be found for punches:
- Comment*
- Start and end time of breaks*
- Start and end time (date is only displayed in cases where the start and end is not on the same day/daybreak)
- Sum of punched hours (including or excluding breaks depending on the setting)
- Section (of the punch)*
- Agreement*
- Cost center*
- Project*
- Tags*
- Unsocial time
- Note that it's possible to manually override the UT by clicking on edit and punch and selecting either “Paid” or ”Save as time in lieu”. The default option is fetched from the agreement template.
- Overtime
- Employee attest
- Manager attest
Anytime you
Punch w/o shift
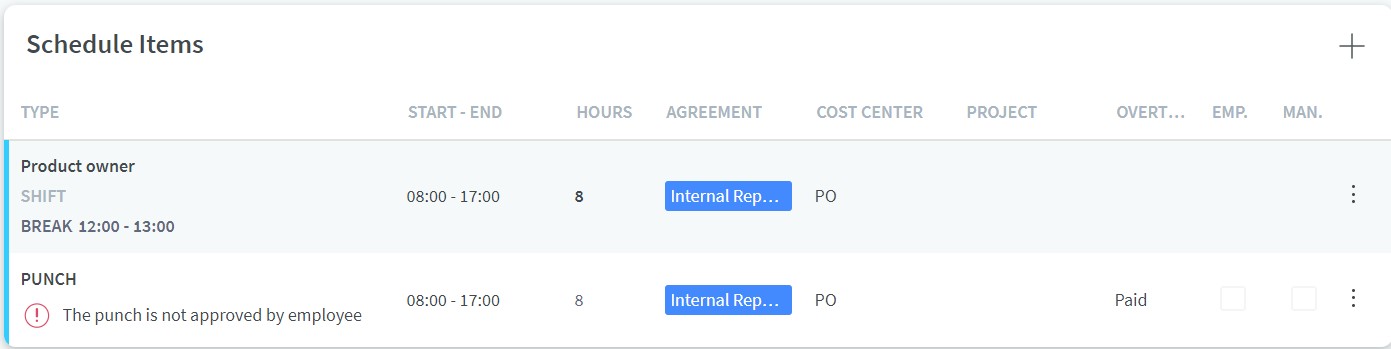
Punches without shifts are indicated in the Time card as a vertical stripe in red and pink. If punch warning is enabled in the parameter setting, you'll also get a warning with text Shift missing:

Punches on tasks
Punches that are connected to tasks are located below the task. If you punch in and out of the "mother" shift and tasks, then the punches that are connected to the shift can be found below the shift. Tasks with connected punches are sorted on start time below the shift with connected punch(es):
Attest a punch
You can attest the punch in the Time card. Both employee and manager attest "box" can be found on the right hand side of the punch.
Edit a punch
If you want to edit a punch, click on Punch or choose Edit after clicking the "three dots" on the right-hand side of the punch. Then, a panel will open. If you want to know more about punches, please read here.
Add a punch
If you want to add a punch, click on the plus icon on the upper-right corner of the Time card and select Punch. A panel will open where you can add the details about the punch.
Delete a punch
If you want to delete a punch, click on the "three dots" on the right hand side of the punch and select delete.
Punching on Home Unit vs. Assigned Shift Unit
Employees can punch on their home unit even if their connected shift is scheduled on another unit. However, the behavior of the punch depends on the default shift type settings for both the home and away units:
- If neither unit has a default shift type set, the punch will be treated as an unplanned punch.
- This behavior allows flexibility but may result in inconsistencies if not closely monitored.
Absence requests
An absence request is indicated as a gray box on the left-hand side of the request. If you click on the row, you'll be able to accept or deny the absence request, as well as be able to decide what to do with the shifts (delete, unassign, reassign).
The following detailed information can be found for punches:
- Absence type
- Start and end time
- Start and end date (only displayed in cases where the start and end is not on the same day/daybreak)
- Sum of absence request hours on that day

Absences
Absences are indicated in the Time card as a dark vertical stripe. Previously, there was a limit of displaying only absences created in less than a year from the date you’re selecting in the Time card. This has now been addressed so that all absences in Quinyx displays in the Time card.
The following detailed information can be found for shifts:
- Absence type
- Comment (o)
- Start and end time
- Start and end date (only displayed in cases where the start and end is not on the same day/daybreak)
- Sum of absence hours on that day
- Employee attestation
- Manager attestation
Attest an absence
It's possible to attest an absence in the Time card. Depending on the setting, the absence can be attested upon creation.
Edit an absence
If you want to edit an absence, click on the shift type name or choose Edit after clicking the "three dots" on the right-hand side of the absence. Then, a panel will open. If you want to know more, please read here.
Add an absence
If you want to add an absence, click on the plus icon on the upper right corner of the Time card and select Absence. A panel will open where you can add the details about the absence and save. Read more here.
Delete an absence
If you want to delete an absence, click on the "three dots" on the right hand side of the absence and select Delete.

Absence shift
If the employee was scheduled on a shift when the absence was added, the shift will turn into an "absence shift". In the Time card, the absence shift will still have it's own row, and you're able to see details of the absence shift; however, the user cannot make any changes to the absence shift (and hence it's not clickable).
Time warnings
If a punch, absence, or shift has a warning, it's indicated by an exclamation mark and an explanatory text. Read more about Time warnings here.
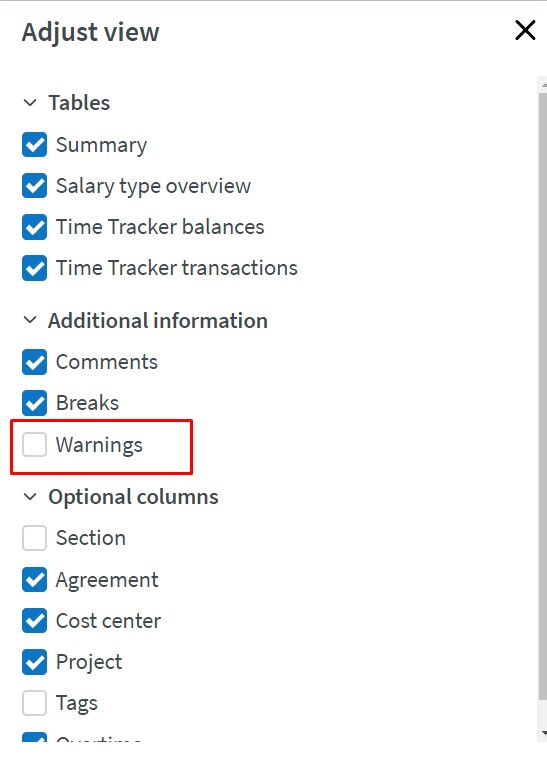
If you aren't interested in Time warnings, you can simply remove it from the view by deselecting Warnings it in the Adjust view section:
Summary
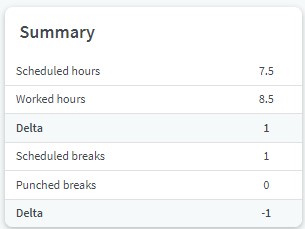
Diff (delta) in Summary table
In the Summary table, it's possible to see the difference between:
- Scheduled hours and Worked hours
- Scheduled breaks and Punched breaks
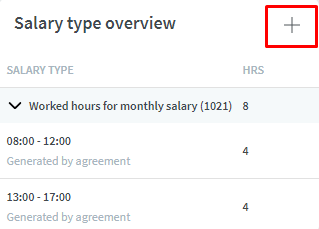
Salary type overview
In the Salary type overview, you can see the salary outcome for a particular day and employee.
The following detailed information can be found in the table:
- Name of salary type (e.g. "holiday") incl. salary type id
- Sum of hours per salary type
- Start and end time of what has generated the outcome (typically a punch)
- How the salary type was generated
- Automatically
- Registered manually
- From a manual rule for the shift that has created the salary type
- From a manual rule for bank holidays that have been created in the salary type

How salary outcome is shown in the Time card
Salary outcome is shown on the start day of shift that is connected to a punch. If there is no shift connected, the salary outcome is shown on the start day of the punch.
Example: An employee has a shift and punch from 22:00 day 1 ending 05:00 day 2 (daybreak is 23:59:59).
Time card day 1:
- Shift 22:00-05:00
- Punch 22:00-05:00
- Salary outcome: 7 hrs
Time card day 2:
- Shift 22:00-05:00
- Punch 22:00-05:00
- No salary outcome shown on this day
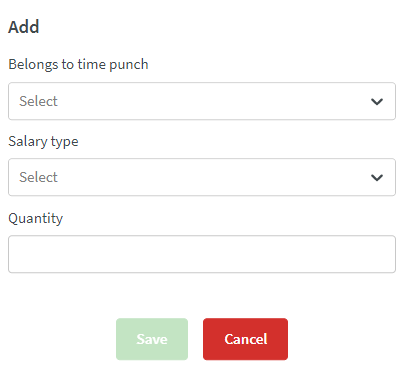
Add/edit/delete salary types manually
It's possible to add/edit/delete salary types manually in the Salary type overview if the user has the permissions to do so.
Click on the + icon in the upper right corner of the Salary type overview table, and select which punch the salary type should be connected to, salary type, and quantity:
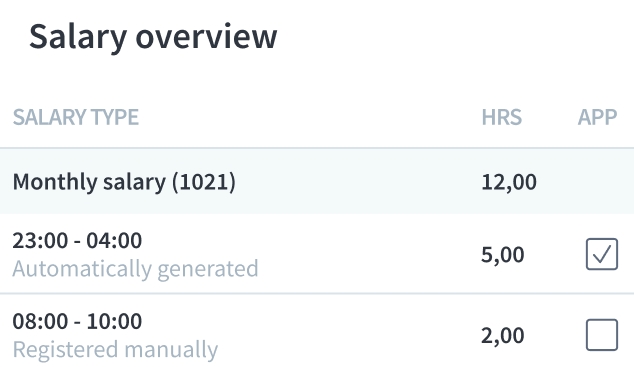
Approval of salary types
It's also possible to approve Salary types in cases where the Salary type requires approval (currently set up on the Salary type in Classic). The approval checkbox can be found on the right-hand side of the salary type:
Time Tracker balance
The Time Tracker balance is located on the right-hand side of the Time card underneath the Summary and Salary type overview tables. Here you'll find a list of all Time Trackers relevant for this employee and their balance.
Learn more about Time Trackers here.
Time Tracker transactions
Below the Schedule items table, you can find the Time Tracker transaction table. This section gives you clear visibility into employee’s time balances and transactions. It helps managers and Admins easily monitor, review, and manually adjust employee time balances when necessary.
You can use this section to:
- View past and future transactions.
- Manually adjust time tracker balances.
- Filter and focus on relevant data.
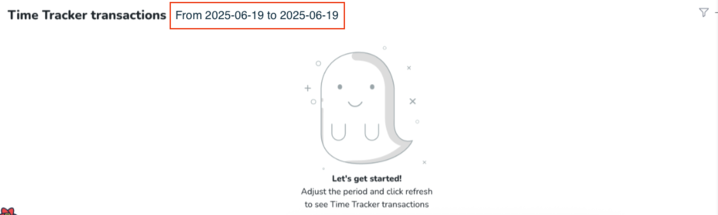
Default date selection
When you see the Time Tracker transactions section, Quinyx defaults to “Today” as both the start and end date. You can change this range at any time using the filter button.
Refresh button
Click the  refresh icon button to pull the latest transaction data from the system.
Add or adjust a Time balance
To modify a time balance:
- Click the + icon in the top-right corner.
- This opens the Add new transaction section. Fill in:
- Time Tracker (select which time tracker balance to adjust)
- Effective Date of the adjustment
- Count (the amount of time to add or deduct. If you want to deduct, then simply specify the count in negative ‘-’ e.g. deduct 8 hours can be specified as -8 in count)
- Comments (add context or notes for future auditing or clarity)
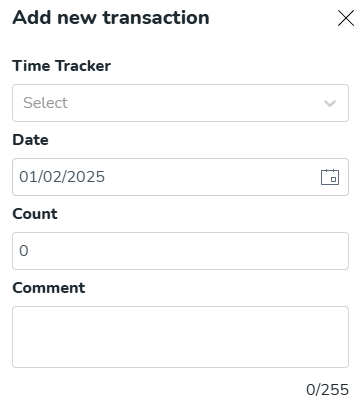
- Click Save or cancel.
Once you've clicked Save and refreshed the Time Tracker transaction view again, you'll see the entry logged here with options to edit and delete:

Filter options
Use the filter panel to focus on what matters:
- Only show time trackers with transactions: Hide time trackers that haven’t changed during the selected date range.
- Only show time trackers with a balance: Focus only on balances that are still active (i.e. do not show the ones with ‘0’ value).
General functionality
Adjust view
It's possible to adjust the Time card based on the users need and decide what you want to see in the view. You only need to set this up the first time you go in to the Time card after that it will be remembered.
The following table/row and information can be adjusted:
Tables
- Summary
- Salary type overview
- Time Tracker balances
- Time Tracker transactions
Additional information
- Comments
- Breaks
- Warnings
Optional columns
- Section
- Agreement
- Cost center
- Project
- Tags
- Overtime

See when you're in a locked period
When you're entering the Time card in a locked period, it will look something like this:

You can lock the schedule in the schedule view by clicking on the three dots on the upper right-hand side of the tool bar. Then select “Lock schedule”.
Go to next or previous day
Go to next or previous day by clicking the arrows next to the employee's name:

Permissions
Object | Permission | Comment |
Time card | Scheduling | To see the Time card the user needs to have at least read access |
Shift and task | Scheduling | To see shifts and tasks, the user needs to have at least read access To add/edit/delete shifts and tasks, the user needs to have write access |
Punch | Punches | To see punches, the user needs to have at least read access To add/edit/delete punches, the user needs to have write access |
Attestation | Punches | To be able to attest time, the use needs to have write access |
Absence and leave request | Absence | To be able to see absence and leave requests, the user needs to have at least read access To be able to add/edit/delete absences and approve/deny leave requests, the user needs to have write access |
Time Tracker (balance and Transaction) | Time Tracker | To see balance and transactions, the user needs to have at least read access To add transactions, the user needs to have write access |
Add salary type | Manual salary types | To add/edit/delete manual salary types, the user needs to have write access |