Version 0102
Release date February 24, 2021
New functionality
Projects
We're adding the possibility to view, create, and update projects.
View projects
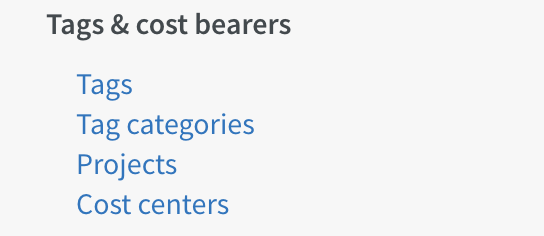
To view a list of all existing projects, navigate to account settings and click "Projects" under the heading "Tags & cost bearers" in the menu on the left-hand side.
A new page will open, and you can see a list of all existing projects.
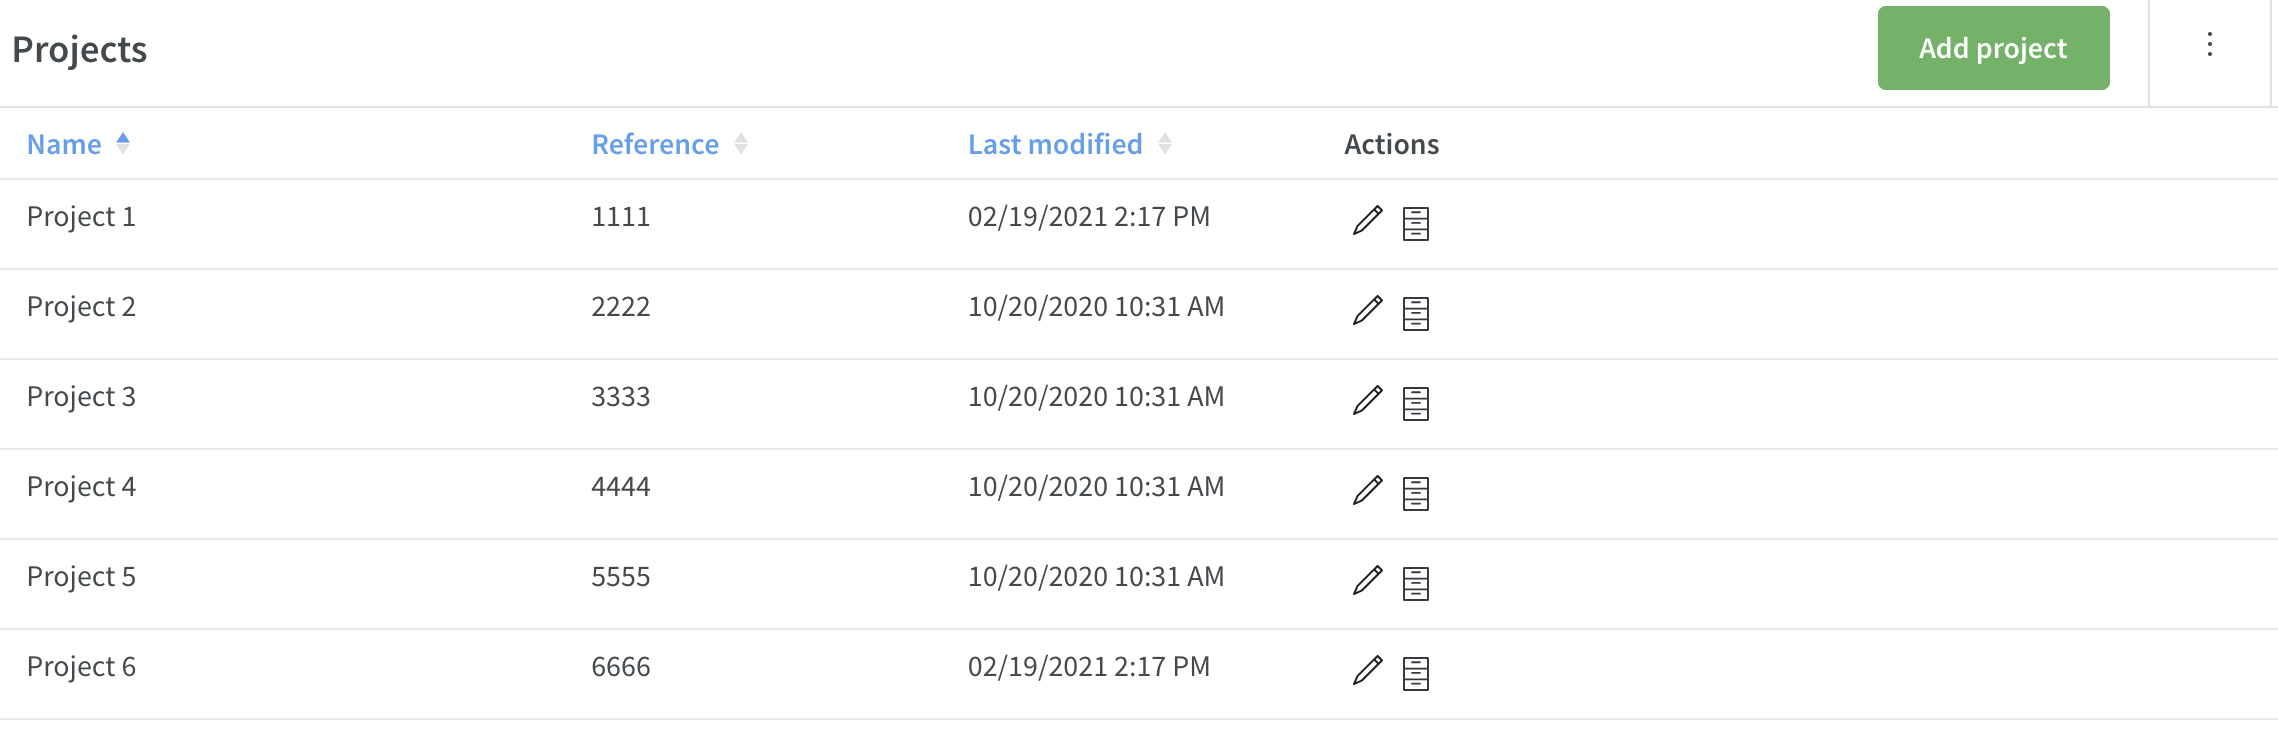
You'll be able to view the following columns:
- Name: Name of the project.
- Reference: Reference of the project.
- Last modified: Date and time for when the project was last modified.
- Actions: Click to edit or archive the project.
It's possible to sort the list on name, reference, or last modified.
Edit projects
To edit an existing project, click on the pen icon under "Actions". A new pop-up will appear, allowing you to edit the name and reference.
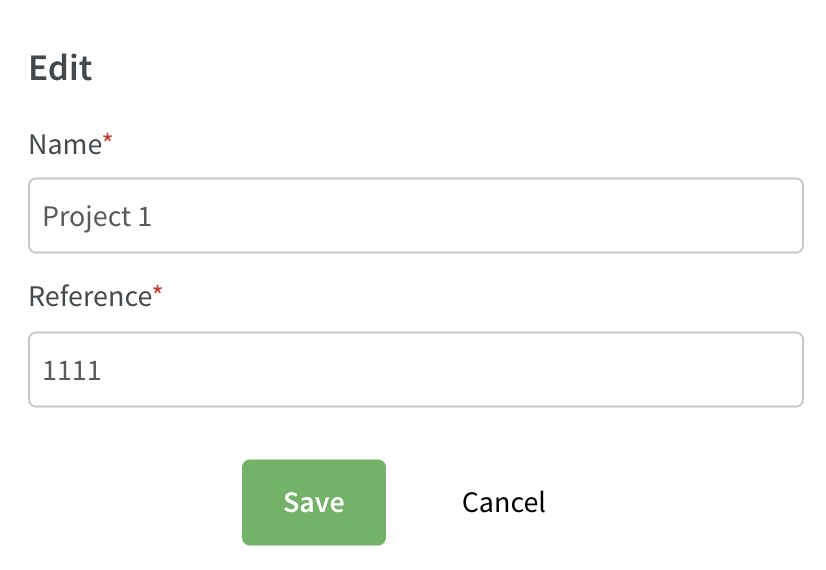
Click save when you're finished with your changes. The pop-up will close, and you'll see a success message in the top right-hand corner notifying you that the changes are saved.
Archive projects
If a project is no longer used, it's possible to archive it. This will hide the project from all selection menus inside the application and from the list of projects under account settings.
Click on the archive icon under actions, and the project will disappear from the list.
To view previously archived projects, click on the three dot menu in the top right-hand corner and click "View archived projects". The archived projects will then be displayed in the list. They will be greyed out and the archive icon crossed over so that you can easily see which projects have been archived
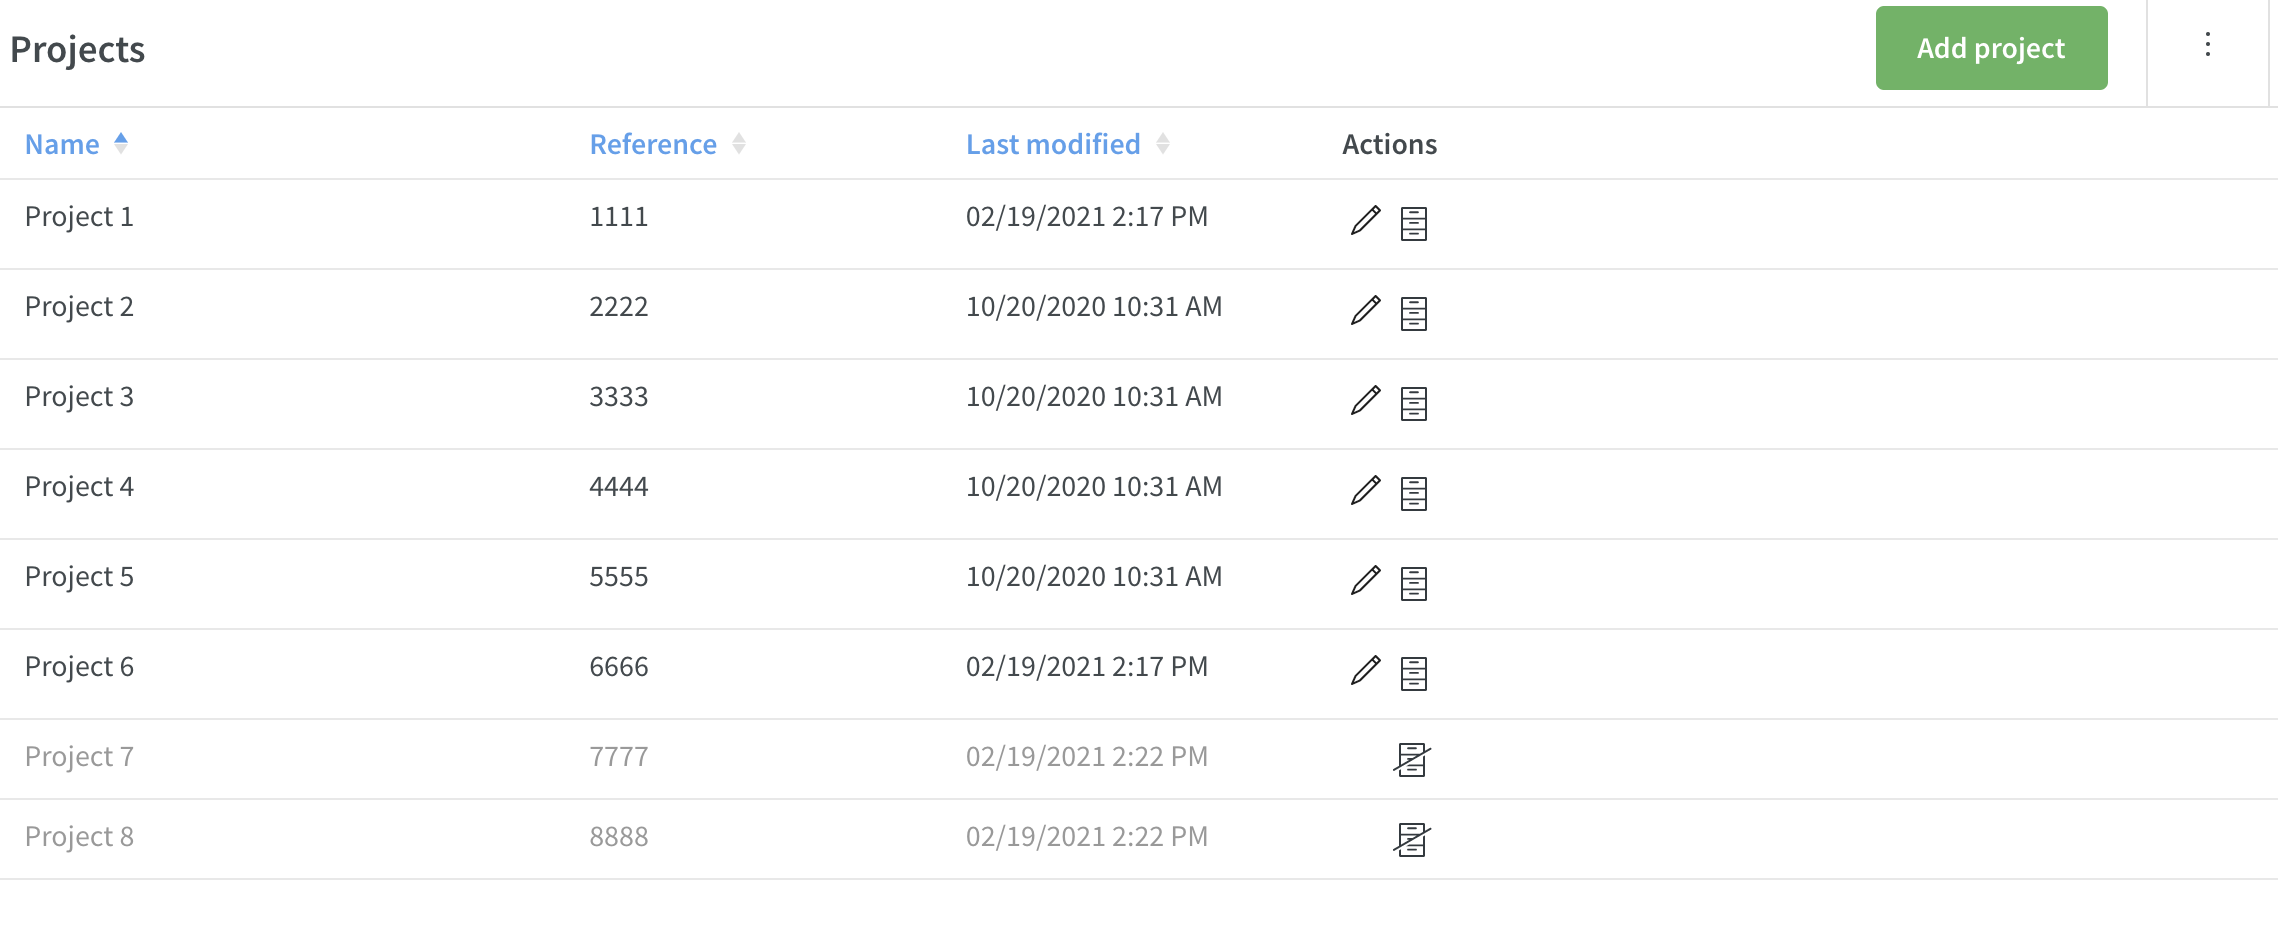
To unarchive the project, just click on the archive symbol, and the project will be active again.
If you no longer want to see archived projects in the list, go to the three dot menu again, and select "Hide archived projects".
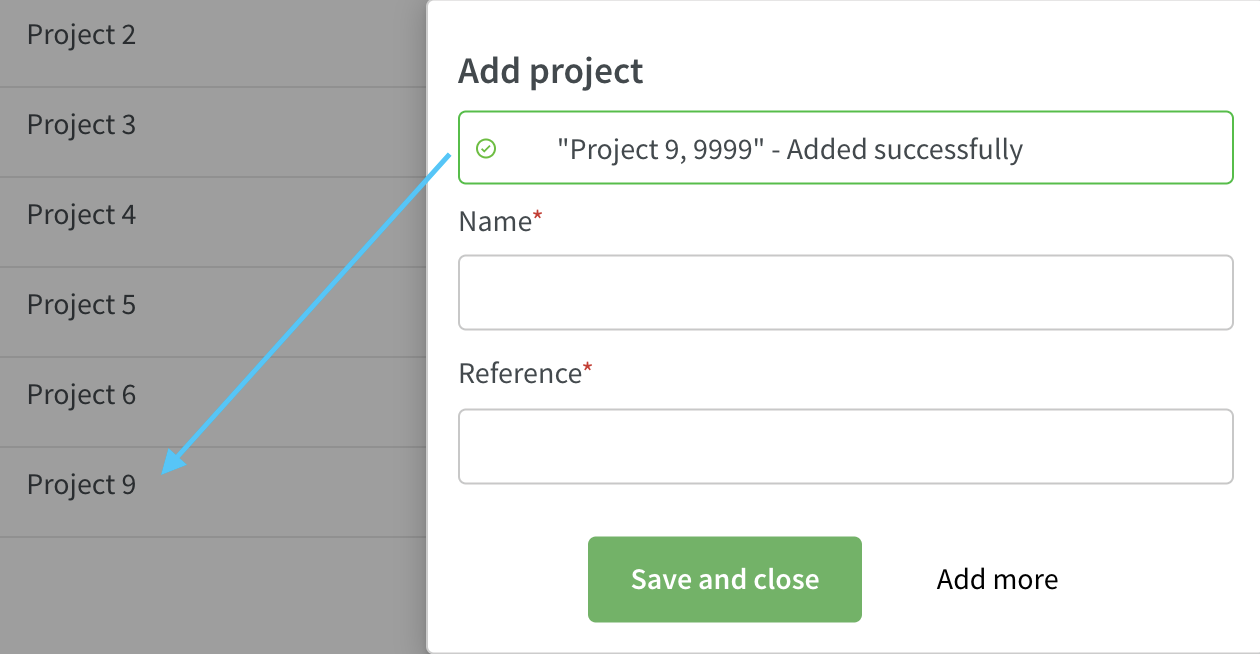
Add projects
You can add new projects by clicking on the green "Add project" button. A new pop-up will appear, and you can start adding new projects.
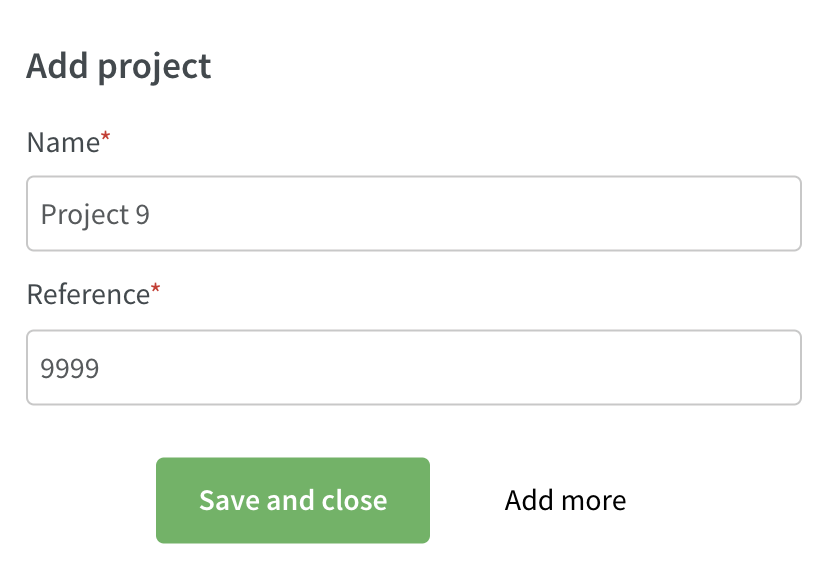
- Name: Enter a name for the project.
- Reference: Enter a reference for the project.
You have two options:
- Save and close: The pop-up will close, and you'll see a success message in the top right corner notifying you that the project has been saved.
- Add more: The project will be saved and displayed in the list of projects immediately. You'll be notified with a success message inside the pop-up indicating the project was added. You can continue adding more projects by repeating the steps listed above.
Time Settings & Warnings
In this release, we are adding the possibility to edit "Time Settings and Warnings", formerly known as "Parameters" in Classic.
Time Settings
These settings are used to control functionality related to time punch approval and payroll transfer.
You'll find the time settings page under Account settings > Templates in the menu on the left-hand side.

You'll see a grey text under each functionality that describes what the setting does. To activate/inactivate a setting, just check or uncheck the box under the activate column.
Warnings
These settings control what type of warnings should be used in the schedule view within your organization.
You'll find the warnings page in the menu on the left-hand side under Account settings > Agreements > Warnings.
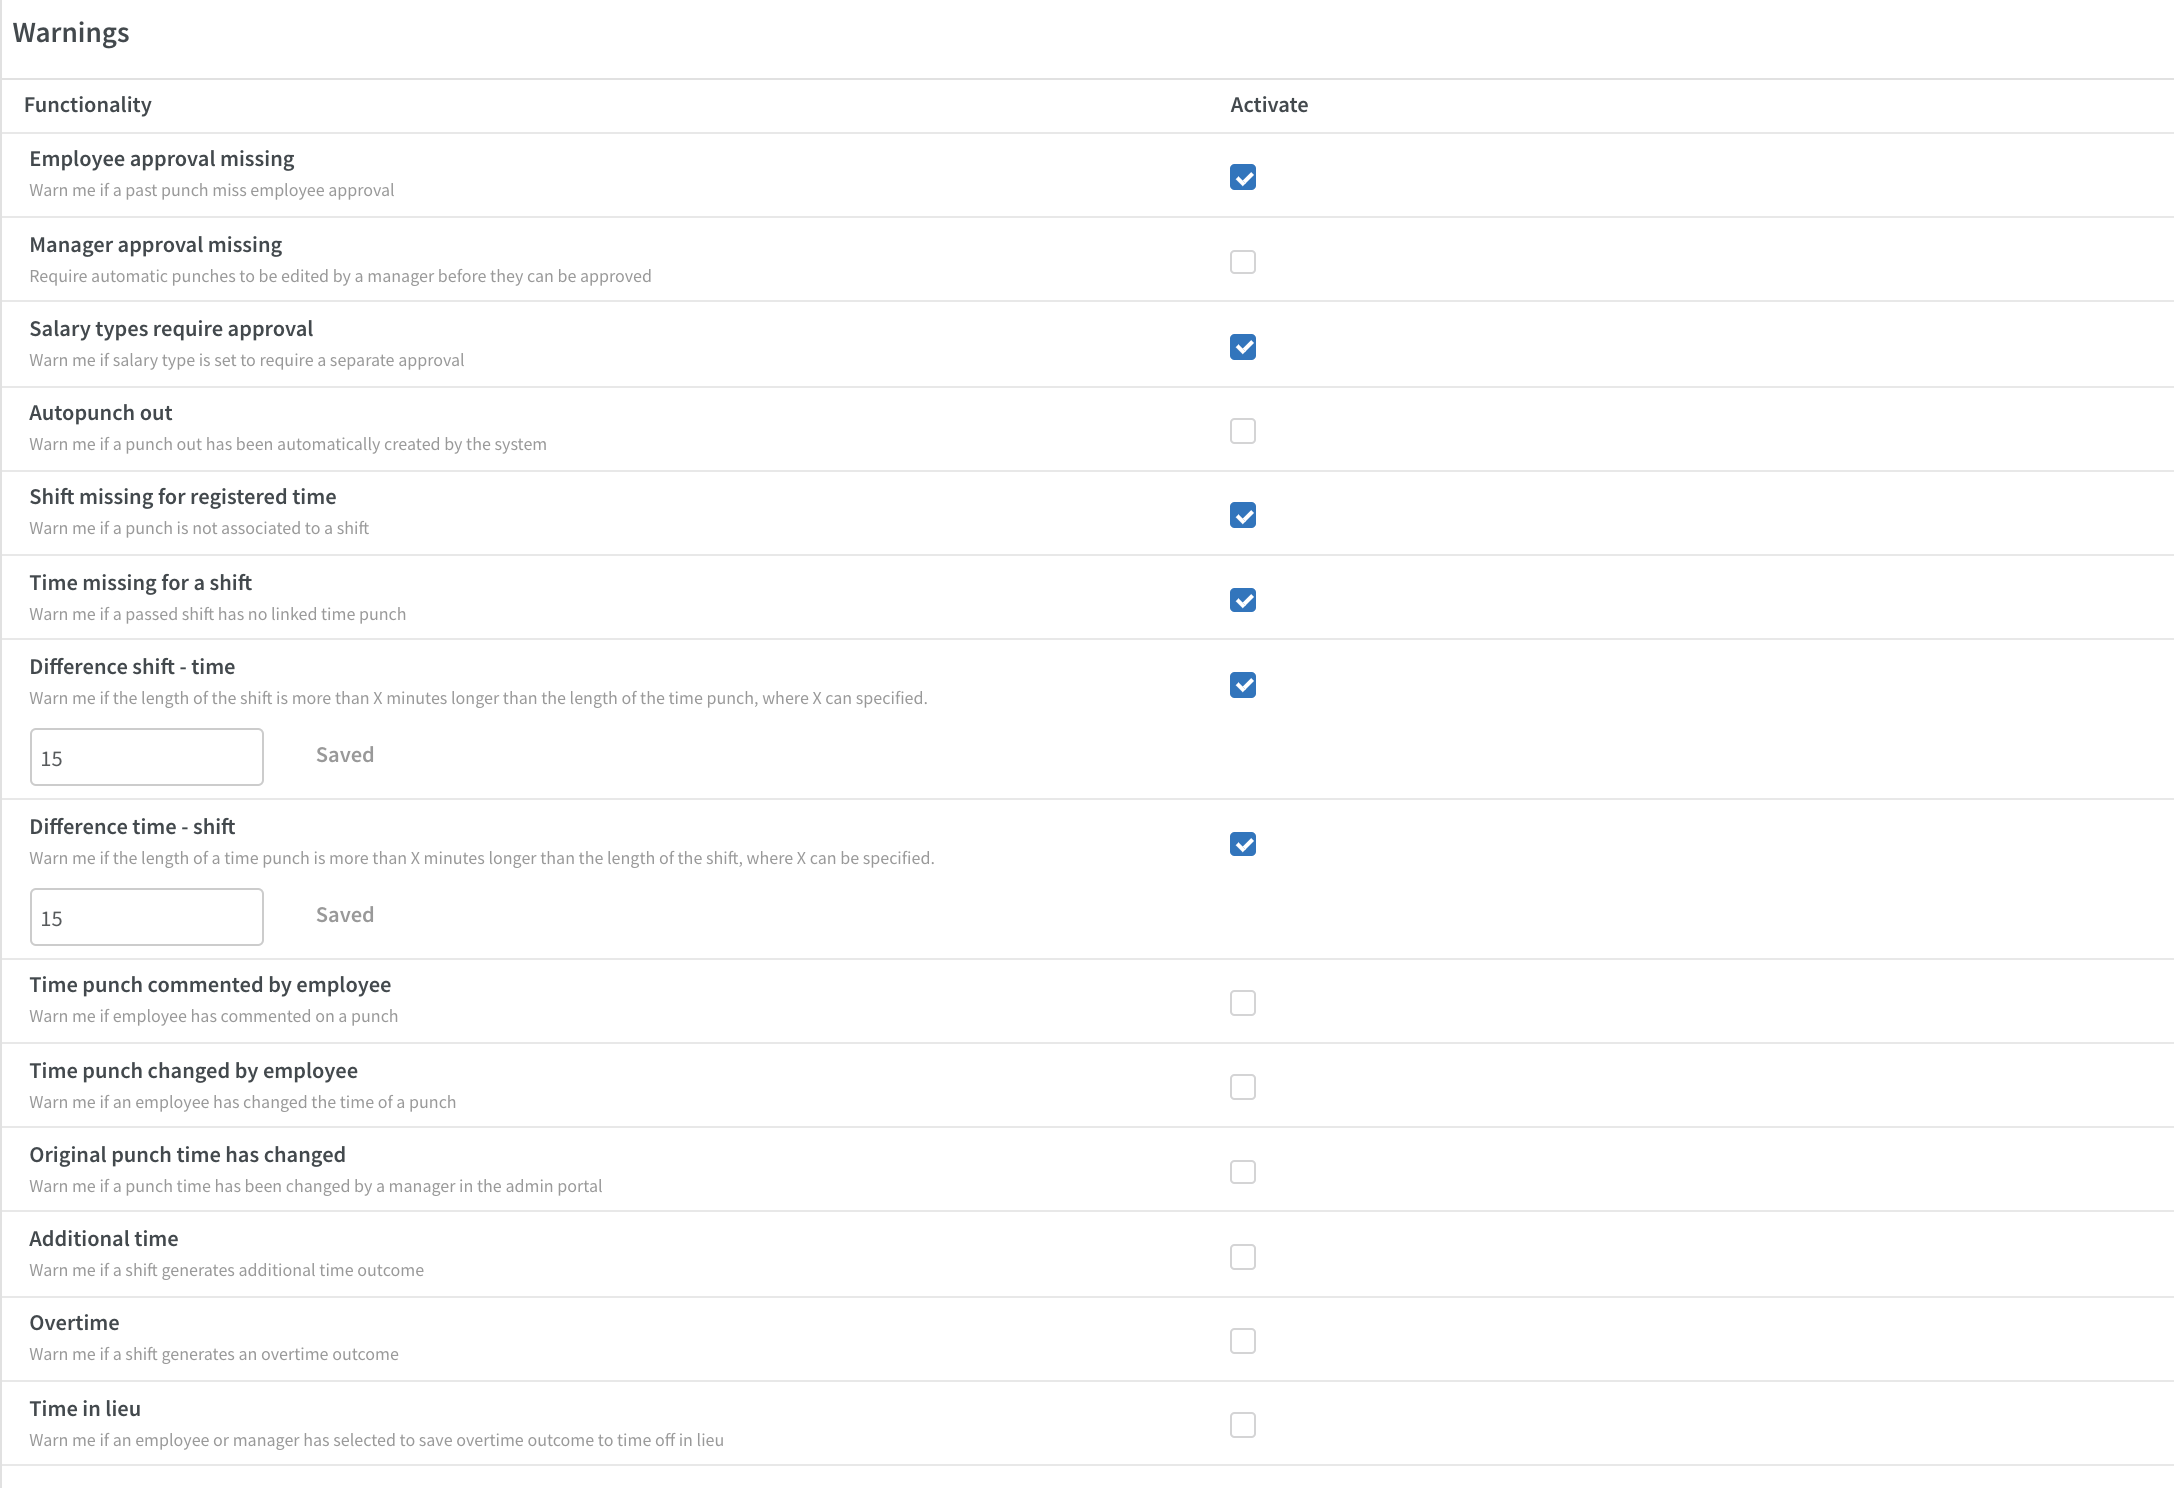
Under each functionality, you'll see a grey text that describes what the warning does. To activate/inactivate a warning, simply check or uncheck the box under the activate column
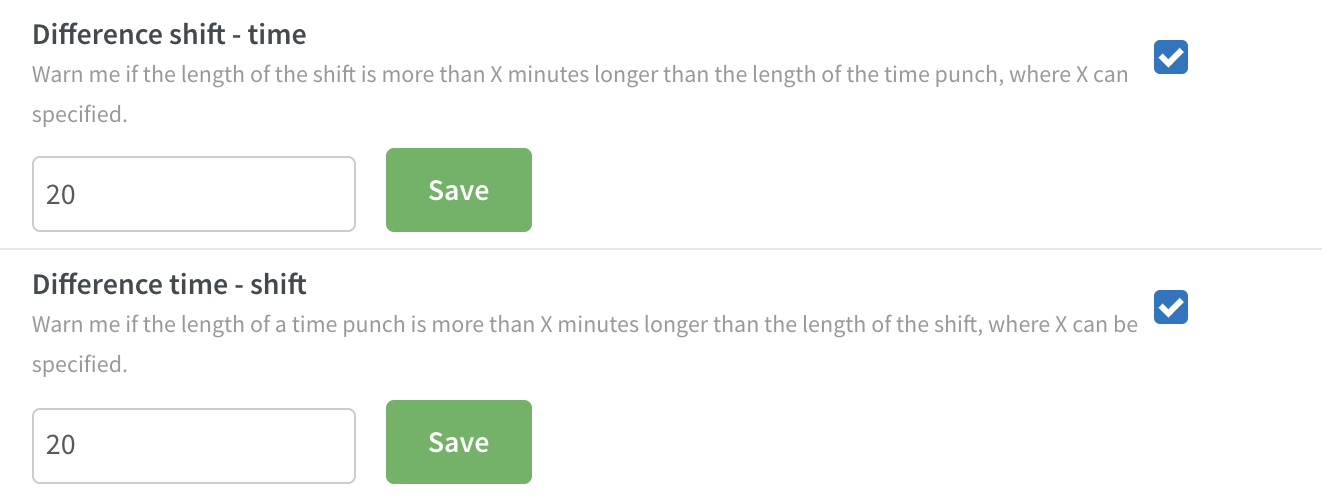
If you activate Difference shift - Time and/or Difference time - Shift, a new input field will be visible where you can set the number of minutes the warning should use. Once you've added a value in the field, a green save button will be enabled. Click save to store the value.
Schedule and Base schedule
Metric display mode in Schedule
Until this release, the employee metrics by the avatar displayed scheduled hours across agreements, whereas the nominal hours displayed for the main agreement only.
As of version 102, this functionality is changing. In the Employee list display options, you’re now able to configure how to display agreement metrics under the “Metric display mode” heading:
- Totals
- This displays the totals for scheduled hours and nominal hours across agreements.
- Note that if there are parallel agreements that have different schedule or balance periods, and schedule period or balance period respectively is selected as metric calculation period, a badge saying “Different periods” will appear here since summing them would be misleading.
- By agreement
- This displays the scheduled hours and nominal hours as one row per agreement. Just as in People and the metrics panel, main agreements are color coded dark blue and non-main agreements are color coded turquoise.
- When the “Diff. of scheduled/nominal hours in calculation period” sorting option is selected, the actual sorting of employees in the left-hand margin is still done according to hours across agreements.
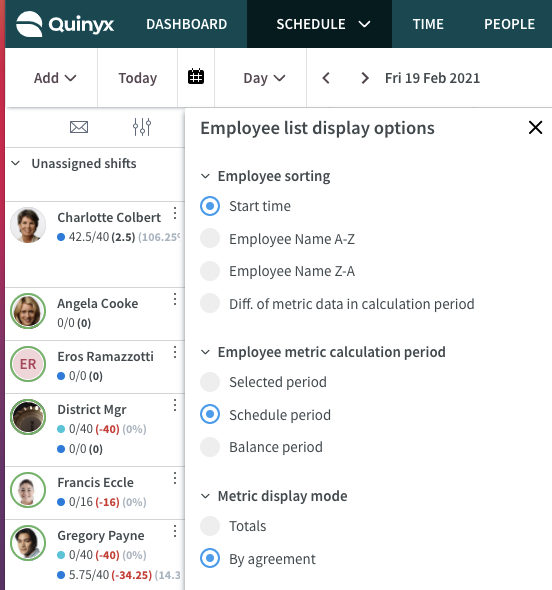
In both of the above cases, the metrics by the employee avatar now also display with a percentage sign indicating the percent of nominal hours that are currently scheduled. In some cases the percentage doesn't appear fully - we'll address this shortly.
Metric display mode in Base schedule
As of this version, the metrics in base schedule now consider all agreements valid today, as well as agreements valid only in the future. The same metric display options (as mentioned in Schedule above) have also been added to base schedule, as has the improvement with showing the percentage of scheduled hours out of nominal hours. However, a few differences apply in Base schedule compared to in Schedule:
- When “Totals” is selected, the base schedule hours sums hours across agreements valid today and/or in the future, whereas the preliminary nominal hours of the metric show hours across agreements valid as of today’s date only. This is so that the preliminary nominal hours you’re tracking aren’t misleadingly skewed by agreements not valid until at a later point in time.
- When “By agreement” is selected and an employee has parallel agreements, all shifts on which the Agreement field still says “Selected automatically” will count towards the agreement set as main agreement as of today’s date.
Section integration keys
We are adding the option to set integration keys for sections when adding or editing a section. You'll now be able to set both section integration key and group integration key.
Integrations keys can be used when you configure an integration between Quinyx and other systems.
Integration key - Add sections
When adding a new section, you'll now see two new fields for group integration key and section integration key.
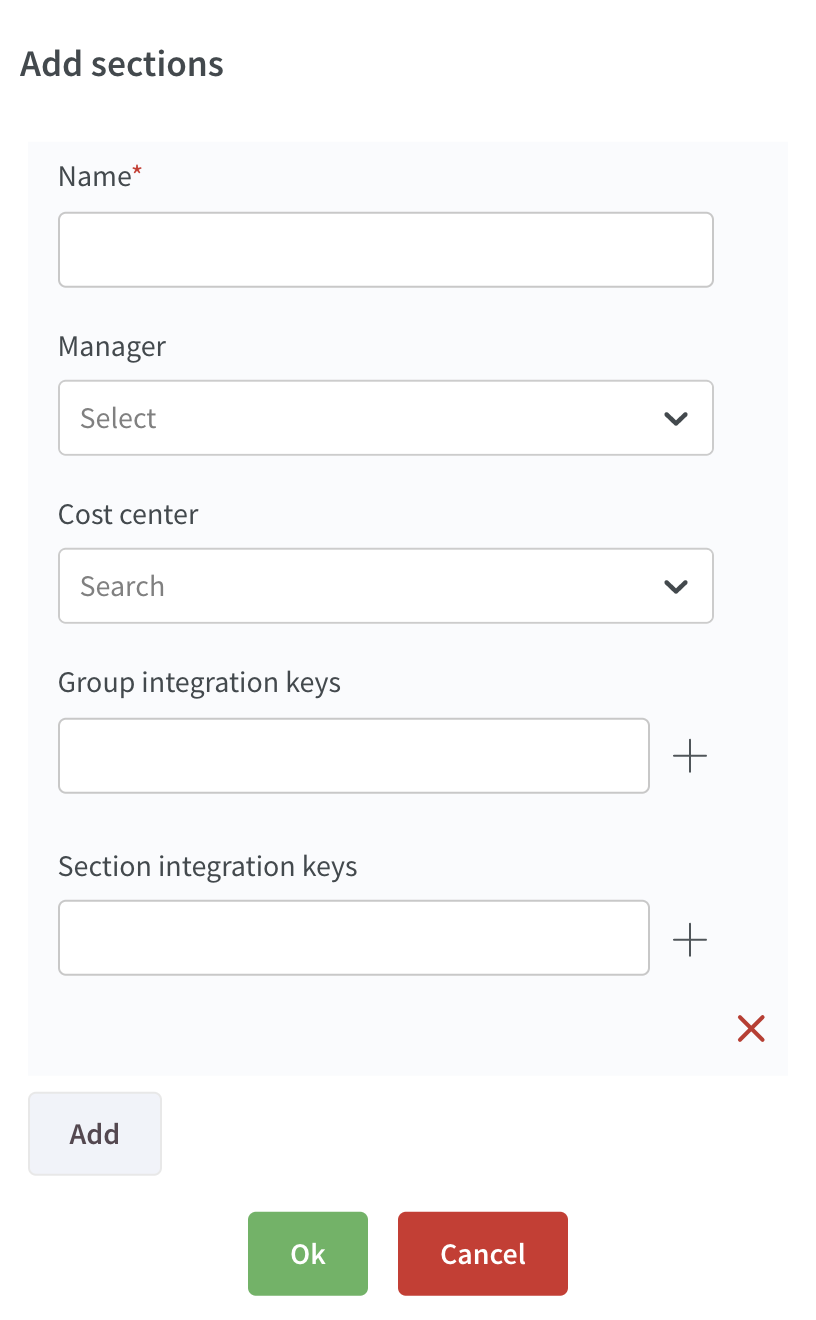
Just type your integration keys in the fields you want to use before you save the section. If you want to add more than one integration key for a section, just click the plus sign, and a new field will appear where you can enter additional integration keys.
Integration key - Edit section
When editing an existing section, you'll now see two new fields for group integration key and section integration key. If your section already has integration keys configured, they will be displayed in those fields.
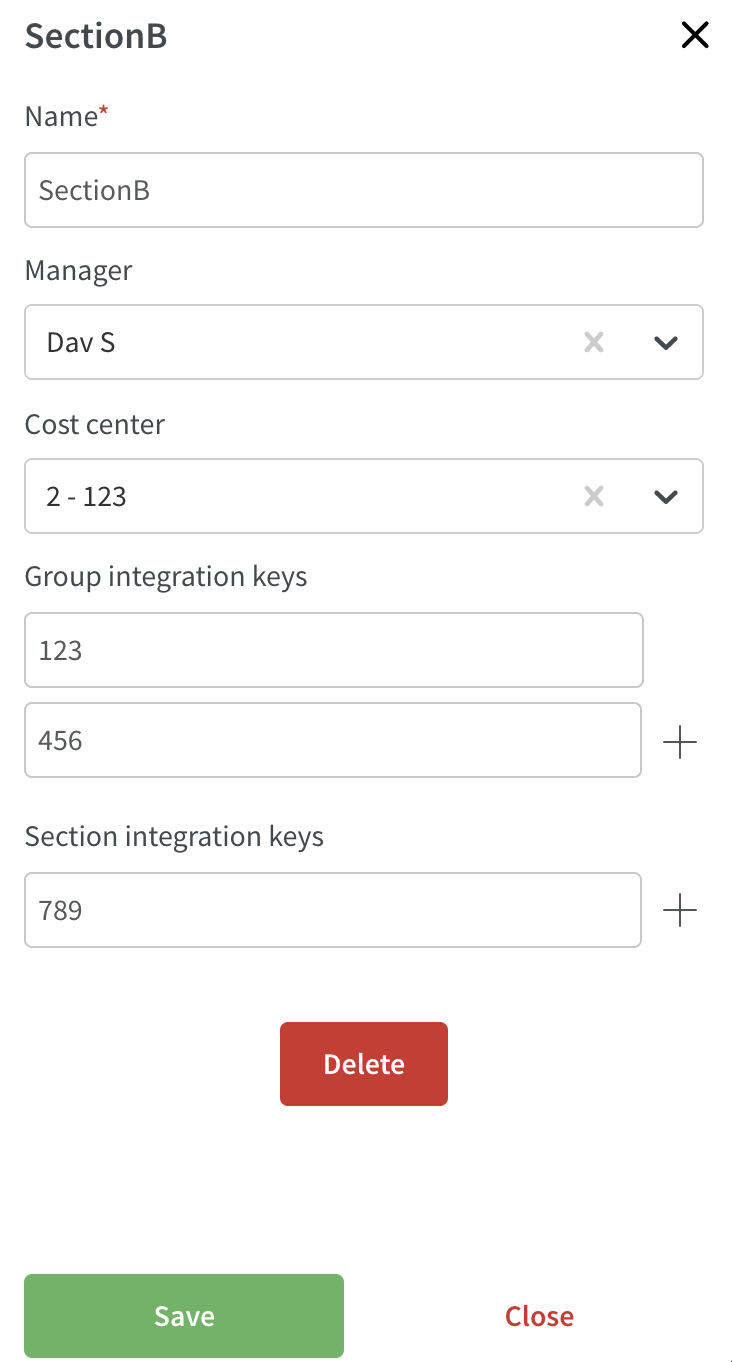
If you want to edit an existing integration key, just change the key before saving the section. And if you want to remove an existing integration key, just delete the entered key from the field before saving the section.
Updates and performance improvements
- The list of variables you see when creating a calculated variable is now in alphabetical order.
- We've added logs for manually added salary types. You'll find the new log under "Search logs" in account settings.
- Prior to this release, you needed to trigger a salary calculation in Schedule for the deviation punches to appear. For base schedule shifts where the applied or selected agreement is set to deviation reporting, deviation punches are now created at rollout.
- This following only concerns customers having previously worked in Classic: Prior to this release, fixed schedules in Classic migrated to Neo base schedules didn’t consider shift section values. We've improved this so shift section values are considered for future migrations.
Bug fixes
- Resolved an issue that displayed inactive cost centers in the Group management side panel.
- Resolved a Schedule report issue that prevented new employees from being displayed in the printed schedule view.
- Resolved a Monthly schedule report issue that prevented future employees from being displayed.
- Resolved a schedule issue that didn’t allow a punch to be attested either from the punch or an employee’s Time card.
- Resolved an issue that produced a 500 error when adding a manual salary on an open punch.
- Resolved an issue that produced a 400 error when saving an agreement template after activating "Count scheduled time within specified period towards overtime and unsocial time threshold".
- Resolved a display issue that caused variables in statistics to appear on top of the Lighthouse widget.
- Improved the accuracy of data in the following reports: Schedule period, Schedule, Shift staffing, Monthly Schedule, Payroll, and Absence Report.
- Fixed an issue on reports where an employee was not included in the output if their start date was in the future.
- Resolved a bug where "Minimum weekly rest requirement not met" and “Minimum daily rest requirement not met” warnings were incorrectly triggered by stand-by shifts.
- Resolved a bug related to setting preferred unit on agreement for users with roles higher than local managers.
- Resolved a bug where bank holiday reductions reflected in the nominal hours displayed in the metrics panel but not in the metric by the employee avatar.
- Resolved a bug where the break length of absence shifts crossing daybreak was doubled as you removed the absence from the shift.
- Resolved an issue where re-rolling out a base schedule inside of the period of the initial rollout caused incorrect rolled out hours metric data.
- Resolved an issue where minus hours were incorrect when re-running payroll after previously having reversed.
New HelpDocs articles
- Build an organizational structure
- Time settings
- View, add, edit, and archive cost centers
- Warnings settings
REST API / Web service updates
- Added new API end point GET /budget-data to retrieve budgets. This update will result in the deprecation o GET /forecast-data .
SOAP API / Web service updates
At Quinyx, we've moved to HTTPS for all of our customers except a single endpoint for backwards compatibility. This endpoint is for WSDL integrations and only available on the address apiftp.quinyx.com. To ensure your customer data is safe and secure, this HTTP endpoint will be deprecated. The documented URL for Quinyx WSDL is: https://api.quinyx.com/FlexForceWebServices.php
This is why on 1st of May 2021 on the production environment, we'll disable port 80 and only allow 443 (HTTPS) on the following endpoints:
apiftp.quinyx.com/FlexForceWebServices.php
How does this affect you?
If you're still pointing to this endpoint on port 80, you have to change these integrations to port 443, i.e. HTTPS. You can already do this and test that everything works as expected.
The following SOAP API endpoints will be discontinued and removed from Quinyx WFM August 2021.They are already now replaced with REST API endpoints for Neo Forecast. Read more about Neo Forecast and the improved functionality here and about the new REST APIs here.
- 6.2 wsdlGetForecasts
- 6.3 wsdlUpdateForecasts
- 6.6 wsdlUpdateForecastV2
- 6.8 wsdlUpdateForecastsV3
- 6.4 wsdlGetSalesData
- 6.9 wsdlGetSalesDataV2
- 6.7 wsdlGetOptimalStaffing