Version 0089
 Updated
by
Leigh Hutchens
Updated
by
Leigh Hutchens
Release date August 26, 2020
New functionality
Password management
With this release, we are introducing the possibility to send a password reset email to multiple employees and have improved validations for our different password security levels.
Send password reset email to multiple people
Previously, you could only send a password reset email to one person at a time. Now, it will be possible to send the password reset email to multiple people at once.
- Navigate to People, and click on the three dots in the top-right corner.
- Click on send password, and a side panel will open.
- Select the people you want to send the password reset email to.
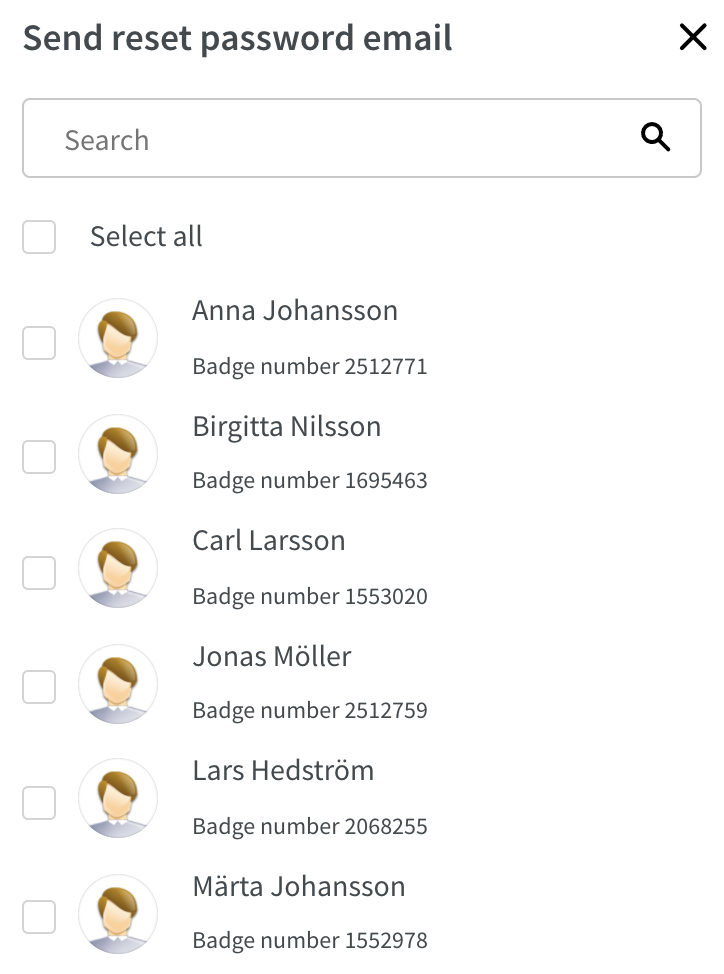
- The people you select will appear in a list below the search field.

- When you are finished selecting people, click send, and the side panel will close.
- A toaster will appear in the top-right corner indicating whether the email was sent successfully.
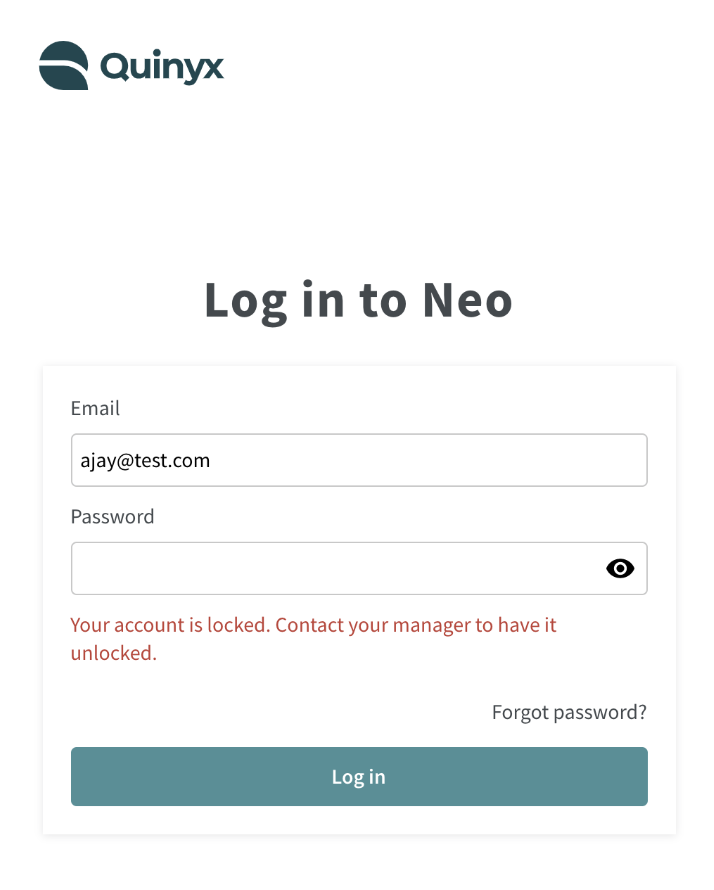
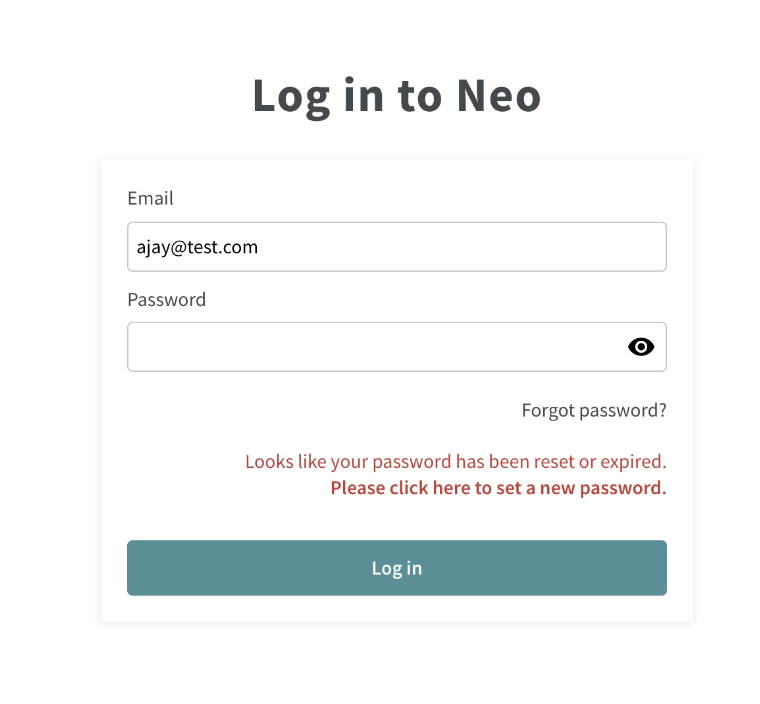
Improved password validations
We've added the remaining validations for both of our password security levels. All validations (described here) will now be checked when a user logs in to Neo, and the user will be notified with a red text on the login page if something is not correct (see examples below).
Schedule
Time card
We continue to release time card functionality. Enjoy!
Approve/deny leave request(s)
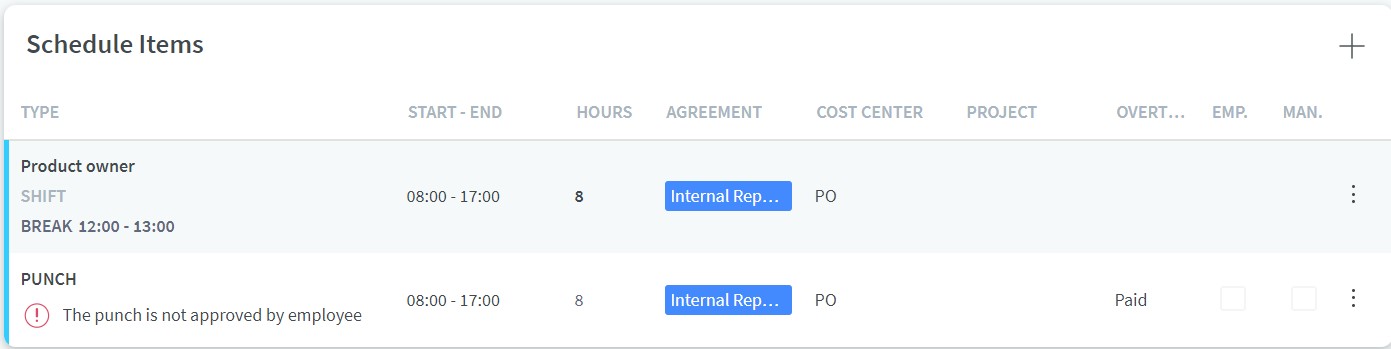
It's now possible to see/edit leave requests in the Time card. A leave request is indicated as a gray box on the left-hand side of the leave request. If you click on the row, you'll be able to accept or deny the leave request, as well as be able to decide what to do with the shifts (delete, unassign, reassign).

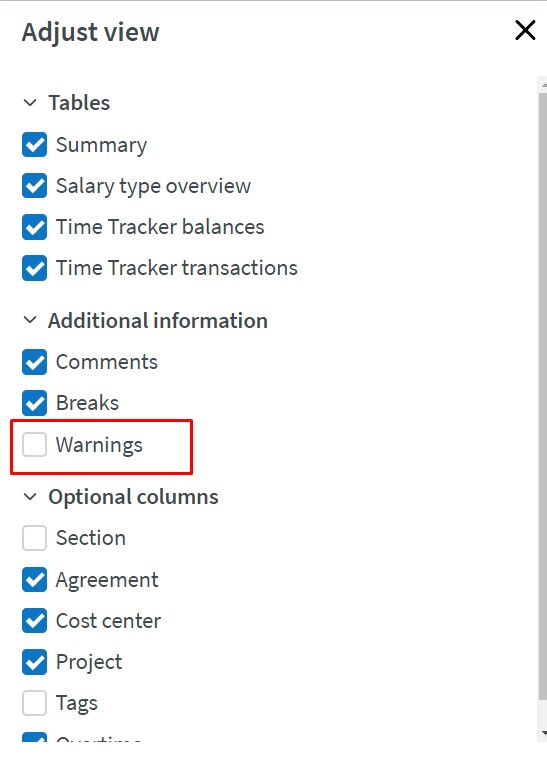
Time warnings
All Time warnings are now supported in the Time card. If a punch, absence, or shift has a warning, it's indicated by an exclamation mark and an explanatory text. Read more about Time warnings here.
If you aren't interested in Time warnings, you can simply remove it from the view by unselecting "Warnings" it in the Adjust view section.
See when you are in a locked period
When you are entering the Time card in a locked period, it will look something like this:

You lock the schedule in the schedule view by clicking on the three dots on the upper right-hand side of the tool bar. Then select “Lock schedule”.
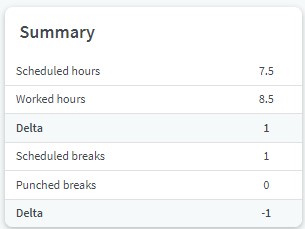
Diff (delta) in Summary table
In the Summary table, now you can see the difference between:
- Scheduled hours - Worked hours
- Scheduled breaks - Punched breaks
Go to next or previous day
Go to next or previous day by clicking the arrows next to the employee's name.

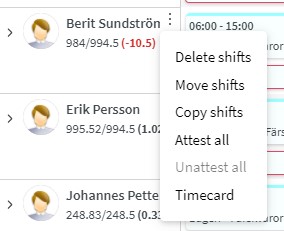
Be able to enter the Time Card from a touch device
It's now possible to enter the Time card on from a touch device by clicking the three dots next to the employee name and select "Time card".
Time
Reverting previously transferred payroll items
As of this release, you’re able to revert previously transferred items. As described in the 0086 release notes, when you create a definitive payroll file (“Create payroll file” button), the payroll items included in that file will have their status updated to “Transferred to payroll” in Time, and those items will be locked from being edited in Schedule. Reverting the items changes their status back to “Ready for payroll” and enables them being edited in Schedule again.
You can revert any transferred payroll item. Just tick the employee of your choice who has at least one payroll item. Among the multiple buttons appearing in the top-right corner of the view, there's now one called “Revert”.

Clicking the revert button will bring up a modal summarizing the number of selected items about to be reverted, as well as which ones won’t be since they haven’t been transferred yet. If you select an employee who's ready for payroll but who has no transferred items, the Revert button will still display, but the summary in the modal will state 0 items will be reverted. If you want to revert only a subset of a given employee’s items, we recommend you make use of the Adjust view panel’s filter options to specifically load only those items for that employee in the view.
Proceeding to actually reverting items displays a progress bar while your request is being processed. While this request is running, the Adjust view panel will close and functionality within the Time view will be disabled, but you can leave the view while the request is running and come back later.
Once your request is done, you will land in the same view, with the same data as before. You can now enter Schedule and edit the reverted items. If you want to display the current status of the reverted items, click “Apply” in the Adjust view panel.
Updated summary modal for other payroll actions
As described in previous releases, the remaining payroll actions all have a summary of items to be included vs. ignored as well. The different actions are described here. As of the above described revert feature being implemented, an implication is that an additional summary line may or may not occur if your account’s “Transfer only fully approved times” Classic parameter setting is set to true. The line reads “X payroll items will be ignored because they are ready for payroll but the employee isn't” and appears if you’ve selected employees ready for payroll in combination with at least one who's not ready but has at least one item that’s already been transferred to payroll.
Permission
In order to carry out the revert payroll action, Write access is required on the Transfer to payroll permission for the groups on which the items you want to revert are taking place. If you only have that access for some of the selected items, you will receive an error message that reads “You don't have access to perform this action for all selected groups”.
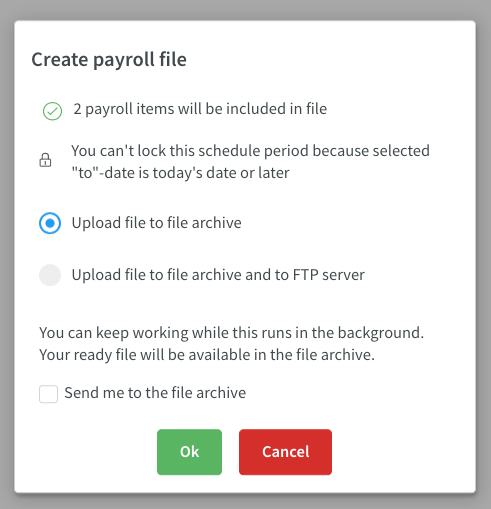
Transfer payroll file to FTP server
As of this release, customers with an FTP server set up on their Quinyx account are able to transfer a payroll file to that FTP server in addition to it being transferred to the file archive.
When clicking the “Create payroll file” button that appears after having checked at least one checkbox, the modal that displays will have two additional options if you have an FTP server set up:
- Upload file to file archive.
- This is the default and only behavior for accounts without an FTP server set up.
- Upload file to file archive and to FTP server
Updates and performance improvements
Forecast
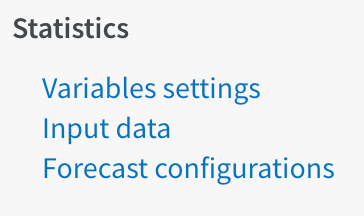
'Variable' renamed to 'Input Data'
We have renamed the term 'variable' to 'input data', as this better illustrates to the user that this data is passed to Quinyx from an external system. You will see this change under Account Settings > Statistics.
Calculated variables
Calculated Variables are now available to all customers. Previously, this functionality was released to only those with access to the Forecast module.
As such, we recommend customers that wish to keep using this KPI re-create this now using a Calculated variable to prepare for the change. To read more about calculated variables, please click here.
Bug fixes
- Cost centers inactivated in Classic are no longer selectable when adding a shift in Neo.
- A punch connected to a task is now visible in the time card after the shift with that task is deleted.
- Resolved an issue where the KPIs for an employee with multiple agreements, both expired and active, were not displaying for the expired agreement.
- Resolved an issue causing all salary types on a time card to disappear after approving a salary type that has been added manually.
- Resolved an issue where the "Include transactions not approved by employee in payroll file" Classic parameter setting wasn't considered in the ready for payroll indicator.
- Resolved an issue causing a 404 error when deleting a punch connected to a task.
- Resolved a validation error that was preventing an agreement template from being updated after ticking a box for absence type.
API / Web service updates
Please see Classic version 382 release notes for more information about API and Web services updates.
POST /actual-data
We have added an end point for uploading actual data against input data. The term 'actual' will also match those selectable from within the Neo user interface. This change will result in the deprecation of POST /raw-data.
POST /budget-data
We have added an end point for uploading a budget against input data. The term 'budget' will also match those selectable from within the Neo user interface. This change will result in the deprecation of POST /forecast-data.
appendData
In this release, we have changed the default behavior of this call. Both budget-data and actual-data endpoints accept appendData and by default this is now set to FALSE. Sending in new data for both budget-data and actual-data will now overwrite existing data for the defined resolution unless AppendData=true is defined. Note that legacy endpoints will retain their current behavior. Customers wishing to use the new default behavior for existing integrations will need to update their integration.