Audit logs - Shift
In addition to shift booking, shift swaps, shift unassignment, and shift unassignment on away unit audit logs, you can search for shift audit logs in Quinyx. This provides you with information about who created, updated or deleted specific shifts, when, and the action taken. This provides managers with a big picture to understand if some of the shift changes are actually coming from the connected shift requests.
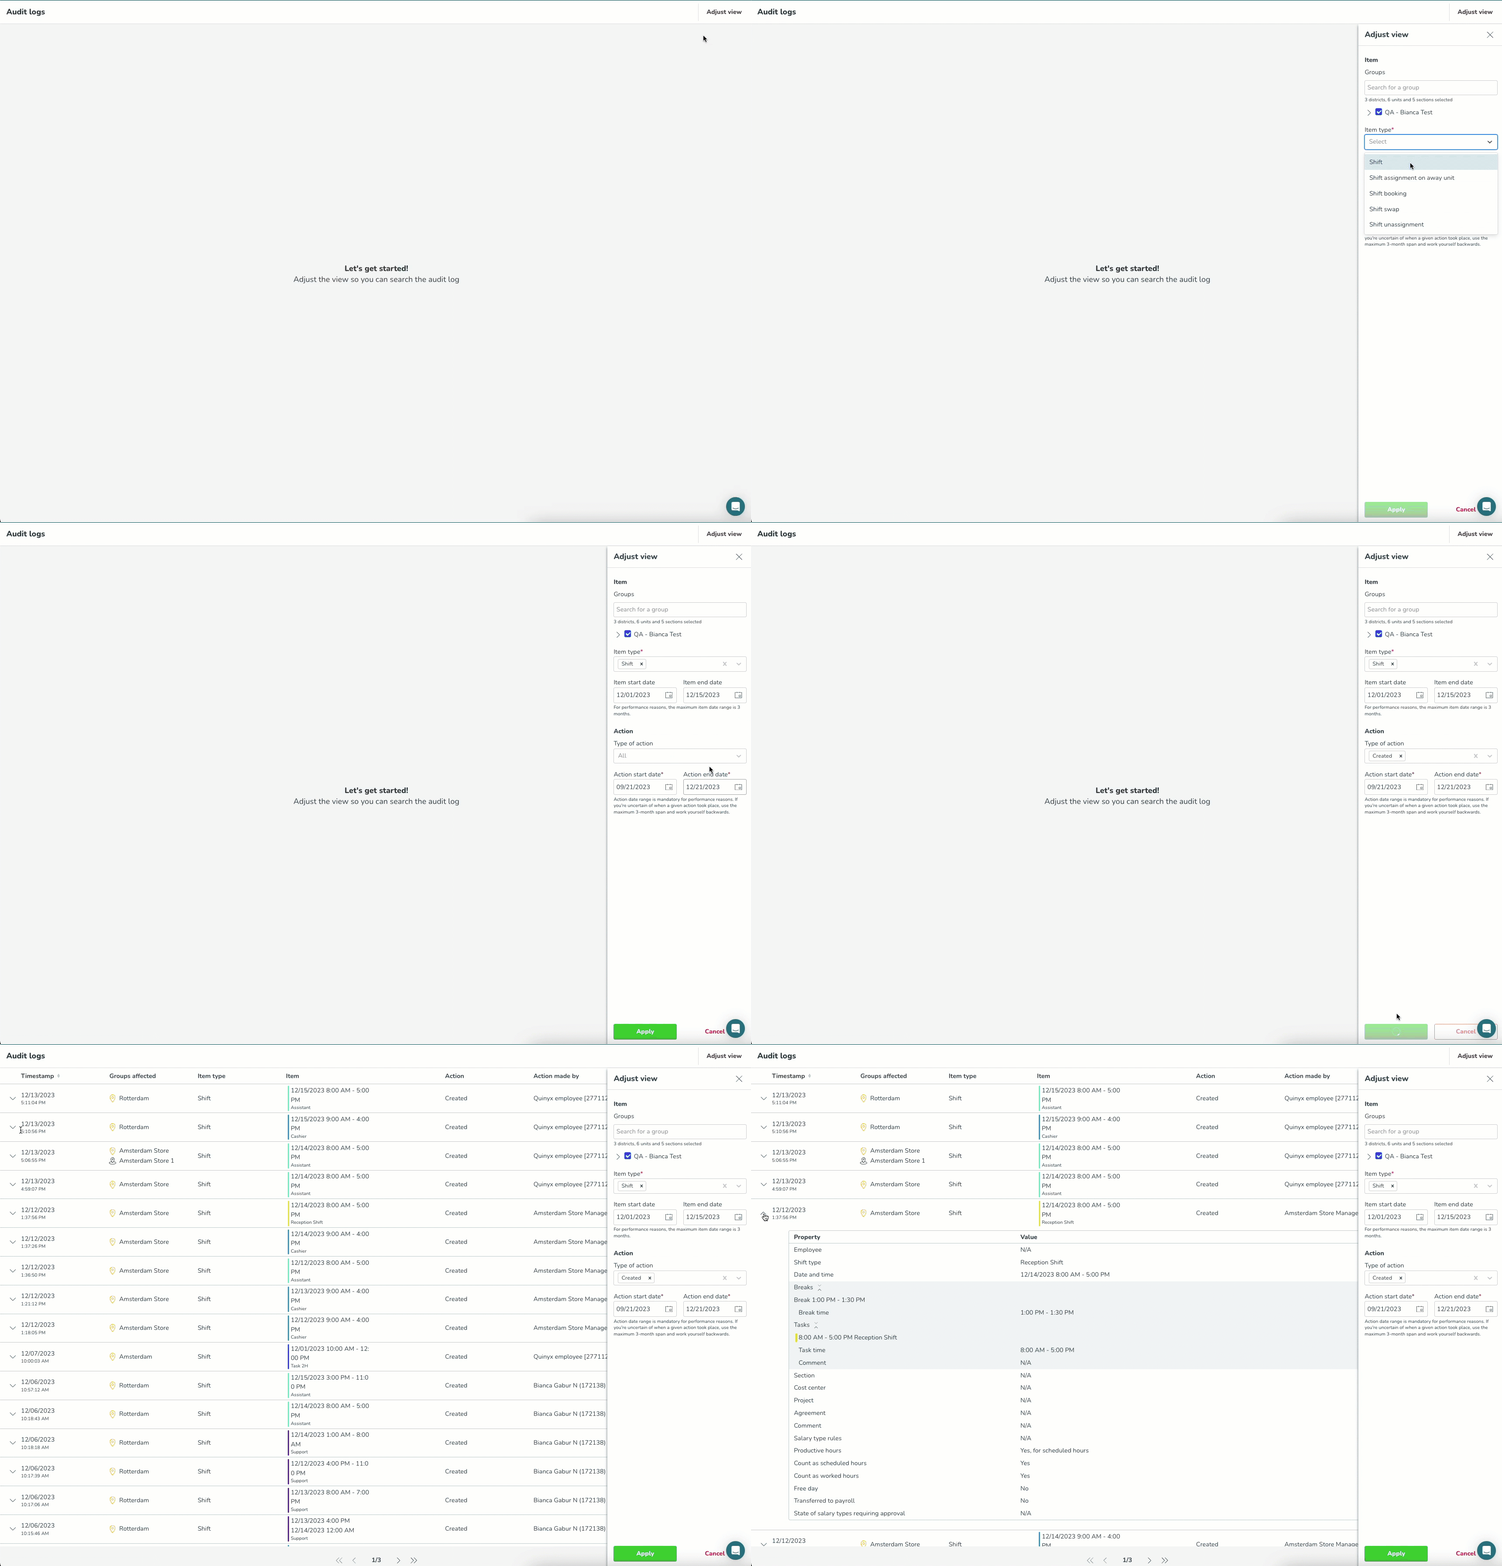
You can view shift audit logs by navigating to Audit logs > Adjust view > [Item type] Shift.
Groups

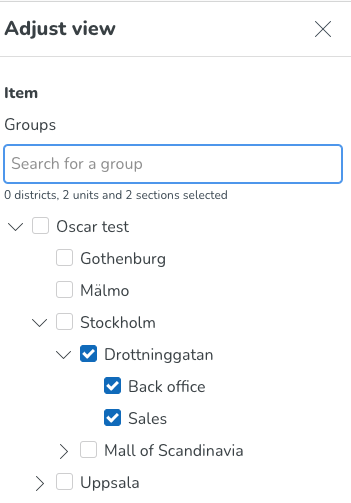
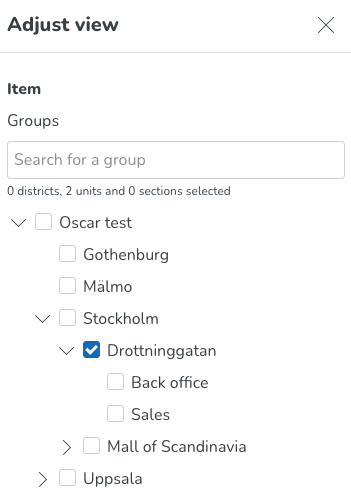
- This tree allows you to select which groups you want Quinyx to fetch logs for. Use the checkboxes of the tree structure of groups to select this. You can use the free text field to more easily locate items in the tree structure. The tree structure is collapsed by default.
- Under the free text field, the number of districts, units, and sections selected respectively will be displayed.
- You can select any group or groups on which you have at least one non-employee role with at least read access on any of the permissions.
- The default value for this field is the group currently selected in the navigation bar's group selector, as well as all of its child groups (if applicable).
- Deselecting a parent group also deselects all of its child groups.
- Selecting a group automatically selects all of its child groups. Note that you're able to deselect all said child groups at your discretion. Example: In the first picture below, Quinyx will search for all items taking place on both unit Drottninggatan as well as on its sections Back office, and Sales. In the second image, we're searching for items that take place on Drottninggatan, but not items that take place directly on the sections, meaning that shifts with shift section Drottninggatan > Backoffice or Drottninggatan > Sales will not be included in that search.
Item type
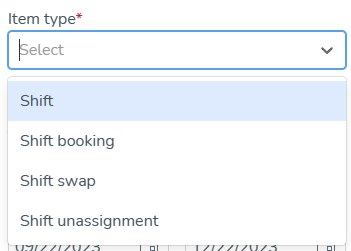
- This field allows you to select which items you want Quinyx to fetch logs for.
- This field requires you to select Shift.
- Assuming you have at least read access on the relevant permission - for shifts, that would be the Scheduling permission - on non-employee role any of the groups you've selected in the Groups tree, that item would be available for selection in the Item type field.
- The item type field is mandatory.
Item start date / Item end date

- The Item start date and Item end date fields, respectively, will only apply to relevant item types, which is why the two date fields only display upon selecting item type.
- Item dates apply to shifts, so these fields will display if you select Shift in the Item type field.
- These dates allow you to set the start and end date of the period within which the item(s) you’re searching for start.
- This also applies to deleted items; the Item start date and Item end date fields also allow you to search for items that took place in a specific date range when deleted.
- There are no default values for these two date fields.
- Selecting a value in any one of the fields auto-populates the other field with the same value.
- If you edit any of the fields in a non-consistent manner - i.e., so that the item end date is prior to the item start date - Quinyx will auto-populate the other field to the same value as the one you just populated.
- The Item start date and Item end date fields are optional fields.
- The maximum period you’re able to specify using the Item start date and Item end date is three months.
- The search carried out considers the business daybreak of the group the schedule item takes place on.
- The search using the Item start date and Item end date fields considers the time zone used when displaying the schedule in Schedule in Quinyx.
Type of action
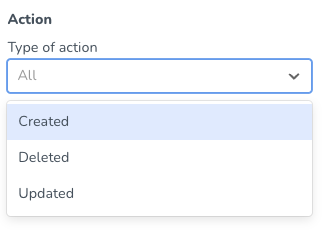
- This field allows you to select which types of actions - taken by a given user - you want Quinyx to fetch logs for.
- Currently, you're able to perform any, several, or all of the following actions:
- Created
- Deleted
- Updated
- If you make no selection in this field, the field will read "All," meaning that logs for all of the above-listed actions will be fetched by Quinyx.
Action start and end date

- These date fields allow you to set the start and end date of the period within which the action you're looking for was carried out in Quinyx.
- The default values for these fields are three months back in time from today's date for the "Action start date" field and today's date for the "Action end date" field. If you're uncertain of when a given action took place, use the maximum 3-month span and work yourself backward.
- Action start and end date are always in the same time zone as the group currently selected in the group selector of the top bar.
- The action start and end date fields are mandatory for performance reasons.
Once you're done adjusting the above search parameters, click Apply, and Quinyx will fetch the log data in question. A spinning wheel will display on top of the Apply button until the results of your search are displayed.
Action made by
You’re able to specify - when using the (current) audit logs - which user has carried out a given action in Quinyx.
In addition, to enable you to further narrow your search for the historical piece of data you’re attempting to locate when using the (current) audit logs, this field also allows you to get a full list of all actions taken by a given manager, which is typically useful when attempting to verify claims of particular managers favouring certain employees or simply not complying with company policy.
The field used to do so can be found toward the bottom of the Adjust view panel in the (current) audit logs:

In this field, you’ll be able to select any of the following:
- Any user with any manager or employee* role on at least one of the dates in the Action start date - Action end date range on any of the group(s) selected in the Adjust view panel’s groups tree. For each user, first name, last name and badge number will display in the following format: [First name] [Last name] [(Badge number)].
- Any Quinyx system administrators on at least one of the dates in the Action start date - Action end date range (displayed as “Quinyx employee [employee id]”).
- Quinyx System; this option will search for all the updates made by Quinyx as a system.
- Names of integration credentials, or uuid in case the integration name has been deleted. Note that these display regardless of whether the integration credentials in question existed in the (action) date range your search applies to. These will allow you to search specifically for log data of actions stemming from an integration making use of any of our external REST APIs.
- Due to technical constraints, any integration credentials that have been deleted won’t display as a possible search value in this field. Should you need to search for actions which relate to a deleted integration credential, you will need to search for them manually.
- SOAP. This value allows you to search specifically for log data of actions stemming from an integration making use of any of our external SOAP APIs.
The default value of the field will be “All” text, meaning all managers/employees (as defined above) are included in the search by default. The dropdown values will be sorted alphanumerically.
The field will be searchable - like the Action made for the field.
Action made for
You can specify (when using the (current) audit logs) which user has been impacted by a given action in Quinyx. This enables you to get a full list of actions for a specific employee, which is typically useful when verifying claims by specific employees of unfair treatment.

- This field allows you to search for any user with an employee role on the group(s) selected in the Adjust view panel group tree as of today, any time in the past, or the future.This means that editing your selections in the group's tree after populating the Action made for field will reset the field.
- Each employee in the field’s drop-down will display as per the following format: [first name] [last name] [badge number]
- You may search for a specific employee by typing their name(s) or badge number and/or by scrolling the list that adapts to what you’ve typed. You may also search for employees simultaneously by selecting various employees in this field. The employees in the list are sorted alphabetically.
- The default value is “All” meaning that if you leave this field blank when clicking “Apply” in the Adjust view panel, log results will not be fetched for one specific employee.

Time stamp |
|
Groups affected |
|
Item type |
|
Item |
|
Action |
|
Action made by |
|
Action made for |
|
Permissions and audit log search results
Your search results as a user will reflect your Quinyx permissions. When it comes to shifts for example, you will only get log data for shifts actioned on groups on which you have at least read access on the Scheduling permission. If the permission expires somewhere in the period specified using the Action start date and Action end date fields respectively, you will only see log data for the calendar dates on which said permission applies.
How do I know what an item looked like at creation?
For items in your audit log search results that are of type Create, you're able to see more details about the properties that applied to said item at the time of creation by clicking the chevron in the left-most column of the table of search results.

As a result, an item sub-table for shift create actions expands, listing all possible item properties and their corresponding values. The below illustrates what said sub-table for a shift can look like:

The table below clarifies the values to be expected by property for the item sub-table for shift create actions:
Property | Value |
Employee | This property describes the employee assigned to the shift at shift creation. The information displays as [First name] [Last name] [badge number]. If the employee has been deleted in Quinyx, then "[Employee has been deleted from Quinyx]" displays instead. N/A displays if no employee was selected at creation. |
Shift type | This property describes the shift type selected for the shift at shift creation. If the employee has been deleted in Quinyx, then "[Shift type has been deleted from Quinyx]" displays instead. |
Date and time | This property describes the start and end time of the shift. Shifts are displayed as follows for shifts that start and end on the same calendar date: [Start date] [Start time] [End time]. Shifts are displayed as follows for shifts that start and end on different calendar dates: [Start date] [Start time] [End date] [End time]. |
Breaks | All breaks of a shift are contained within a separate table within the table, as breaks are sub-items to shifts. The separate table is expanded by default but can be collapsed by clicking the two chevrons next to the Breaks property name. Doing so will display the breaks of the shift in question.  Each break displays as "Break [break start time] - [break end time]". In addition, breaks contain the "Break time" sub-property, for which the value column holds the [break start time] - [break end time]. |
Tasks | Similar to breaks, all tasks of a shift are contained within a separate table within the table, as tasks are sub-items to shifts. The separate table is expanded by default but can be collapsed by clicking the two chevrons next to the Tasks property name.  Each task displays as [task start time] - [task end time] [task type name]. The task type color displays as a vertical bar in front of that. Tasks contain the Task time as well as the Comment sub-properties. The first displays as [task start time] - [task end time] in the Value column. The latter displays with the text of the comment in question in the Value column, or as N/A if there the task in question has no task. |
Section | The section property describes the shift section of a given shift. If a shift has a shift section, its full name displays in the Value column. If there's no shift section, N/A displays instead. |
Cost center | The cost center property describes the shift's cost center. If a shift has a cost center, its full name displays in the Value column. If there's no cost center, N/A displays instead. |
Project | The project property describes the shift's project. If a shift has a project, its full name displays in the Value column. If there's no project, N/A displays instead. |
Agreement | The agreement property describes the shift's agreement. If a shift has an agreement, its full name displays in the Value column. If there's no agreement - which only applies to unassigned shifts -, N/A displays instead. |
Comment | The comment property describes the shift's comment. If a shift has a comment, its full text displays in the Value column. If there's no comment, N/A displays instead. |
Salary type rules | Similar to tasks, all salary type rules of a shift are contained within a separate table within the table, as salary type rules are sub-items to shifts. The separate table is expanded by default but can be collapsed by clicking the two chevrons next to the Salary type rules property name.  Each salary type rule displays as "Rule [number reflecting the order with which the rule displays in the shift panel in Schedule]". In order to reflect the salary type rules UI from Schedule, this audit log property contains the following sub-properties:
|
Productive hours | The productive hours property describes the state of the productive hours setting. The option selected for this setting will display in the Value column. |
Count as scheduled hours | The count as scheduled hours property describes the state of the count as scheduled hours setting. "Yes" will display in the Value column if the setting is set to true, "No" will display if it's set to false. |
Count as worked hours | The count as worked hours property describes the state of the count as worked hours setting. "Yes" will display in the Value column if the setting is set to true, "No" will display if it's set to false. |
Free day | The Free day property describes the state of the Free day setting. "Yes" will display in the Value column if the setting is set to true, "No" will display if it's set to false. |
Transferred to payroll | This property describes whether or not the shift has been transferred to payroll or no. When the shift is transferred to payroll, this property's value will be "Yes". When the shift isn't transferred to payroll, this property's value will be "No". Note that if a payroll run is reverted, that will be reflected in this property. By definition, the value of this property will always be "No" at shift creation. |
State of salary types requiring approval | This property is a special case. When a bank holiday has a day-rule using the "Shift without matching punch" option, and the salary type generated as a result of that requires approval, then the approval of said salary type will be logged on this specific property. Similar to salary type rules, all of the above-mentioned salary types requiring approval will be contained within a separate table within the table. The separate table is expanded by default, but can be collapsed by clicking the two chevrons next to the property name. Each salary type requiring approval in this separate table displays using the following format: [name of salary type] [custom salary code]. The sub-properties for each salary type requiring approval in this separate table display with the following sub-property:
By definition, the separate table will always be empty at shift creation. Note that for all other occasions of salary types requiring approval, they will be logged as a property on the punch log items. |
Warnings | You can find information about the warnings that the manager accepted when the shift was created or edited inside the shift audit logs. This information will make the shift audit logs more complete and will provide a better overview to anyone searching for audit logs if any of the configured rules were broken when the shift was created or edited. The list of accepted warnings will be visible inside the audit logs table as well as inside the shift history view. In the images below you can see how this warnings list is visualized:   |
The table will display 20 search results per page. In this example, our search results populate 21 pages, and we're viewing the first one out of those:

To browse your search results, use the outermost arrows to navigate to the first and last page of your search results respectively, and the innermost ones to step through each individual page.
How do I know what properties were updated?
For items in your audit log search results that are of type Update, you're able to see more details about which properties were de facto modified at the time of the update by clicking the chevron in the left-most column of the table of search results.

As a result, an item sub-table for shift update actions expands, listing all item properties that were affected by the update in question and their corresponding values. The below illustrates what said sub-table for a shift can look like.


The following applies to the item sub-table for shift update actions:
- It has one column for "Old value" and one column for "New value", which are used to indicate how the value of a given property has evolved.
- "Old value" column values display with strikethrough, in an attempt to highlight that the value in question was made obsolete as of the update in question.
- Just as in the item sub-table for shift create actions, the properties containing sub-properties display within separate tables, which are expanded by default, but can be collapsed at your discretion by clicking the two chevrons next to the property name.
- This separate table has sub-headings indicating what action has been taken on the list of items (breaks, tasks, salary type rules etc.). Possible actions are created, updated, and deleted.
- When breaks have been updated specifically, this will display as the break with the obsolete values being deleted and then created a break being created with the new values (refer to the above picture). The reason for this is strictly that of technical limitations.
- The same goes for tasks that originate from a base schedule if they're updated in the base schedule and then re-rolled out, as well as if tasks are updated using an integration that uses our SOAP Web Services. This limitation regarding tasks is something we plan to resolve in the medium term.
- When a sub-item (such as a break, task, etc.) has been created, we will display N/A with strikethrough as the value in the Old value column. When a sub-item has been deleted in Quinyx, we will display N/A as the value in the New value column.
- The "State of salary types requiring approval" property will display as updated when a salary type requiring approval is generated as a result of a bank holiday with the "Shift without matching punch" option is approved and unapproved respectively.
When one of these salary types is unapproved due to Quinyx re-calculating the correct salary - which happens depending on internal calls, for instance, when a user enters the manager portal's time card for the day the salary type is generated -, the "Action made by value" will be "Quinyx". Also, when a salary type, as described above, is configured to be automatically approved, the "Action made by" value will be "Quinyx" as well. - This separate table has sub-headings indicating what action has been taken on the list of items (breaks, tasks, salary type rules etc.). Possible actions are created, updated, and deleted.
Important bug fix information
The Quinyx logs are immutable. That means that if for some reason a bug occurs and the data that is logged by the system and displayed to you as a user is incorrect, and you report it, and we fix that bug, then that bug will be fixed for future occasions, but the data that was logged while the bug was in existence will, unfortunately, remain incorrect. Please refer to this article for an exhaustive list of bugs and improvements pertaining to or somehow affecting log data along with relevant information, including but not limited to [name of schedule item, such as shifts/shift bookings/shift swaps, etc].

