Version 0067
Organisation
Devices
With the release of Neo 0067 we are introducing a new page under group settings called Devices. On this page you can see all the employees in your group and whether or not their mobile device is authorised for punching.
You can also do batch authorisations and search for specific employees to see the status of their device.
- Navigate to group settings
- Click on Devices
- The list with employees in your group and their devices will now be visible:

You will now see five columns:
- Badge number - the employee's badge number
- Name - the employee's first name and last name
- Device key - the unique key of the employee's mobile device
- Last used - date and time for when the device was last used
- Authorised - Indicates if the device is authorised or not
The columns that are highlighted with blue colour can be sorted by clicking on them.
You can search the list on badge number or name by typing something in the search field.
To authorise one device click in the checkbox on the right hand side. The checkbox will now become blue with a white checkmark indicating that the device is authorised.
If the list contains many employees we will divide them into different pages. That will be indicated in the top right corner with a number for the page you are at, and one number indicating how many pages there are. Click the arrows to navigate between the pages.
To authorise all the devices visible on the page click the checkbox next to the text authorised in the header. All the checkboxes will then become blue with a white checkmark indicating that all devices are authorised.
Employee sharing
With this release we are adding support for seeing in the role overview if a person was shared with an end date.
If an end date was set when you shared the person you will see a yellow clock icon next to the shared label:
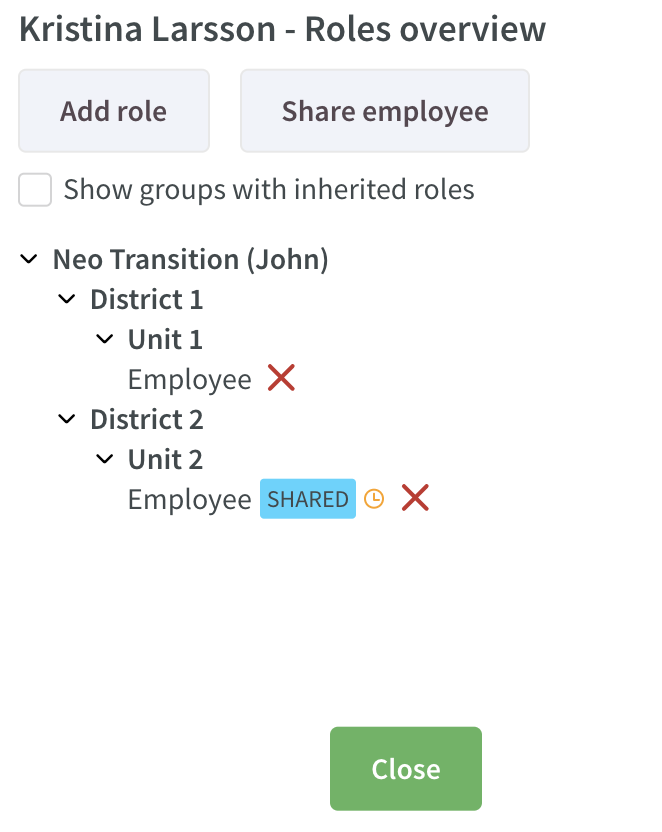
If you hover over the clock icon you will get a tooltip saying that the role has an end date and what date that is.
Qmail
Neo 0067 comes with the ability to access your Qmail. Qmail is the messaging tool in Quinyx.
You access your Qmail from the below icon in the right-hand side of Neo's top navigation bar. If you have unread Qmails, the amount will appear on top of the Qmail icon:

To refresh Qmail, use your browser's refresh button - this will update the counter and the list of Qmails.
Qmail Overview
Clicking the Qmail icon brings you to the Qmail overview. This view appears in a side panel in order for you to be able to view Schedule, or other parts of the app, while writing a Qmail. This view allows you to:
- View either received or sent Qmails
- Received Qmails are shown by default
- See whether a certain Qmail contains an attachment or has been marked as important
- See when a Qmail was received or sent respectively
- Filter your received Qmails on read or on unread
- Search among your Qmails
- The search can be made on recipient/sender, subject and text in the message
- Select one, multiple or all Qmails shown in the view and take action on your selection of Qmails
- Possible actions include deletion, marking as unread and marking as read
If you've received, or sent, more than 100 Qmails, the bottom of the side panel will include arrows enabling you to navigate to between older and newer Qmails.
Read a Qmail
To read a received or sent Qmail, click the Qmail in question in the overview. This brings you to the read view which displays the full Qmail as well as the information you could see in the Qmail overview for the Qmail in question. From here, you can also delete the message, mark it as unread or reply to it.
Create and Send a Qmail
To send a new Qmail from the overview, click the following icon:

You're able to select one, multiple or all members of the group currently selected in the Neo group selector as recipients of your Qmail. The dropdown list in the recipients field does not close on selection, allowing you to multi-select users.
In addition to typing a subject and message for your Qmail, you're able to add an attachment to your Qmail by clicking the following icon:

You may also select to receive a read receipt. This will trigger an automatic Qmail being sent to you when your recipient opens your Qmail. If you've selected multiple recipients, you'll get one read receipt for each recipient that opens your Qmail. To request a read receipt, click the following icon:

As a last selection, you may select to mark your Qmail as important. If you mark a Qmail as important, your employees will see the Qmail as a popup upon logging in to the Quinyx mobile app. For employees using web-punch, the Qmail appears next time they punch in. To mark a Qmail as important, click the following icon:

After adding the text and making the selections you want, click "Send" to send your Qmail.
Qmail in Schedule
There are two ways of sending Qmails from Schedule.
Qmail from a Shift
If you're viewing a shift which currently doesn't have an employee assigned to it, you're able to send a Qmail to one or multiple employees regarding this shift. Simply click the envelope icon to the left of the "Employee" field in the "Edit shift" dialogue:

The "Compose Qmail" dialogue opens and you're able to create and send your message from here. Please note that when accessing the "Compose Qmail" view from a shift like this, the list of recipients will feature a different sorting logic and interface, namely those of the assignable employees dropdown for shifts.
Qmail from Viewed Employee(s)
You're able to use filters in Schedule to send a Qmail to a specific subset of users in Quinyx.
Just follow these steps:
- Make your choice of filter values in Schedule, for instance to only display all employees with "Skill" German.
- Click the envelope icon above the list of employees in Schedule:
- The "Compose Qmail" dialogue will now open. The "Recipients" field will be pre-populated with the employees presently visible in Schedule.
- Type and send your Qmail to the selected recipient(s).
Schedule
Unavailability
It's now possible to see when employees are available (or not available) in the schedule view. The purpose of this feature is to provide additional help in the scheduling process to find relevant employees to schedule for a particular shift, but also to simplify scheduling employees who are shared across units. You will now be able to see when employees who are shared to your unit have shifts on other units, but also be able to see when your employee is scheduled elsewhere.
How do I find this feature?
- Go to the schedule view
- Click on the filter icon

- Select “Unavailability” from the first filter option called “Schedule items”.
- Now you will be able to see unavailability in the schedule view; a grey striped pattern.
What is the definition of unavailability?
- (un)availability defined on the agreement (for employees who are not shared, it's always the main agreement on home unit, for employees who are shared, it's the main agreement where the shift is scheduled).
- Start and end time of the defined unavailability
- Unavailability reason

In the example above, the employee is unavailable according to agreement the whole day.
- Absences
- When an employee is absent on home unit or other unit (if applicable)
- start and end time of the absence
- Unavailability reason
- When an employee is absent on home unit or other unit (if applicable)

- Shifts
- When an employee is scheduled on home unit or other unit (if applicable)
- Start and end time of the shift
- Shift type
- Unit name (if the shift is on another unit)
- Section (if applicable)
- When an employee is scheduled on home unit or other unit (if applicable)
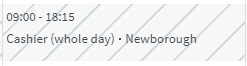
In the example above, the employee is unavailable as he/she has a shift on another unit that day (Newborough).
Additional information:
- You are able to see unavailability in all views. When there is not enough space to fit all information without removing parts of the text, the text is removed completely and the information can instead be found on hover.
- If an employee has several unavailabilities at the same time (for example the employee is unavailable according to agreement AND is absent) only one unavailability reason will be displayed in the view. We will first show absences, shifts and lastly agreement. You will be able to see all unavailability reason in the tooltip on hover.
- Note that if an employee is unavailable parts of the day, in all view above one day (i.e. weekly and monthly view), the entire day is shown as unavailable. On hover, you will be able to see the time of the unavailability.
Assignable employees - additional information per employee
With this release we have improved sorting of the list of employees to assign.
Highlights:
- Unavailable employees are included in the list
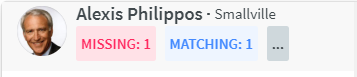
- Matching vs missing skills
- Reason for unavailability is displayed. For example if the employee is already scheduled or is absent.
How to:
- Create a new shift or edit an existing shift
- Select a shift type
- Select date and time of the shift
- Click on the employee drop down to choose an employee to be scheduled on the shift
- Employee list appears, employees are sorted by relevance.
What does “Sorted by relevance” mean:
- Employees who are available or unavailable according to agreement and have a Notice of Interests (if notice of interests are not used, this part is not applicable)
- Home unit
- Away unit
- Employees who are available (according main agreement, no absence or shift)
- Home unit
- Away unit
- Employees who are unavailable (according main agreement, has an absence or a shift):
- Home unit
- Away unit
In the sorting logic we also take into consideration how many skills that are matching between the shift type and the employee.
If employees meet the exact same criteria, they are sorted in alphabetical ascending order.
Visual indications
- Skills:
- blue text: matching skills between employee and shift type
- red text: missing skills between employee and shift type
- Grey dot on the on the employees profile picture:
- unavailability according to agreement
- absence, or
- employee has a shift the same time
- Green dot on the on the employees profile picture:
- Notice of Interests