SAML Single Sign On
 Updated
by
Leigh Hutchens
Updated
by
Leigh Hutchens
Quinyx supports the SAML 2.0 specification for Single Sign-On. This allows users to log in to Quinyx using their existing credentials from your organization's Identity Provider (IdP).
SAML single sign-on (SSO) provider configuration
Prerequisites
Before starting, ensure you have:
- Access rights: You must have the Account manager role to access Authentication settings.
- Identity Provider (IdP): A configured IdP (e.g., Azure AD/Entra ID, ADFS) that supports SAML 2.0.
1. Add a new provider
To create a new configuration:
- Navigate to Account settings > Authentication settings > SAML providers.
- Click Add to open the creation form.
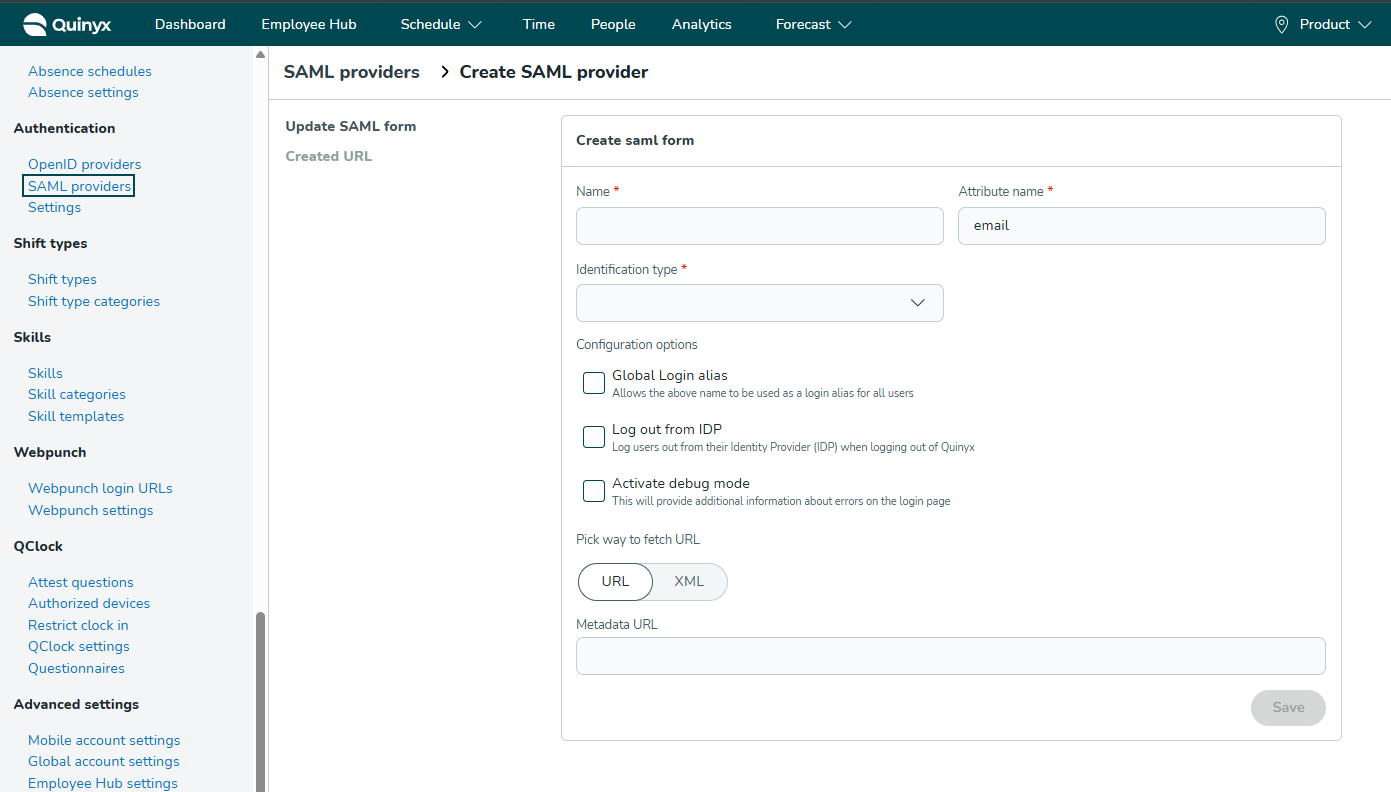
2. Create SAML form
Configure the basic connection details.
- Name: The display name for this provider in Quinyx (e.g., "Corporate login"). This is visible to administrators and, if using a Global Login Alias, to end-users.
- Attribute name: The specific attribute in the SAML assertion that acts as the username.
- Note: Unlike OpenID, SAML often requires the full Claim URI here.
- Azure AD Example:
http://schemas.xmlsoap.org/ws/2005/05/identity/claims/emailaddress
- Identification type: Select which field in the Quinyx user profile matches the Attribute name from the provider (e.g., Email).
3. Configuration options
Control the behavior of the login/logout flow.
- Global Login alias:
- Enabled: Allows users to enter the Name of this provider in the mobile app login screen to be automatically redirected to your SSO.
- Requirement: The name must be globally unique across all Quinyx regions (EU and US). Uniqueness is validated upon saving.
- Log out from IDP:
- Enabled: When a user logs out of Quinyx, they are also logged out of their session in the Identity Provider.
- Note: Ensure your Identity Provider supports Single Logout (SLO).
- Activate debug mode:
- Enabled: Displays detailed error information on the login page if authentication fails. Recommended only for initial setup and troubleshooting.
4. Import IDP metadata
You must provide Quinyx with your Identity Provider's metadata. Select one of the two methods under Pick way to fetch URL:
- URL (Recommended): Select URL and paste the public Metadata URL provided by your IdP into the Metadata URL field. Quinyx will keep the configuration in sync with this URL.
- XML: Select XML to paste the full raw XML metadata code directly into the field.
Click Save to create the provider.
5. Finalizing setup (Created URL)
Once you have saved the configuration, Quinyx generates a metadata URL that you must provide back to your Identity Provider to complete the "trust" relationship.
- After clicking Save, look at the left-hand menu of the SAML provider page.
- Click Created URL.
- Copy the provided URL (this serves as the Entity ID and Assertion Consumer Service/Reply URL).
- Paste this URL into your Identity Provider's configuration settings.
6. Using global login alias
If you enabled Global Login alias, users can log in via the mobile app using a simplified flow:
- Open the Quinyx mobile app.
- In the Username field, enter the exact Name of the provider (e.g., "MyCompanyLogin").
- Tap Continue.
- The user will be redirected immediately to your Identity Provider's login page.
Troubleshooting tips
- Case sensitivity: The provider name is not case-sensitive.
- Error handling: If the user is prompted for a password instead of being redirected, they may have typed the alias incorrectly, or the Global Login alias checkbox was not enabled in Step 3.