Shift Types
 Updated
by
Leigh Hutchens
Updated
by
Leigh Hutchens
This article relates to Classic.
There are different ways of creating a schedule in Quinyx. However you create a schedule, there have to be Shift types, which can be regarded as the building blocks for creating a schedule. Each Shift type comes with several options, enabling you to carry out your scheduling smoothly and efficiently.
Shift types can be found under the Schedule tab and the Shift types submenu.
This view displays a list of existing shift types. The shift type's name very often relates to where and when the employees' work or to the task being carried out.
Examples of shift types:
- Kitchen
- Reception
- Early shift
- Late shift
- Cashier
- Admin
- Driver
- Training
- Doctor
- Nurse
- Spa
- Union meeting
- Workshop
A shift type can be associated with a color. Choosing a specific color for a shift type provides the scheduler with an excellent overview in the schedule. General start and end times are displayed for the shift type if they have been set, along with linked skills.
Create a shift type
Click Add to create a new shift type.
- Name: The name of the shift type. This is what the manager and employee see in the schedule.
- Active: A shift type cannot be deleted if it has been used in the schedule, but it is possible to render shift types inactive by unchecking Active if you no longer wish to use them. It will then no longer be possible to select them during scheduling.
- Normal cost/h: It is not necessary to insert the hourly cost, but this is useful if staff costs need to be tracked in Quinyx. This cost set for the shift type defines a standard cost for unassigned shifts which is shown in schedule view summaries etc. As soon as they shift is assigned the cost is recalculated according to the assigned employee's agreement.
- Unsocial hours cost/h: You can also add an hourly cost for compensation for working different levels of unsocial hours. Note that you then need to add the hourly cost plus the addition, not just the addition.
- Ranking: Ranking is used when automanning shifts. The shift with the highest ranking is manned first. In other words, a shift with a ranking number of 50 is manned before a shift with a lower ranking number.
- Automanning: unchecked if you do not want this shift type to be automanned.
- Use colored shifts: check to be able to give your shift type a color.
- Background color: Select color
- Text color: Select color
Leave periods are displayed in black by default in Quinyx. In addition, it is also common for unmanned shifts to be displayed in yellow. So, one handy tip is to select colors other than just black and yellow for displaying your shift types. - Advanced settings: Click the down arrow to display advanced settings.
- Fixed task: Checked if a certain number of hours should be deducted from the shift's total number of productive hours in order to cover one or more non-productive tasks. The time for the fixed task can be entered in the box on the right. A task is not counted as productive time.
- Productive time: It is possible for shifts that are not counted as scheduled hours to be counted as productive time and so be included in the "Headcount" summary that can be seen in the Daily schedule and Scheduled staff views, if you use the Forecast module. If a shift is tagged as productive time, it will be included in all "Headcount" summaries in scheduled views and Forecast.
- Yes, for scheduled time - hours will be calculated as productive only if the shift has Count as scheduled hours checked and is selected by default.
- Yes, always - the value Count as scheduled hours is ignored, the shift will always be counted as productive time.
- No - This option can be selected if the shift type is used for tasks which do not contribute to sales and should never be included in the headcount which is compared to optimal staffing figures, e.g. Administration or Training.
- Generic shift: Used to "pre-book" staff without defining tasks in advance. You can, for example, build a fixed schedule for an employee using generic shifts and publish it. When automanning is used, employees who are scheduled with generic shifts will be moved to the matching regular shifts.
- On-call shift: Enabled if the shift is an on-call shift. When this is enabled, the shift is not checked against the employee's time rules in the case of staffing. This is because on-call shifts are not covered by the same collective agreement rules as regular shifts.
- Standby: Selected if the shift is a standby shift. Standby shifts work similarly to on-call shifts.
- Overtime shift: works like other shifts and is included in agreed hours but will be totaled separately from the standard time.
- Count as scheduled hours: Checked by default and means that the shift type's hours are included in the time summaries and calculations against set time rules.
- Count as punched hours: Checked by default and determines whether time punches, linked to the shift type, are to be included in time summaries.
- Free day: Day off shifts can be used to schedule days off for employees, which allows employees to swap days off with one another via the shift switching function. Days off are not counted as scheduled hours.
- Available in Webpunch: Check this to make the shift type selectable in Webpunch.
- Section: It is possible to link a shift type to a section to facilitate filtering.
- Category: It is possible to group shift types under a category, for further filtering capabilities. Select whether the shift type belongs to a category. The categories are created under "Categories" under the Shift types menu in the Schedule tab.
- Account: Select whether the shift type is to be posted to a specific account
- Cost center: Select whether the shift type is to be connected to a specific cost center. This will ensure that time worked on this shift is also assigned to the selected cost center, so that it will be posted accordingly in payroll files and reports.
- Project: Select whether the shift type is to be posted to a specific project.
- Description: The description is an additional field for entering further information about the shift. The description is visible to all employees.
- Time: It is not mandatory to add start and end times to a shift type, but it can save you a great deal of time when scheduling if the shift type is normally used for the same periods in the schedule. The shift type times are suggested by default during scheduling, but they can of course be adjusted.
- Break: It is not mandatory to add breaks to a shift type, but it can save you a great deal of time if breaks are generally scheduled at the same times. Break times are suggested during scheduling by default, but they can be adjusted. Depending on the set up, up to 3 breaks can be added and the agreement controls whether or not the break is paid. It is also possible for Quinyx to calculate a break on the basis of shift length if break rules have been defined. In this case, click the calculator icon to calculate a break on the basis of these rules.
- Show breaks: You can uncheck Show breaks if the scheduled break does not need to be displayed in the schedule. It is useful if staff can take their break when there is time rather than at a fixed time.
- Select type of shift: Here, it is possible to schedule tasks within a shift. In this case, select the shift type for the task and the start and end time.
For example, if staff need scheduled admin time during a shift, it would look like this in the schedule. - Add rule: Using the Add rule button gives you the chance to add rules manually for salary types which will apply when an employee works according to just this shift type.
Examples may involve adding a meal deduction after someone has worked for more than a certain number of hours, to track the number of days worked, or to add a supervisor supplement.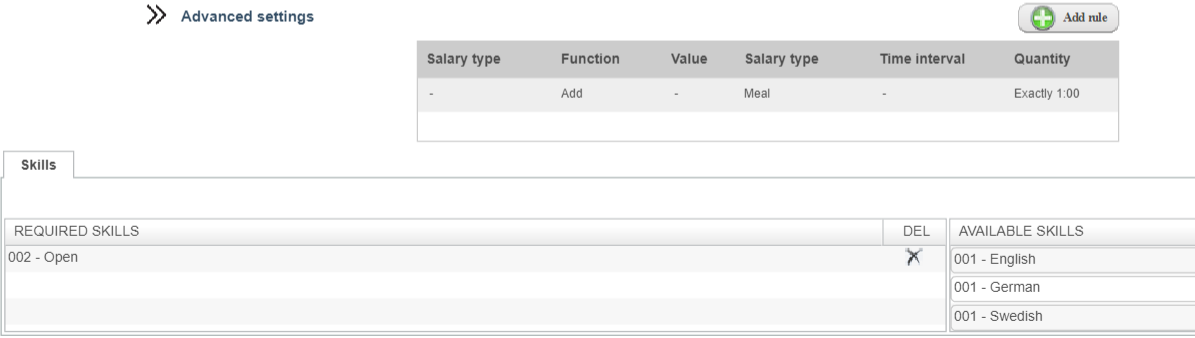
- Skill/Experience: It is possible here to select whether a skill is required for the shift type.
Somebody may need to have keys if they work on the morning shift, or they may need certain certification to work on a specific type of shift. If a skill is required, and the scheduler attempts to schedule someone who does not have it, a warning will be displayed to the scheduler. Employees will be prevented from automatically being assigned to a shift if they do not have the necessary skills for that shift - Click Save.
Disable a shift type
A shift type cannot be deleted if it has been used in the schedule, but it is possible to render shift types inactive by unchecking Active if you no longer wish to use them. It will then no longer be possible to select them during scheduling.
Note that it is fine to disable a shift type that is used in the current schedule. This will not affect the rolled out schedule, all that will happen is that it will not be possible to select the shift type in future.
Disable as follows:
- Open the shift type
- Uncheck Active
- Save

Update a shift type
It is possible to change settings in a shift type and at the same time choose to update the fixed and rolled out schedule with the changes.
Changing opening hours is one example.
- Open relevant shift type
- Change relevant information (e.g. start time)
- Click Save.
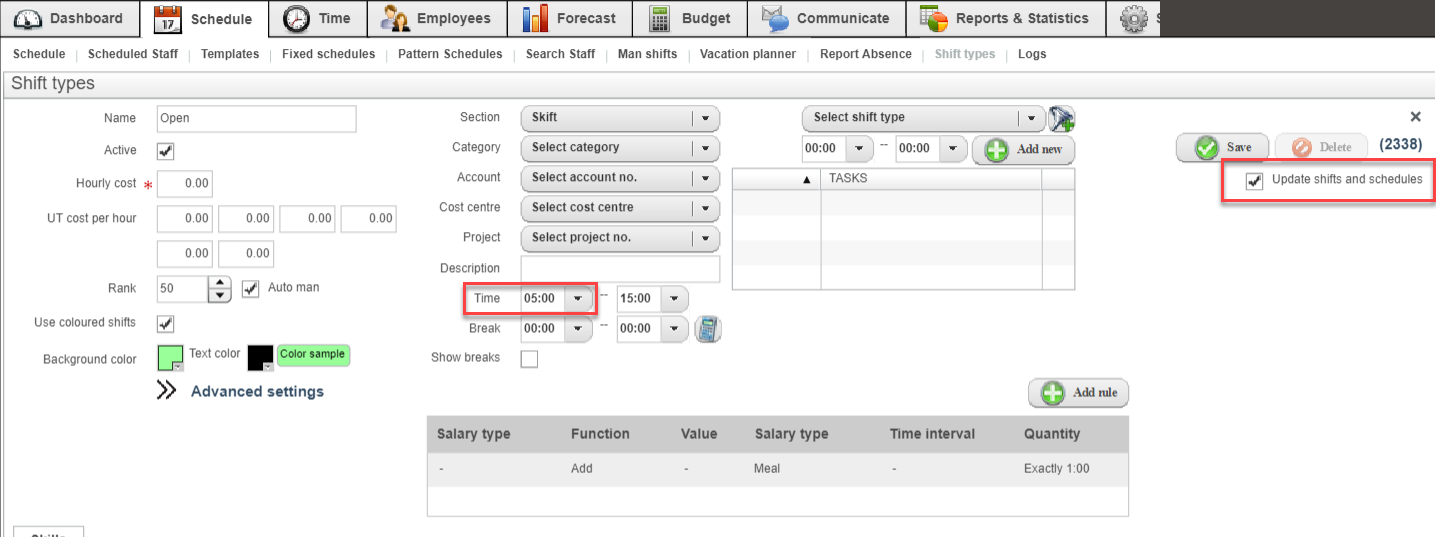
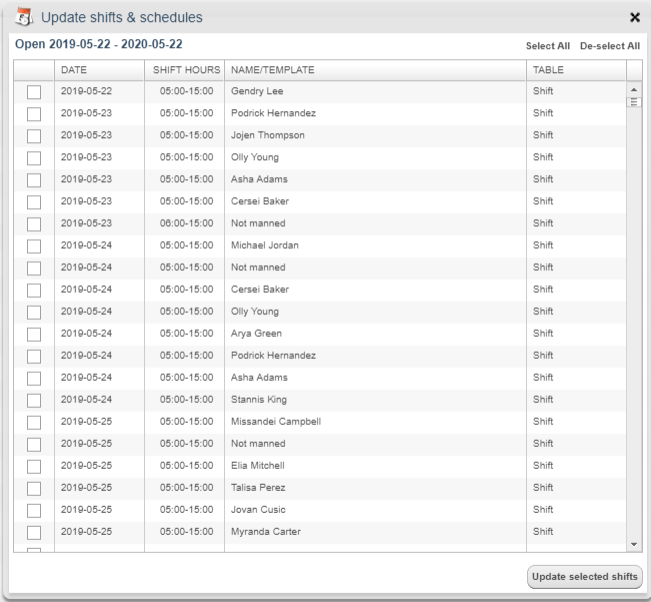
- For other changes to take effect, select Update shifts and schedules.

- Select the records that you want to be affected by the change by checking relevant checkboxes and periods.
- Click the button Check what is updated to view a list.
- Select the shifts to be updated. Note that you can use the "Select All" function on the right-hand side.
- Click the button Update selected shifts.
Manual rules on shifts
It is possible to define rules for extra salary types to be generated when an employee punches time on a shift. These salary types will be marked with an orange square in the salary type table on the time card. Click on “Add rule” to add a new manual salary type rule on the selected shift type. In the dialog window that opens, you can define how and when the extra salary type should be generated, as well as the amount.
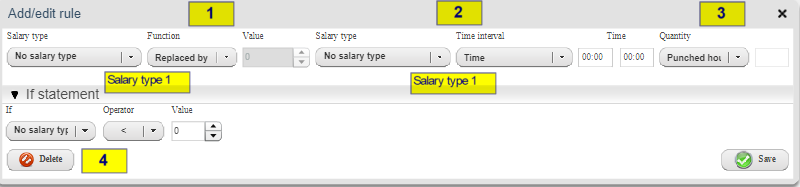
What and when (1)
Here you can define a rule for how the extra salary type should be generated. A number of different rule types can be set up. In the examples below, we make references to the yellow notations in the image above.
- Replaced by: Salary type 1 is replaced by Salary type 2 during the period defined under 2. This means that all instances of the type selected in the drop-down menu Salary type 1 that are generated from punches connected to the shift will be replaced by (or, in other words, converted to) Salary type 2.
- Add: Salary type 2 will be generated in addition to all automatically generated salary types from punches connected to the shift.
- Multiply by: Salary type 1 is multiplied by Salary type 2 (where Salary type 2 is an automatically created salary type). A multiplication factor is required under Value, e.g. 1.5 if you want 1.5 times more of salary type 1 to be created in relation to Salary type 2.
- Replaced completely by: Salary type 1 will be replaced completely by Salary type 2, regardless of how many hours of salary type 1 has been generated and what rules are defined under 2.
When (2)
Here you can choose between which times the rule should be applied, i.e. if the extra salary type should only be generated if the employee punches time between certain hours of the day, or if they have worked a certain amount of hours during the given business day. The following options are available:
- Time: The rule should only be applied if the employee has worked between the selected hours of the day.
- Within Schedule: The rule should only be applied for hours worked within the scheduled shift.
- Outside schedule: The rule should only be applied for hours worked outside the scheduled shift.
- Generated hours: The rule should only be applied for all hours generated of the selected salary type.
Amount (3)
Here you can define how many hours of the selected salary type should be generated from the given rule. The following options are available:
- Worked hours: The salary type should be generated for the same amount of hours that has been worked
- Exactly: An exact amount of the salary type should be created. E.g., 1 meal deduction regardless how many hours have been worked.
- Minimum: The salary type should be generated for the same amount of hours that have been worked, with a lower limit as defined in the next field.
- Maximum: The salary type should be generated for the same amount of hours that have been worked, with an upper limit as defined in the next field.
If statement (4)
Here you can define a rule that says that the extra salary type should only be generated if the defined condition is met, e.g,. if the rule should only be applied if more than 5 hours of hourly salary has been generated. The following options are available:
- Less than: The defined rule under 1, 2, and 3 only applies if the salary type selected in the left dropdown menu has been generated for less hours than what has been entered in the field to the right.
- More than: The defined rule under 1, 2, and 3 only applies if the salary type selected in the left dropdown menu has been generated for more hours than what has been entered in the field to the right.
- Equal to: The defined rule under 1, 2, and 3 only applies if the salary type selected in the left dropdown menu has been generated for exactly the amount of hours that has been entered in the field to the right.
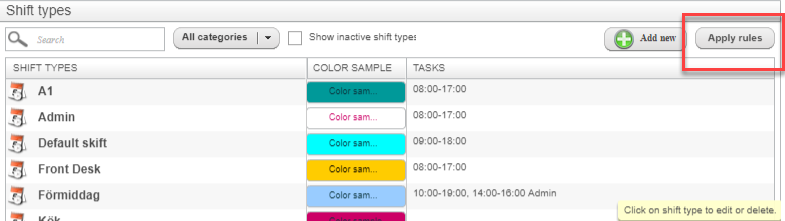
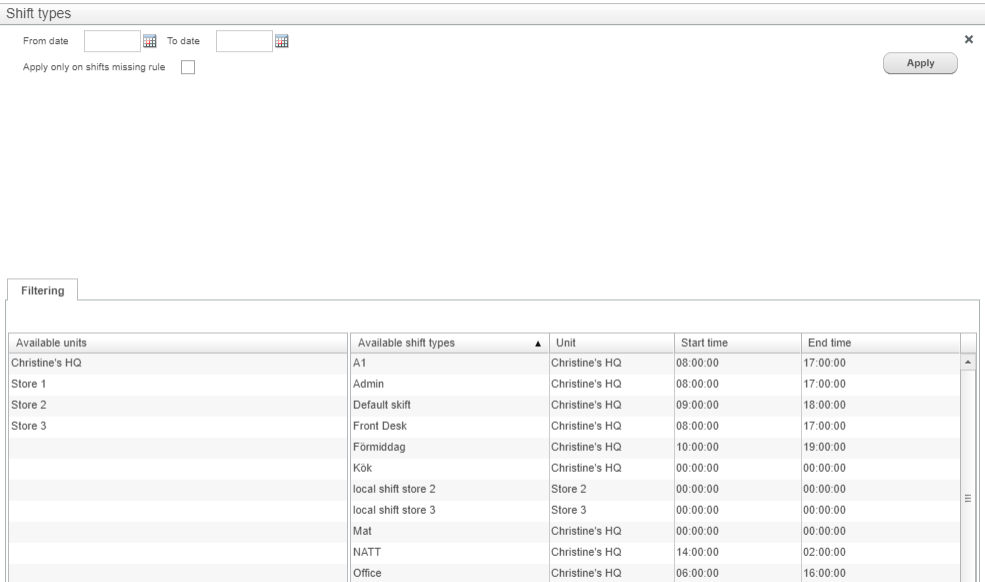
Apply rules
It is possible to update pay type rules from shift types on historical shifts and update multiple different shift types in different units at the same time. The button "Apply rules" can be found in the shift type settings. It is possible to apply the change just to shifts that have no rules.
This may be useful if new pay type rules are implemented in a shift type halfway through a period.
Rules for calculation of breaks
Under rules for calculating breaks, you can define the amount of time that has to be worked before an employee is to have a break, how long it should be, at what point in the shift it should be scheduled, and the day of the week on which this rule applies. Schedulers can then quickly click the calculator during scheduling so that Quinyx adds the correct break automatically. Rules for each day of the week can be used, for example, if breaks are to be shorter on Sundays compared with other days of the week. Break calculation rules for specific days of the week will always be applied prior to rules for "All days of the week".
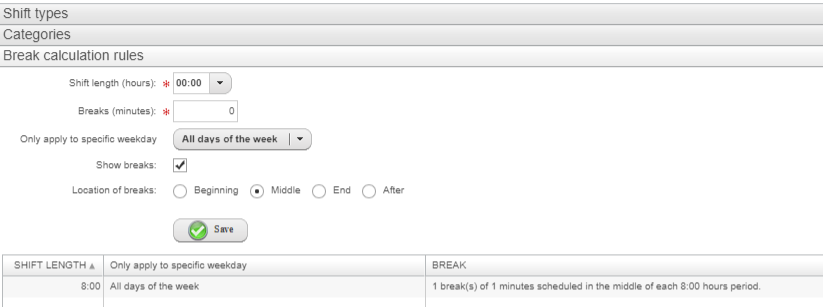
You can set up break calculation rules for specific days of the week in individual agreements and agreement templates.