Filtering
 Updated
by
Leigh Hutchens
Updated
by
Leigh Hutchens
Filtering
Filtering allows you to specify what you want to see in the schedule by removing everything in the view except what you have filtered on.
How to find the filter options:
- Go to the schedule
- Click on the "filter icon" in the menu.
 Note that the number on the filter icon indicates how many filter selections currently are active in the view.
We offer the following filter options:
Filter | Explanation |
Schedule items | Shifts, punches, leave requests, absences, notice of Interests, tasks, unavailability. |
Base schedule | Shifts originating from a specific base schedule. Note that if you've deleted underlying shifts as a result of having added an absence, only to later remove that absence and reinstate the shifts, those shifts will not appear as a part of the filter. We aim to improve this. Note that this filter field only appears if there is at least one shift originating from base schedule in the period Schedule period you're currently looking at. |
Shift type | Shift types. In the drop-down of the Shift type filter field, we display shift types with the same details as in the shift type drop-down of the Add shift / Edit shift panel. This means: the shift type color appears in front of the shift type name, and after the shift type name, the times configured on the shift type will display. |
Shift status | Filter by unassigned shifts and assigned shifts. The field behaves as follows:
|
Shift section | Filter shifts based on the section they take place on. |
Employee section | Filter employees based on them belonging to a specific section. A section only appears in the Employee section drop-down if at least one employee has a role directly on that section on any of the dates in the currently viewed period. |
Employee status | Employees with schedule items, Employees without schedule items. |
Absence type | Filter by type of absence. |
Home unit | Drop-down includes the home units of employees that have a role on group currently selected in Quinyx. You may select one or multiple units from the list which will then update the Schedule to show only employees whose home unit corresponds to the selection you've made. |
Staff category | Filter employees by staff category. |
Employee | Employees with a role in the group. In the drop-down’s values in this field you can search for: employee name only, employee badge number only, and both employee name and employee badge number. |
Skills | Filter employees by skills. Note: if you select multiple skills in this field, any employees shown in your schedule will have each one of those skills. |
Attest | Filter attested punches and unattested punches. |
Reports to | Here, you can filter on employees who have reports to defined (People > People details > Advanced details) by selecting the manager of the employee in the drop-down. Note that currently the filter field "Employee" and "Staff category" can't be used in conjunction with the "Reports to" filter. |
Warnings | Filter punches only. This field was previously called "Punch". Read more here for specifics. |
The first time you go into the schedule view you will see everything you can see in the schedule, i.e. no filters are pre-selected in the view.
Favorite filters
You can save your most common filters by selecting the Save button at the bottom of the filter panel. When the filter is saved you will find them at the top of the filter panel.
Quinyx recommends that you set up your favorite filters for your most common tasks (and then name the filter accordingly). For example, the "Attest" favorite filter may contain schedule components "shifts" "absence" and "punches". Depending on how you work within your organization, unattested punches and punches with warnings can also be interesting to add to the same favorite filter or an additional favorite filter.
Favorite filters are local, meaning that only you can see and access your favorite filters.
And / Or
This toggle selection determines how the filter works when you make use of more than one filter field. "Or" will show all employees that match your selection in at least one one of the filter fields you've used, whereas "And" will show only employees that match your selection in all of the filter fields you've used.
Example: You filter by type "Cleaning" and employee "Anna Stevenson". If you select "And", both conditions must be true for you to get any results. If you choose "Or" it is enough that one of the conditions is true to give a result.
Quinyx remembers your filter choices
Quinyx remembers the filter choices you have made in the schedule view, meaning that if you go to another part of the application or log out, the same filter will remain when you go back to the schedule view next time.
A note about the Warnings filter
The “Warnings field” only targets punches. Note that this field will soon be placed under a heading indicating it targets punches which is why the current filter name isn't more specific.
The drop-down options are granular:
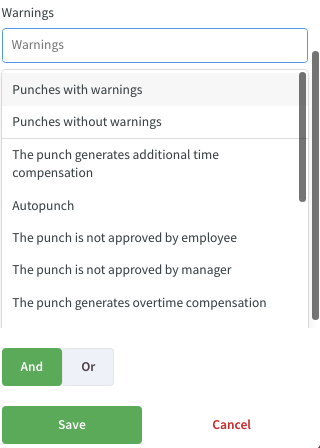
This is the full list of warnings that might appear in your list, but note that only the warnings configured for your Quinyx account in Time > Parameters in Classic will actually display in this drop-down, so that your users aren’t shown warnings of no relevance to them. The full list of options this drop-down could possibly contain is as follows:
- Punches with warnings
- Punches without warnings
- The punch contains salaries that require approval
- Note that once a punch has been approved, the warning no longer appears and therefore the punch won't display when the filter is applied either.
- Shift missing
- Punch missing
- Autopunch
- The punch is longer than the shift
- Punch commented by employee
- The punch is shorter than the shift
- The punch is not approved by employee
- The punch is not approved by manager
- The punch has been edited by employee
- The time of the punch has been edited
- The punch generates additional time compensation
- The punch generates overtime compensation
- The punch generates time in lieu
As you can see from the above picture, there’s a line separating the two top options from the rest. The reason is that the two top choices are describing the overall state of punches and not a specific warning. “Punches with warnings” select all of the specific warnings “under the line”, which makes it easy for you to multi-select warnings. “Punches without warnings” selects only that same option and will display all punches without warnings. The remaining options, such as “The punch generates additional time compensation”, filters out punches having specifically that warning. If you select multiple options, then Schedule will show all punches that have any of the selected options.