How to find and use filters in Quinyx
 Updated
by
Victor Jespersen
Updated
by
Victor Jespersen
Filtering in Schedule
How to find and use filters in Quinyx
- Go to Schedule > Schedule.
- Go to the funnel icon (filter) located in the upper-right corner.
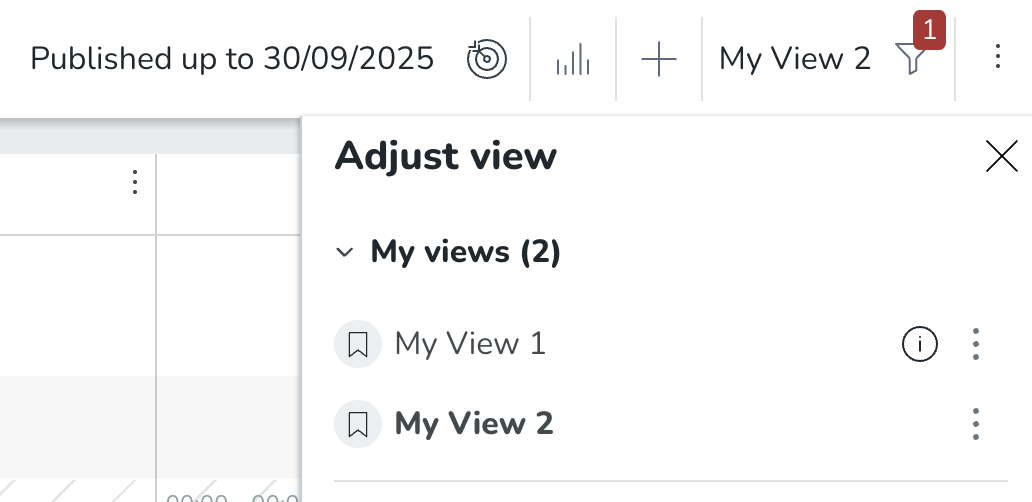
- Click on Filters, and the filter navigation panel will open, displaying two different sections: My views and Filters.
- The first time you go to the Schedule view, you'll see all the information that particular view has, i.e., all people, all shifts, all tasks, all punches, etc. For this reason, all boxes are ticked in blue. Note that all headings and groupings will be expanded by default - including those of each blue checkbox, we've just collapsed them in the above pictures for pedagogical purposes.
The filter panel consists of two headings: My views and Filters.
My view | This is the section that contains filters that you, at some point, configured and decided to save for future occasions, as you predicted you'd be using them on a recurring basis. |
Filters | This is the section that contains what we call Filter Groupings. You can think of a filter grouping the same way as a type of schedule item, i.e., an item that can be found in the actual schedule. The filter groupings are: People, Shifts, Tasks, Punches, Absences, Absence Requests, Unavailability, and Availability. Each filter grouping offers a number of options (fields) underneath, allowing the user to choose one or more fields/values to filter on all at once. Each filter grouping can collapse and expand, facilitating easy navigation in the filter panel without using the scroll bar. All filter groupings are expanded by default. |
- Sections are collapsed by default, for a clean view.
- Persistent section preferences: Open the sections you use most often, and they will stay open every time you access the panel, helping you work faster and more efficiently.
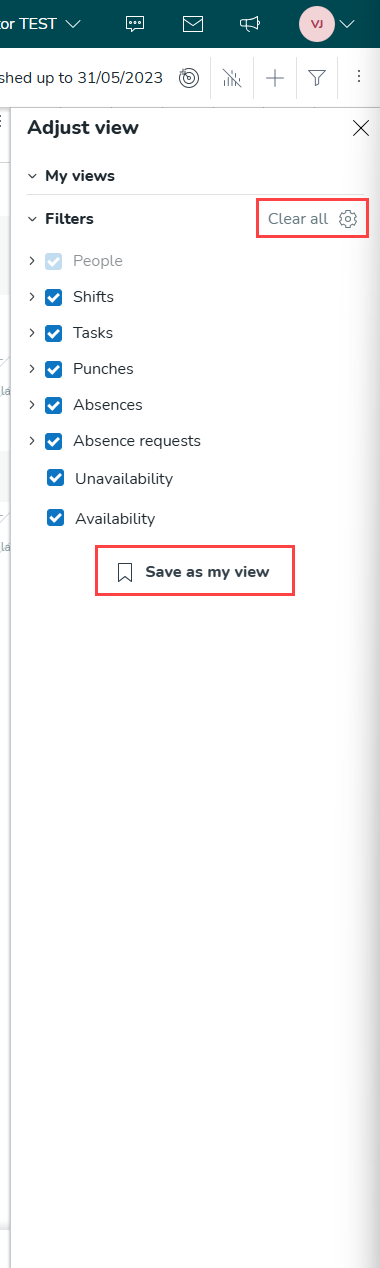
- In Filters, you will find a group of buttons, a gear, A Clear all button, and a Save as my view button at the bottom.
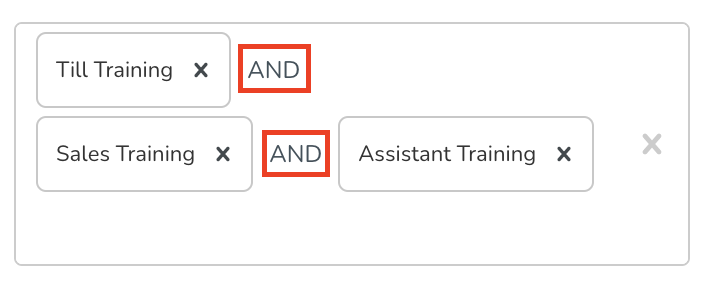
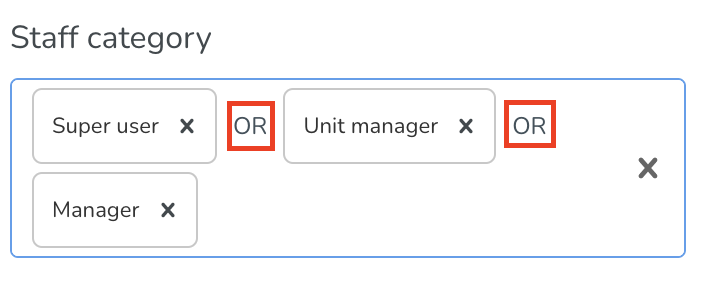
 | The gear icon represents Filter Settings. In these settings, you'll find one and/or toggle for each filter grouping that contains filter fields. These groupings are People, Shifts, Tasks, Punches, and Absences. This toggle determines how the filter works when you make use of more than one filter field within the same grouping. Using "Or" will in your schedule display all items of the grouping in question that match any of the selections you’ve made in the grouping. Using “And” will in your schedule display only those items matching all of your selections in the grouping in question. Example: You filter by shift type "Cleaning" and shift status unassigned. If you select "And", the schedule will show all shifts that meet the criteria of being the shift type "Cleaning" but also that of being an unassigned shift. If you choose "Or", all shifts that are either of shift type “Cleaning” or unassigned will display: 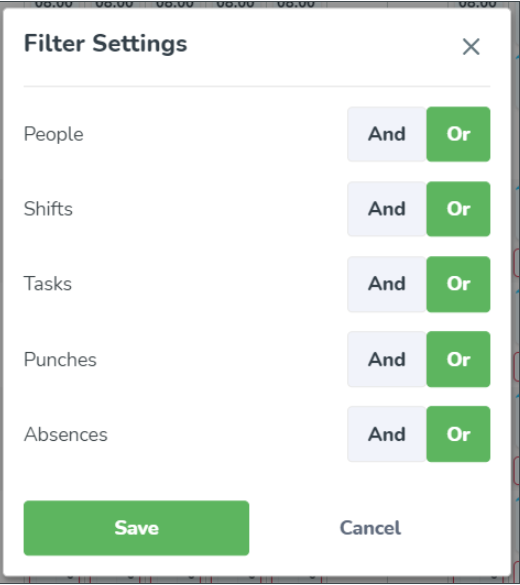 The logic AND/OR applies between fields of the same grouping (People, Shifts, Tasks, Punches and Absences), which is why we have one toggle per grouping. The logic between filter fields is, as described in the Filter groupings and fields, not the same thing. | ||||||||||||||||||||||
Clear all button | The Clear all button clears all filters currently applied. | ||||||||||||||||||||||
Save as my view button | Click the Save as my view button in order to save a filter search you want to keep for the future by giving it a name and an optional description. This saved filter will appear in the first section of the filter panel which is called My views, as mentioned at the beginning of this article. 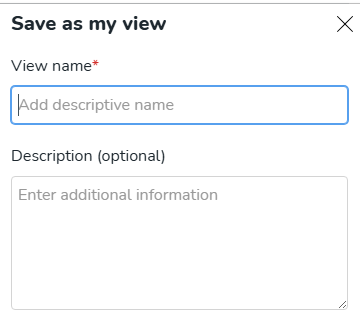 The following factors are saved when you save a view:
The saved views you create are available in whichever Quinyx group you navigate to - be it a section or a unit. In addition to that, Quinyx remembers your filter selections on account level, meaning they carry over even if you move to another section or unit. Favorite filters are user-specific, which means that only you can see and access your favorite filters. Note also that you can update an existing saved view. To do so, just select the saved view by clicking on it. Then edit your filter selections at your discretion. Click the star and type the same name as your existing saved view. The below warning then appears. Click OK. 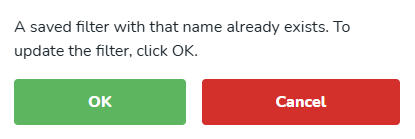 |
How does it work?
- The grouping filter checkboxes mentioned above determine which schedule items you can see. For instance, if you untick the Shifts checkbox, you won't see any shifts whatsoever in the schedule.
- The filter fields allow you to specify more specifically which items of a certain schedule item you want to see. For instance, if you filter on "Early shift" in the Shift > Type field, you will see only those shifts that have Early shift as shift type. Each field affects only the items of its parent grouping; so if you filter on this shift type, tasks won't be affected whatsoever.
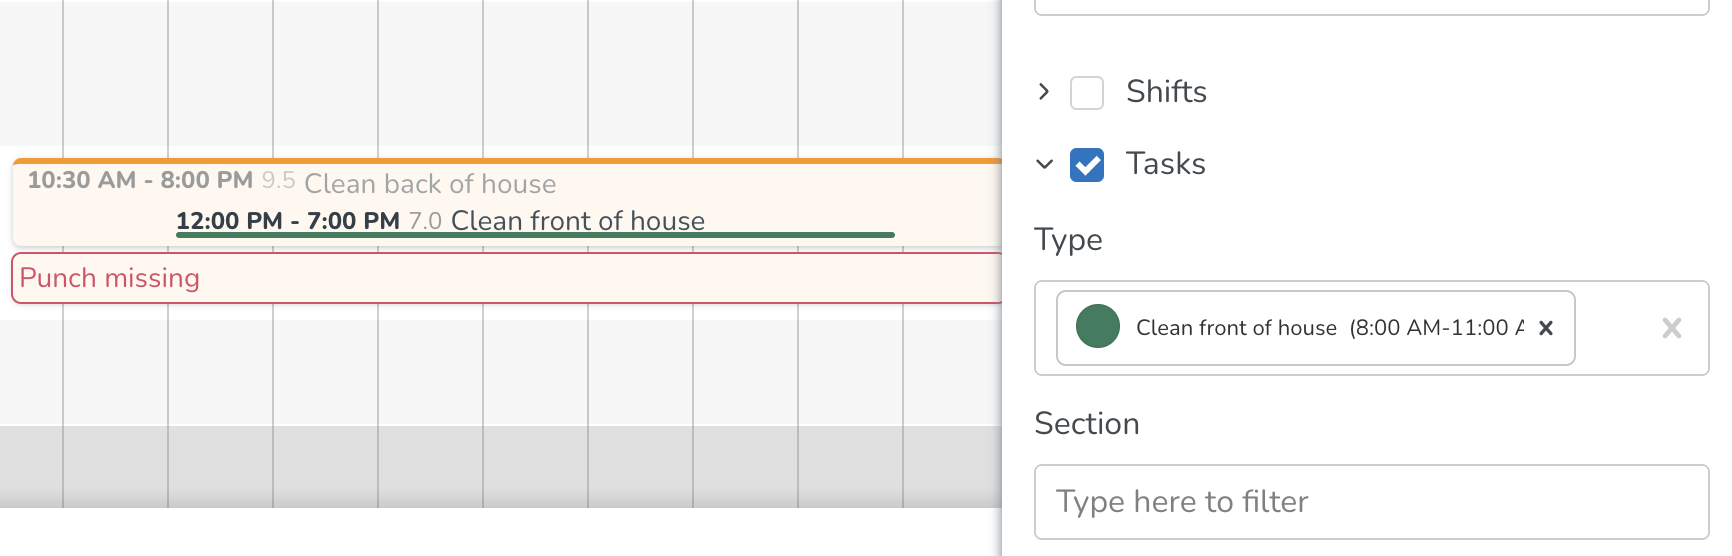
- Tasks that meet the filtering criteria for the Task grouping but take place on a shift that doesn't meet the filter criteria for the Shift grouping will display, but the shift will display with overlay, just as you can see below where we've unticked the Shift grouping and filtered on the task type "Clean front of house".
- We consider punches to be tightly linked to their parent shift or parent task respectively. Therefore, Quinyx applies the following logic:
- If you filter using any of the fields in the Shift grouping, the only punches belonging to shifts that will display are those belonging to shifts that meet the current shift filter selection.
- If you filter using any of the fields in the Task grouping, the only punches belonging to tasks that will display are those belonging to tasks that meet the current task filter selection.Note: This functionality is currently not supported due to technical challenges; an action plan is currently being executed on for this to be resolved in the medium-term. We apologize for the inconvenience.
- If you filter using any of the fields in the Punches grouping, only shifts, as well as tasks belonging to punches displaying as a result of your punches filter selection will display.
A few notes on the filter fields:
- Some filter fields' drop-down menus have an All option. We've indicated which of them have this option in Filter groupings and fields. Using the All option is mainly useful if there are a lot of values. For example, agreement templates in the Agreement template-field - and you want to select all of them except for 1 or 2. You would then use the All agreement templates option and then de-select the specific values you're not interested in by clicking the cross next to the name of that 1 or those 2 agreement templates.
- If you make multiple selections in any one field, small labels saying "AND" or "OR will display between each value. These labels will say either "and" or "or", which is meant to inform you of whether the field in question applies and- or or-logic. This article describes which logic applies to each respective field.
Filter visibility
When you select a saved view (one you have previously saved), its name will appear right next to the Filters icon. However, if you're just using filters(and not a saved view), nothing will change, meaning that the view name won't be shown.