Create your base schedule
 Updated
by
Daniel Sjögren
Updated
by
Daniel Sjögren
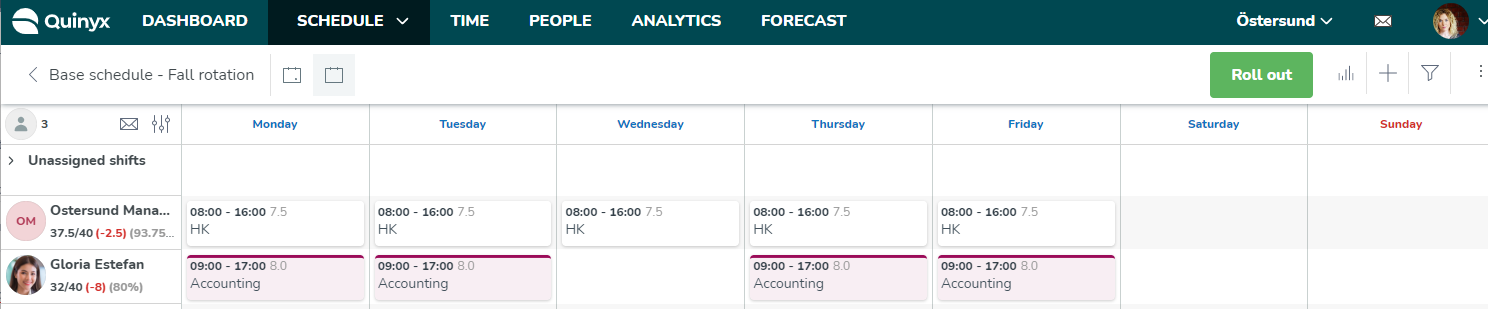
When you click a base schedule in the base schedule overview, you enter the actual base schedule view. This is where you build your base schedule. The first day of the week is the day that is configured as the first day of the week in Quinyx.
Create a new base schedule
You create a new Base Schedule by selecting Create new in the base schedule overview. You then name your base schedule a name that needs to be unique for the current group, i.e. for the current section or unit or district, depending on what's currently selected in the group selector. Next, you need to select a template period of anywhere between 1 and 24 weeks. Note that you can only view 8 weeks at a time. Therefore, when you're for instance viewing an 11-week base schedule in the All viewing mode, the first 8 weeks would appear when you enter the base schedule, and weeks 9-11 would appear in a three-week mode when you click the right arrow. The employee KPIs under the employee’s name would display for the entire 11 weeks.
Add, copy, and delete shifts
Shifts in base schedule are added, copied, moved, and deleted the same way as in Schedule. You may also want to display statistics while adding shifts. Note that when adding shifts through Add > Shift in the day and time section and the day field, you can navigate with your keyboard's arrows and the enter key to easily select multiple slots to place your shift on.
When an employee is available and can be assigned to a shift, you'll see a badge below the employee's name when you create the shift. If an employee is unavailable, the row is slightly greyed out. When adding a shift, you will also see a counter that represents the number of hours of a shift that is being created.
Once you're finished adding shifts, you're ready to roll out your base schedule.
Agreement selection
Shift agreement selection is slightly different in base schedule compared to schedule. Since base schedules don't have dates, the validity dates of each agreement are displayed next to the agreement itself.
Agreements that don’t expire will feature a from mention to indicate their start date only.
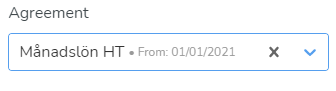
Agreements with a To date in the past relative to today’s date will not appear in the list. This means you’re also able to see agreements whose From-date are in the future, which is very valuable when working with seasonal employees or if one of your existing employees is getting an agreement between today’s date and the period you aim to roll out for.The main agreement always appears at the top of the list, followed by any additional agreements in alphanumerical order.
If you don’t make a manual selection, Selected automatically displays in the field. This means a Quinyx algorithm will select an agreement automatically when the shift is rolled out based on unit, agreement template, and employment rate of the agreement in question. If a manually selected agreement is not available on the rollout date(s), Quinyx’ algorithm will select an agreement automatically. All warnings about expired agreements are given at rollout and not in the edit shift panel.
Salary type rules
Salary type rules are not displayed, nor can they be added manually, however, salary types rules from shift types will be applied when the base schedule is rolled out. For more information about salary type rules, click here.
Copy employee rows
When viewing your base schedule, click the ellipsis by the employee you want to copy the shifts from and select the Copy option. This will copy the visible days of the employee row, including the days on which there are no shifts. If you're in the daily view, only the viewed day's shifts will be copied. Likewise, being in the weekly view will copy the row of the viewed week for that employee, and being in the full base schedule view will copy the employee's entire base schedule row.
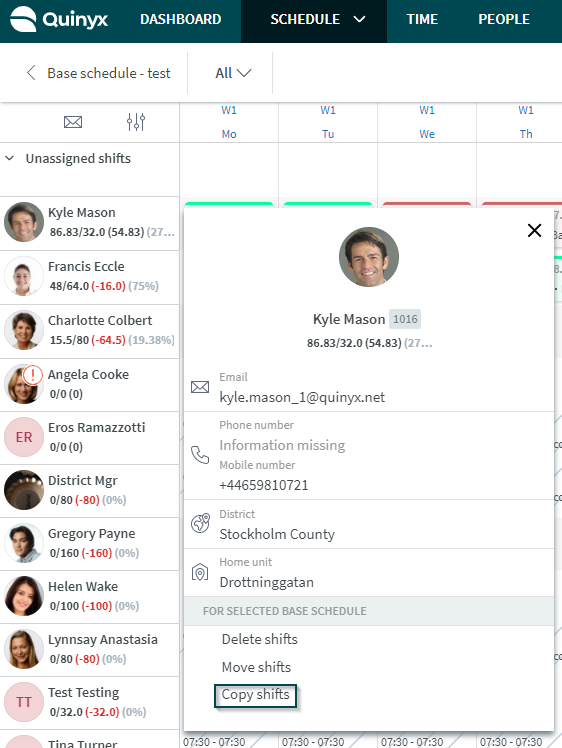
The side panel that appears when you've clicked copy indicates which employee you're copying shifts from (Kyle Mason) as well as the number of shifts copied (15 shifts). What's more, it allows you to make the following selections:
- In the To employee section, select which employee or employees to copy Kyle's row of shifts to. We've chosen to copy the shifts to Charlotte Colbert. You may also copy to the person you're copying from.
- In the To period section, select the period you want to copy the selected shifts to for the above-mentioned employees. So, in the first field below the to period, you should enter the day of the employee to which you're copying the row for on which you want the first day of the row that you're copying from to be placed - the second field will populate automatically. Then click Save.
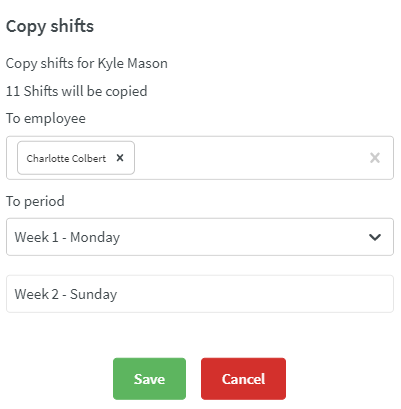
This action will result in a base schedule that now looks as follows.
Kyle's shifts have been duplicated for Charlotte. The Copy employee row feature is particularly convenient when you're looking to create a base schedule with the same sequence of shifts for multiple employees but on a staggered basis.
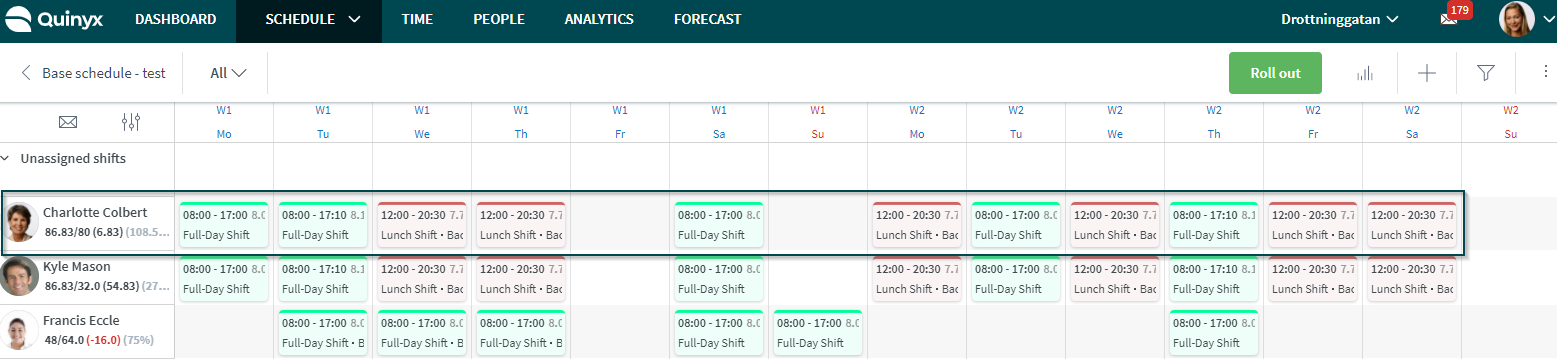
Move employee rows
You may also move an employee's base schedule row.
When viewing your base schedule, click the ellipsis by the employee you want to move the shifts from and select the Move option. This will move all the shifts for the selected employee for the days currently shown - if you're in the daily view, only the viewed day's shifts will be moved, whereas being in the weekly view will move all the shifts of the viewed week for that employee. Likewise, being in the full base schedule view will move the employee's entire base schedule row.
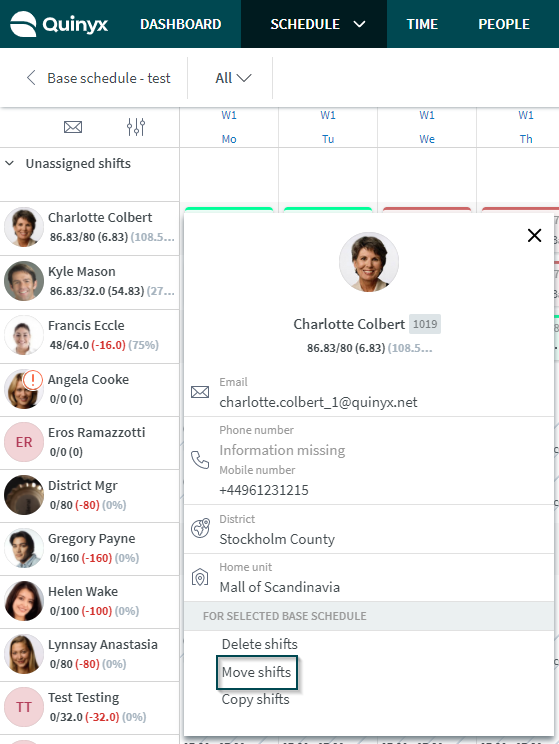
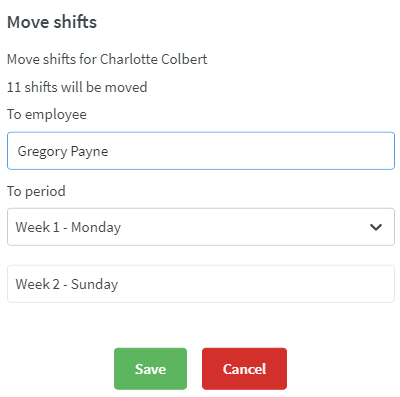
The side panel that appears when you've clicked move states which employee you're moving shifts from (Charlotte Colbert) as well as the number of shifts selected for moving (15 shifts). What's more, it allows you to make the following selections:
- In the To employee section, select which employee to move Charlotte's row of shifts to. We've chosen to move them to Gregory Payne. You may also copy to the person you're copying from, which is useful if you want to offset the person's rotation.
- In the To period section, select the period you want to copy the selected shifts to for Gregory. In the image below, we choose to use the default value for this section, which is to move the row in question as is without offsetting the shifts forward or backward in the base schedule and click Save.
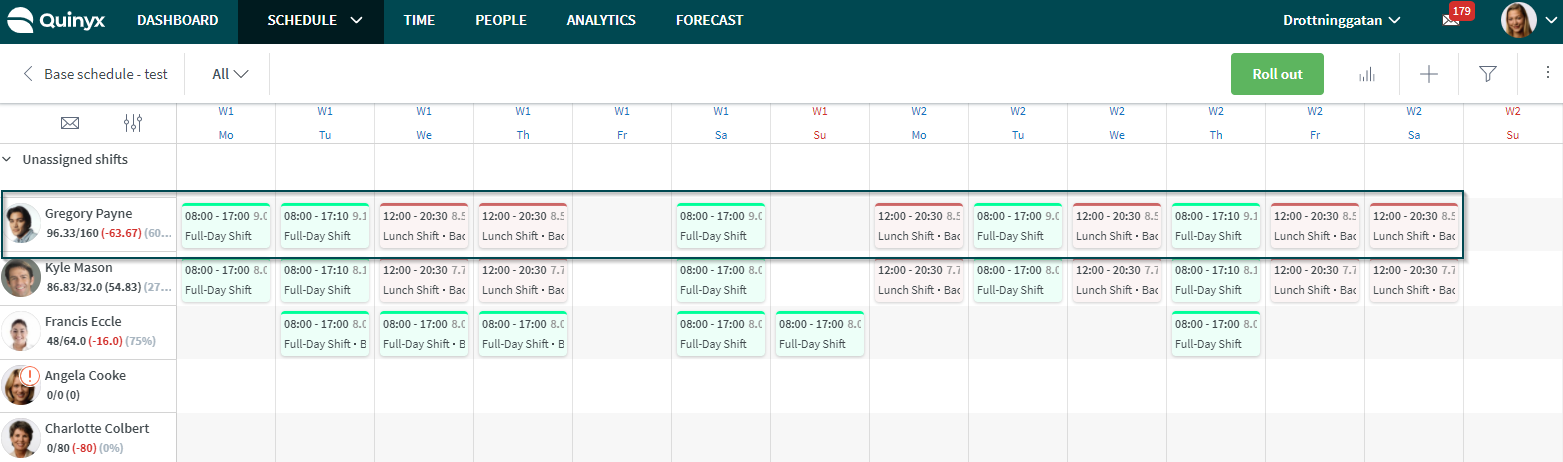
You'll receive warnings if there are any issues with the shifts you're moving. The warnings will appear in a warning panel for all shifts with a warning which will give you a better overview of affected shifts.
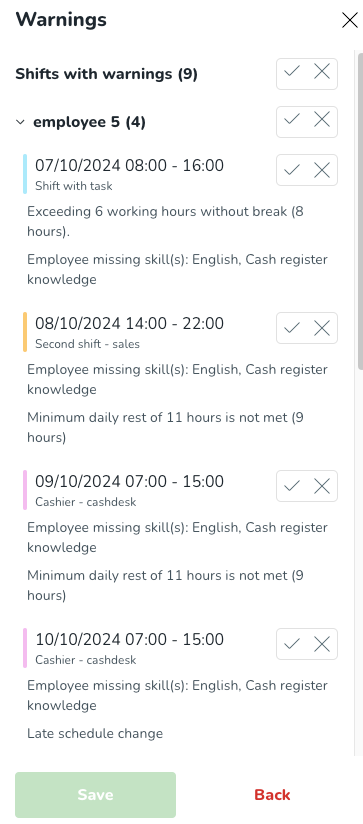
You can either select the check mark on the shift to accept the warnings and proceed with the change or select the cross icon to reject the warning and cancel the change. Once all the warnings have been handled, select the Save button to proceed.
View employee count
You can view the number of employees currently displayed in the base schedule.
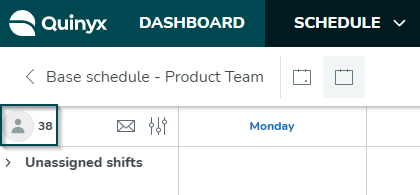
This count is useful any time you want to quickly get an idea of the number of employees you’re currently looking at in your schedule or base schedule.
Example 1
You just want to see how many people in total are working at your location today, so you navigate to the day view and make sure that the only filter groupings ticked are shifts, tasks, and punches and that Items in current view is selected in the Employee has field.
Example 2
You want to see how many people are currently absent from your location in the currently viewed period, so you select Items in current view and untick all filter groupings except for absences.
The number of employees displays regardless of view mode - day, week, month, or custom - and considers any filters applied. It is visible at all times but will not display if you’re using a very small screen, such as that of a mobile device.