Shared views
 Updated
by
Leigh Hutchens
Updated
by
Leigh Hutchens
Shared views expands the existing personal saved views functionality by introducing two new additions: Shared with Me and Company Views. My views, where you save and manage your own personal views, remain unchanged.
Designated administrators can now configure a schedule view once, give it a name and description, and share it with specific roles across the organisation. This ensures all relevant managers are working from the same setup without requiring manual guidance.
A view saves your complete screen configuration, including:
- Applied filters.
- Display options (such as selected sorting and employee metrics).
- Selected statistics variables.
Key benefits
- Configure a view once and share it with the entire organisation or specific roles.
- Ensure consistency across teams by providing ready-made views for common scheduling tasks.
- Reduce repetitive setup for managers and planners who need the same screen configuration regularly.
- Speed up onboarding for new managers by giving them access to relevant views from day one.
- Reduce dependency between management levels. Managers can resolve scheduling questions independently using the right pre-configured view, freeing up time across the organisation.
How it works
The Filters panel is now organised into three categories:
- My views: Views you have personally created and saved for your own use. This has not changed.
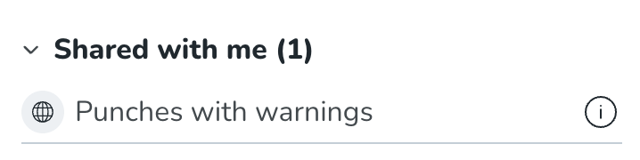
- Shared with me: Views that have been shared directly with your role. The name and description configured by designated administrators are visible, so you always know what the view is for and which filters are applied.
- Company views: A centralised library of all views shared across the organisation. Visibility and management of this section is controlled by the Shared schedule views permission.
Filters that can't be shared
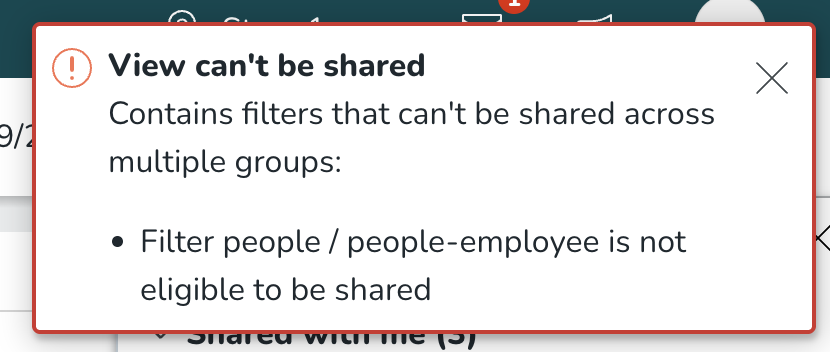
Some filters are tied to a specific unit, section, or group and cannot be shared across the organisation. If a view contains one or more of these filters, sharing will be blocked, and a message will appear listing which filters need to be removed. The following filters are not eligible for sharing:
- Employee
- Home unit
- Reports to
- Employee section
- Shift type (local shift types only)
- Shift section
- Task type (local task types only)
- Task section
Filters configured at the customer level, such as staff category, agreement template, skills, shift status, shift warnings, punch type, absence type, and others, are fully supported and can be included in shared views without any restrictions. To share the view, remove the filters listed in the message and try again.
Sharing views with roles
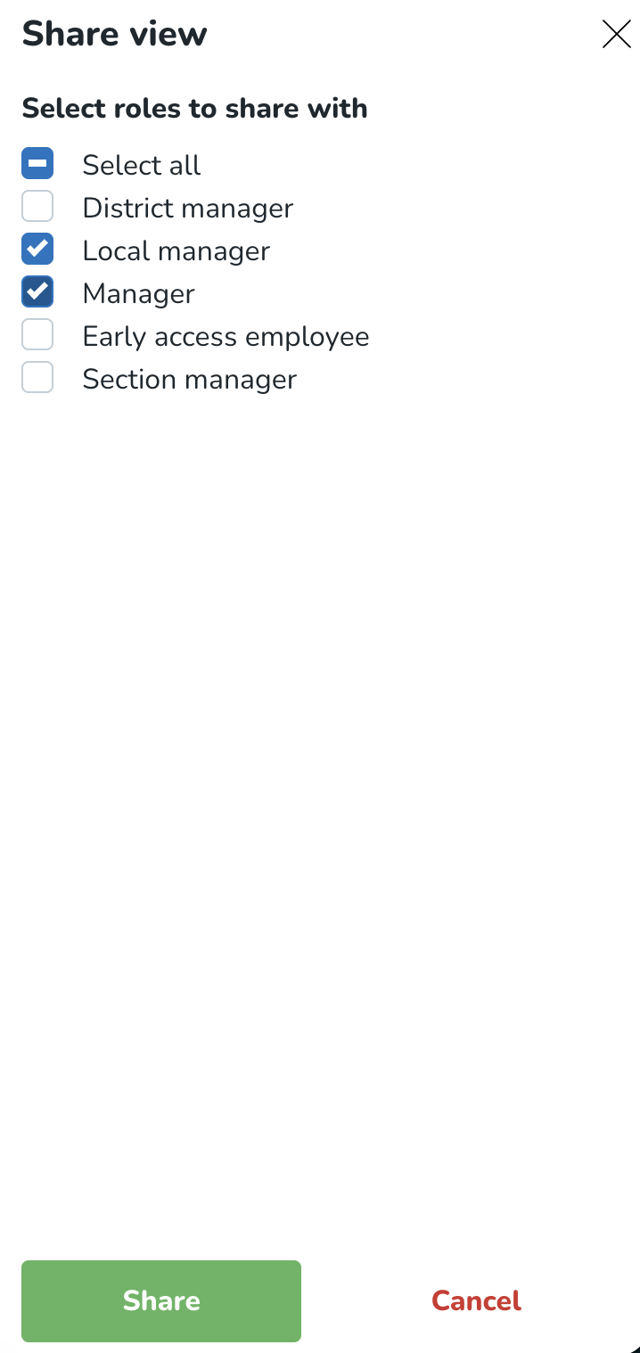
When sharing a view, designated administrators can select which roles should have access to it, for example, unit managers, section managers, or area managers. This adds an additional layer of configuration depending on what each role needs.
Permissions
Access to Shared Views features is managed through the Shared schedule views permission, which can be configured per role. This also allows organisations to extend view management responsibilities to additional designated administrators with a simple permission assignment. The default value of this permission is “No access”.

- Write access: Users can share their saved views, edit existing shared views, delete existing shared views, and see the full Company Views list.
- Read access: Users can see the Shared with Me list and the full Company Views list, but cannot share, edit, or delete shared views.
- No access: The default for most managers. Users can see views shared directly with them in the Shared with Me list, but do not have access to Company Views and cannot share, edit, or delete them.
Getting started
Follow these steps to set up and use Shared Views in your organisation:
- Assign permissions: Administrators ensure that the relevant roles have the correct access level for the Share schedule views permission before any views are shared.
- Create a view: Users with write access navigate to the schedule, open the filters panel, and use the existing Save as my view option to create and save the view they want to share. The saved view becomes available in My views.
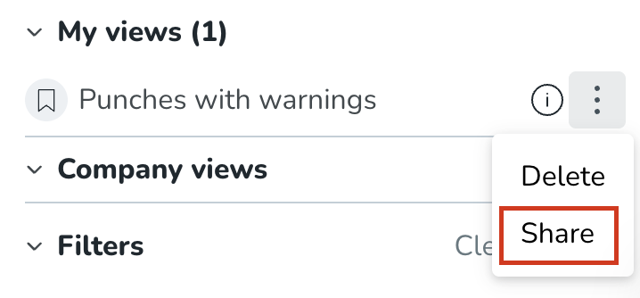
- Share the view: From My views, select the three-dot menu on the view and choose Share. A new panel opens with a list of roles. Select the roles the view should be shared with and confirm.
- View is distributed: Once shared, the view is permanently removed from My views and becomes available in Company views. For all roles it was shared with, the view appears in Shared with me.
- Update sharing at any time: To change which roles a view is shared with, access the sharing panel again via the three-dot menu. Roles that already have access will appear pre-selected, making it easy to add or remove roles as needed.
- Browsing views: Each section (My views, Shared with me, Company views) displays up to three views by default. If there are more, a See more link opens a full list in an overlay panel on top of the Filters panel.
- Visibility based on permissions: Which sections a user sees in the Views panel depends on their access level for the Share schedule views permission, as outlined in the Permissions section above.